The Basics - Intro
If you're new to 3D in general, or messiah in particular, you might start up the program and just see it as a wall of buttons. But in the words of the late great (very great) Douglas Adams:
![]()
(That's the friendliest letters I could find.) Sure, there's a learning curve, but it's not quite as daunting as you think (assuming you do think it's daunting). Everyone learns at different rates, but everyone does learn. And getting you off on the right foot is what this section is all about. I've organized it into four parts:
Loading & Using A Scene: Loading a scene and animating with it. This lets you jump right in and get your feet wet.
Creating Your First Scene:
Setting up a scene from scratch.
Learn It
Once... GUI Basics: General things to know about the
messiah interface.
Learn It
Once... Keyframing: General things to know about working
with keyframes in messiah.
As you can see, I've started with an actual project rather than just pages of information. I know that when you get a new piece of software the first thing you want to do is try it out, not do a lot of reading. Not only that, but learning about the software is easier once you've tried it out. So go through the "Loading" and "Creating" chapters, then move on to the two Learn It Once chapters. After that, feel free to try your own projects, or maybe do some of the tutorials here. Keep the Help browser running in the background so you can pop over to it when you have a question.
|
Screen Layout |
Here is the messiah interface. As you can see, despite what may look like a lot to learn, there are really just four key areas. There is the World View, where you see the animation, the Motion Graph/Dope Sheet where you adjust motion, the Item List which shows what's in the scene and lets you do things like parenting, and the "blocks," which are the components with all of the controls and settings.
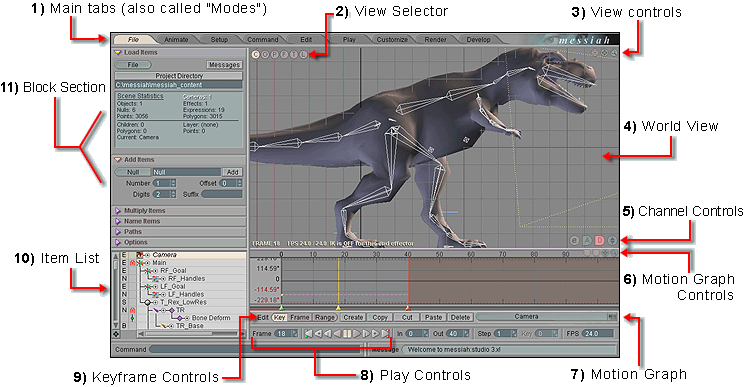
Here's what that all means. (Clockwise from upper left.)
1) Main tabs: There are several modes in messiah. For example, Animate and Setup. Each one has its own set of controls and sub-tabs which will appear on the Block Section (see below). Generally speaking, the Animate tab is the one you'll use the most, because that's where the animation controls are. Click here for more info.
2) View Selector: Use this pulldown list to select the view in World View (see below). Click here for more info.
3) View Controls: Controls for the various views. Not all controls are active for all view types. For example, none of them are active when Camera is the selected view. Click here for more info.
4) World View (or Viewport): This is the "stage" upon which you animate. Click here for more info.
5) Channel Controls: These controls let you work with your scene even if the Motion Graph and Blocks sections are closed. They also let you make certain workflow changes quickly and easily. Click here for more info.
6) Motion Graph: This is where you fine-tune your motions. You can also animate directly in here. Click here for more info.
7) Motion Graph Controls: Zoom, Center, and Pan the view in the Motion Graph. Click here for more info.
8) Play Controls: The play controls are similar to a VCR. Click here for more info.
9) Keyframe Controls: The first set of buttons is usually set to "Key" which means you're working in keyframe mode. Other buttons here allow you to create, cut, copy, paste, and delete keyframes. Click here for more info.
10) Item List: The Item List shows everything that's in the scene-- objects, lights, cameras, effects, etc. It's also one of the places that you select which item(s) you want to work with. Just click on an item to select it. Click here for more info.
11) Block Section (or Sub-Tabs): This is a generic name for the areas above and below the Item List where the various blocks or sub-tabs of settings and parameters are located. (You can choose whether to have these shown as sub-tabs or blocks by using the Customize menu pulldown. Right-click on the Customize tab.) Blocks are used in these docs, just for consistency.
Don't worry about memorizing everything right now, all you need is a rough idea of what everything is. The more you use it, the more familiar everything will become, and the more it will make sense.
Read
this part:
When using messiah, please be aware that
spaces and all other non-letters (such as @, -, #, $, %, +, *, /, [, ), etc.) are
not permitted in names, folders (directories),
objects, scenes, expressions, etc. The two
exceptions are the period ( . ) and the
underscore ( _ ), which can be used. The underscore is recommended
instead of spaces. For example: My_Scene.fxs
Notes:
1) You'll notice throughout the documentation that
the word "item" is used where you might expect something else, like
"object" or "camera, " etc. The reason for this is that
in messiah, the effects and tools can be used on virtually
anything. For example, bones can be applied to the
camera. I don't know why you'd want to do that, but it
can be done.
2) Very important: Make sure you have the most recent driver for your graphics card and that it's fully OpenGL 1.2 compliant. Also, many people have reported that they get better results when set to 32 bit Full Color, as opposed to 16 bit. So if you have a problem with the interface, check your bit depth. On most Windows systems, just minimize all applications and right-click on the screen and select "Properties" from the menu, then choose "Settings". You'll see the bit depth setting there, usually labeled as "Colors."
| Converted from CHM to HTML with chm2web Pro 2.82 (unicode) |