The Motion Graph is the heart of messiah's animation system. This is where you create keyframes, adjust them, move them, copy them, etc. You can adjust the height and width of the Motion Graph by dragging it out from the top and left sides.
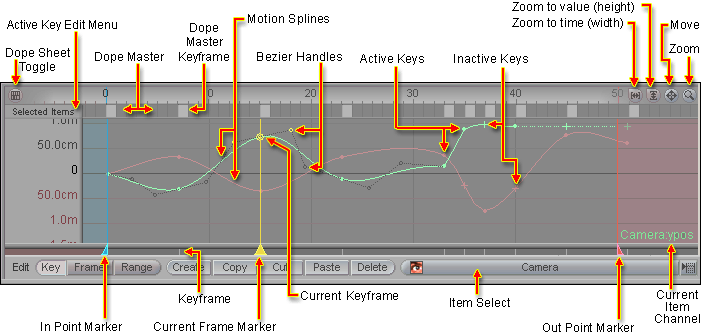
Dope Sheet Toggle:
Press this button to turn the Dope Sheet on and off. When
the Dope Sheet is off, the Dope Master
sits at the top of the Motion Graph. You can also
press F6 to toggle the
Dope Sheet.
Dope Master:
The Dope Master is sort of a mini
Dope Sheet. It lets you quickly
move and copy keyframes. You can toggle the Dope Master on and off with SHIFT
F6.
Moving Keys: Just click and drag the key.
Moving Multiple Keys: Drag a box around the keys, then click and drag one of the highlighted ones.
De-select all frames: Right-click in the Dope Master.
De-select individual frames: Drag a box around it. (Just like you do in the Motion Graph.)
Copying Keys: Hold CTRL and drag the key. This works with multiple keys too.
Active Key Edit:
The Active Edit setting applies to the Dope Sheet and other keyframing
operations. For example, if you use the Create Key pop-up (press
Enter) it will create
keyframes based on what the Active
Edit is set to. For details
about Active Edit, click here.
In & Out Point Markers: These set the range of the animation. Besides just being the start and end of the animation, the In and Out range is also used as the range when performing certain other tasks, such as deleting ranges of frames, or stretching the animation. To slide the In and Out at the same time, right-click and drag one of the markers.
Edit Bar (below graph):
Key:
Select this to work with only the specific keyframe(s) that you
have selected. Use this if you want to edit (copy/paste,
etc.) on the currently selected frame or on multiple selected
frames.
Frame:
Select this if you only want to copy/paste the specific
frame where the yellow frame marker is-- whether there is a
keyframe there or not. (Even if you have multiple
frames selected, it will only act upon the frame where the yellow
marker is.) Use this to copy/paste the value of that exact
frame to another frame or channel.
Range:
Select this edit on the entire keyframe range. The keyframe
range is everything between the In frame (green
line/triangle) and the Out frame (red line/triangle).
If you have Range selected and you press Copy, it
will copy all keyframes for that channel. You can then click
back to Key, go to a frame (using the yellow line/triangle,
or entering the number in the Frame field), then click on
Paste and it will paste the entire range.
When Range is selected, if you press Cut or Delete, it will do it for all keyframes within the In and Out points. Why do you want this? Well, it makes it very easy to select entire motions or just portions of motions and copy/paste them. Simply enter in a new "In" and "Out" point, and press Copy.
Create:
Click on this to create a keyframe at the current frame you are
on.
|
|
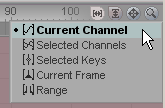
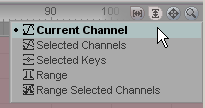
Note: For Copy, Cut, Paste, and Delete, the Left Mouse Button action is dependent upon the Channel Group setting. That is on the lower right side of the World View. It is the second from the left (the M in the image here). Click on the control and it pops up a menu for you to choose from. |
Copy: Click here to copy the information of the selected keyframe(s) into the paste memory buffer for later pasting at another frame.
Left Mouse Button: Copies the channels based on the current Channel Group setting.
Middle Mouse Button: Copies all channels except the current one.
Right Mouse Button: Copies from all channels.
Cut: This will remove the selected keyframe(s) but keep the information in the paste memory buffer so you can paste it onto another frame.
Left Mouse Button: Cuts the channels based on the current Channel Group setting.
Middle Mouse Button: Cuts all channels except the current one.
Right Mouse Button: Cuts from all channels.
Paste: Click here to paste keyframe information after you have copied or cut it. If you are pasting multiple keyframes, place the yellow Current Frame marker to where you want the first of the keyframes to be. Information can also be pasted to other frames, or to other channels (and other frames in those channels). See Notes, below, for more info.
Left Mouse Button: Pastes the channels based on the current Channel Group setting.
Middle Mouse Button: Pastes all channels except the current one.
Right Mouse Button: Pastes all channels.
Delete: This will delete the selected keyframe(s). The information is not kept in the paste buffer.
Left Mouse Button: Deletes the channels based on the current Channel Group setting.
Middle Mouse Button: Deletes all channels except the current one.
Right Mouse Button:
Deletes all channels.
Note: To delete miscellaneous things, such as bones,
objects, etc., press the - (minus) key on your numeric
pad.
Item Select (pulldown list): The Item pulldown list is one of the places where you can select which item you would like to animate or work with. The pulldown list respects the expanded/collapsed condition of the Item List, so if an item is not visible on the Item List because the hierarchy is collapsed, it will not show up here.
Graph Controls:
|
Bezier Handles on Motion Splines: Bezier handles allow you to interactively adjust the shape of the motion spline from inside the Motion Graph. Many animators prefer this to using the Tension/Bias/Continuity controls.
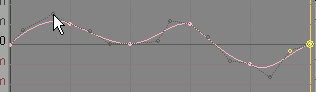
Adjusting Beziers with broken handles (or "tangents").
To activate Bezier handles on a keyframe or group of keyframes, select the keyframe(s) then select Bezier in the Curve pulldown on the Spline block. For additional information about Bezier handles, see Motion Graph Basics.
Keyframe Moving and Adjusting: To move a keyframe (or multi-selected keyframes) in time (left and right), right-click and drag. To adjust the value (up and down), left-click and drag. To adjust the time and value at the same time, middle-click and drag. To create keyframes within the Motion Graph, middle-click where you want the keyframe to be.
Multi-selecting Keyframes: To select more than one keyframe, drag a box around the additional keyframes with the left mouse button. You can do this individually or by dragging it over several keys. You can add and remove keys from the selection by dragging a box over individual keys.
Additional Info: Motion Graph Basics Dope Sheet/DopeMaster Key/Frame Editing Active & Inactive Keyframes Active Edit Static & Dynamic Channels
Notes:
1) There are five basic ways to change the channel that
is visible in the Motion Graph. The first is simply to
click on one of the channels on the Edit Sphere. The
second is to click on the channel on the Item List (click on
the little box with the "+" to the left of the item), then select
the channel(s) you want. The third is to go to the Animate
tab and click on the channel you want from the Motion
block, the fourth is with the Channel
Controls at the bottom right of the World
View, and the fifth is with the numbers on the main part of
your keyboard (1-9).
2) Keyframes can be copied from one channel to the other. For example, if you have a keyframe on frame 5 where the object is at 15 on the Y axis, you can copy that and paste it into the X channel so the object will be at 15 on the X axis as well. This only works when you are copying a single channel. Set the Channel Group to I (Independent Channel), then select the channel you want to copy (on the Edit Sphere, or on the Motion block, etc.), then use the left mouse button to Copy the keyframe. Next, switch to the channel you want to paste to, and go to the frame you want the keyframe to be on (this can be the same frame) and press Paste with the left mouse button.