|
A c t i v e & I n a c t i v e K e y f r a m e s |
|---|
There are two types of keyframes in messiah: Active and Inactive. While this may seem odd at first, you'll soon wonder how you ever did without them. They apply to any keyframed item, whether it's an object, camera, texture, light, etc.
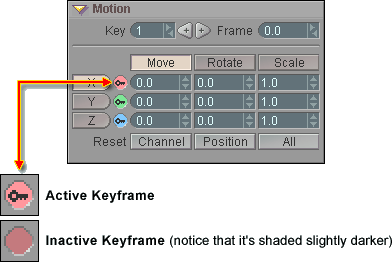
The image below shows how to tell if there is an Active or Inactive keyframe by looking at the Key Modifier buttons.
Active Keyframes:
An Active Keyframe is a regular keyframe just like you may
be used to in any other 3D program. It contains information
for the position, rotation, scale, etc. of an item at a particular
frame. These are generally just referred to as "keys" or
"keyframes." It's usually only in relation to Inactive
Keys that the term "Active" is used.
Inactive Keyframes:
An Inactive Keyframe is a keyframe that exists on a channel
other than the one you're currently on. For example,
if you are set to Independent Channels and you make a
keyframe at frame 10 on the Z channel, then there
will automatically be an Inactive Keyframe on all of the
other channels too. So if you go to frame
10 and
select the Y channel, you will see an Inactive
Keyframe in the Motion Graph and World View (and
there won't be a key icon in the Key Modifier button, as in
the image above).
Inactive keyframes will not affect the animation at all, but if you want, you can activate them so they will. They become normal keyframes when activated. All keyframes can be activated and de-activated at any time, even while the animation is playing, and that's one of the really great things about them. It really helps when you want to see how a particular key is affecting the animation. To do this, just go to the Motion block and you'll see little colored circles to the right of the channel names (X, Y, Z, etc.). When there's a key icon in a circle, it means that the keyframe is active. You can also set messiah to hide these Inactive Keyframes if you want (see "Hiding Inactive Keyframes" below).
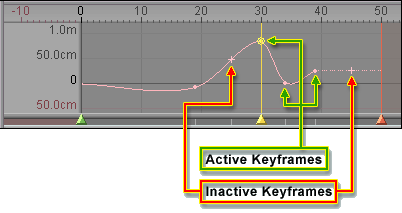
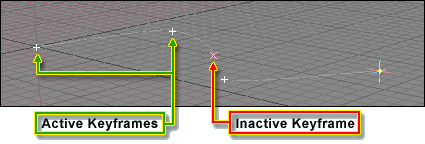
Active/Inactive Keyframes in the
Motion Graph and World View:
The keyframe indicators in the Motion Graph and World
View will show you whether there is an Active or
Inactive key on a particular keyframe.
How Or When Are Inactive Keys
Created?
There are basically three ways that an Inactive Key can be
created:
1) If your Key Edit setting is set
to anything but All Channels, it will create Inactive
Keys on the channels for
which no Active
Key is created. For example, if your Key Edit
setting is set to Independent Channels, any
time you create a keyframe for the active channel, it will
create an Inactive Key on all other channels.
2) If you move a keyframe
in time and your Key Edit setting is Independent or
anything other
than All
Channels.
3) If you left-click on the key icon (see first image) for a channel.
Key Edit Setting:
The Key Edit setting determines what happens when you create
a keyframe with the Edit Sphere (or sliders). There
are two places that you can set this option. First is on the
Key/Frame Editing block on the Edit tab.
Second is with the Channel Groups pulldown on the bottom
right of the active viewport in the World View (part of the
Channel Controls).
Activating an Inactive Key:
There are three ways to activate a keyframe which exists but is
inactive:
-
On the Edit Sphere, click on the channel you want to activate & move it.
-
When the channel you want to activate is visible in the Motion Graph, click on the keyframe and move it.
-
Left-click on the colored circle (Key Modifier button) to the right of the channel name on the Motion block.
To deactivate a keyframe, just click on the key icon for that channel (see image above). The key icon means the keyframe is active, and the absence of a key icon means it's inactive. When the circle is shaded darker but there's no key icon, it means that it's inactive but one of the channels is active. If the box isn't shaded, it means that none of the channels has an active keyframe there.
Hiding Inactive Keys:
There's an option button on the Key/Frame Editing block (Edit tab) called Hide
Inactive Keys. Turning this on will make all Inactive
Keys invisible on the motion spline. Generally it's a
good thing to have the Inactive Keys visible because
a) it tells you that there is an Active Key on one of
the channels, and b) because it makes them easily
available for you to activate. Sometimes, however, there are
so many that they just clutter up the motion spline.
Related Topic (sort of): Static/Dynamic Channels
Additional Information: General Info - Motion Graph Basics