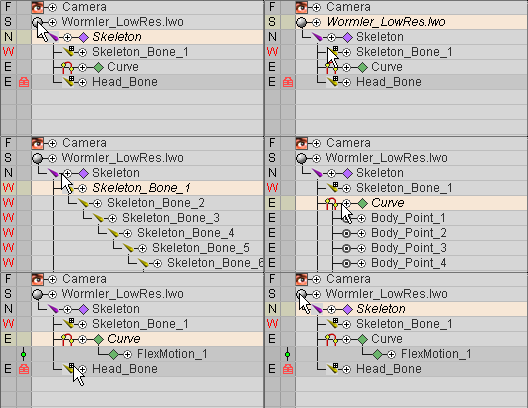
The Item List appears along the left side of messiah's interface, except when you are on the Command, or Render tabs. In addition to giving you an overview of everything in your scene, it has a number of other uses, such as being one of the places where you can choose which item(s) you want to work with, and where you do your parenting and unparenting of objects. Note: The list has different names and functions depending upon which main tab (mode) you're on. For example when you're on the Command tab, it becomes the Expressions List.
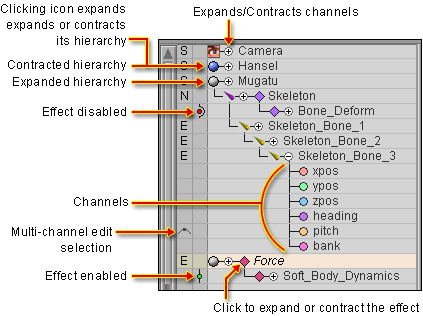
General icons in the Item List:
|
|
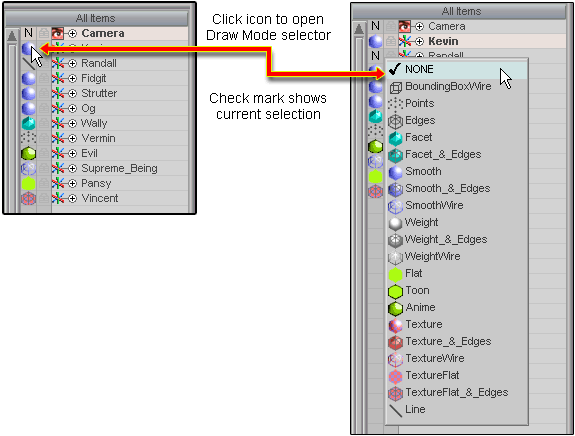
Draw Mode Notes:
1) To change the setting of an item and all of
its descendents, hold down CTRL when you click on the view
modes.
2) Weighted View will show a bone's influence on the geometry. To use it, set the object to W, then select a bone. Now go into Setup, then back out to Animate. You will see the object displayed in black, with the bone's influence showing as light areas. To see another bone, select it then go in and out of Setup again.
3) Line View will draw a line from that object to its parent. This is often used with motion capture data so you can see stick figures instead of null objects. Try it: add two nulls and parent one to the other, then move one away from the other. Now set the child null to Line View. You should see a line connecting the two nulls.
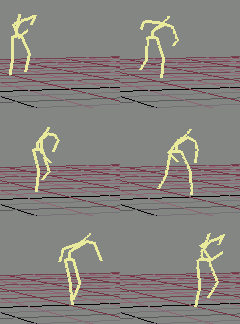
Motion capture character
in Line View mode.
Selecting Items:
Items can be selected in one of four ways: 1) Clicking on
the item in the Item List on the left side of the screen,
2) using the down arrow on the keyboard when the Item
List is active, 3) clicking with the center mouse
button on the item in the World View, and 4)
selecting from the pulldown menu on the bottom right of the
screen.
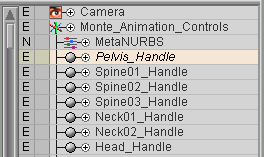
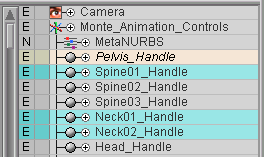
One item selected (highlighted in
yellow).
Multiple items selected (additional items in blue).
Multi-Channel
Editing:
To put all channels of an object into the Dope
Sheet or Motion Graph, expand the
channels for the object in the Item List
by clicking on the + gadget to the left of the object name.
Now multi-select the channels (or specific ones).
Change the Active Edit mode to
Selected Items. If you have an
object whose channels you will want to edit often together in
the Dope Sheet (or Motion Graph), make a Group with those channels, and set the Group to Auto Select.
Now set the Active Edit to
Selected Items. Now, whenever you select one of those
channels in the Item List, they'll all
select, and they'll all show up in the Dope
Sheet and Motion Graph. For
information about Groups, click here.
In order to have multiple channels be editable in the Motion Graph (as opposed to just making them visible), the Multi-Edit gadget in the Item List must be turned on for each channel. These are actually on by default, so you might not have to worry about it. If you look at the "Multi-Channel Edit" arrow in the top left picture on this page, it is pointing to the Multi-Edit gadget, and it is turned on. It is off for the other channels in that object. So if you put all of those channels into the Motion Graph, you would only be able to edit the Pitch and whatever is the currently selected channel. (If you had Heading selected, you would be able to edit Heading and Pitch, but not the others. You would only be able to see them.) Note: Older versions of messiah had Multi-Edit for all of the channels turned off by default.
Renaming:
To rename an item, just double-click on it and type the new name
in.
Deleting Items:
To delete items, either press the - button on your
numeric pad, or right-click on them in the Item List and choose
Delete Selected Items in the context menu.
Moving Items In The Item List:
Items can be moved around in the Item List just by selecting
them and dragging them to where you want them. When you move
an item to the line between two other items so there's a blue
highlight bar at the top (as shown immediately below), it will go
above it, and not get parented to them. If you drag it so
there's a blue highlight bar at the bottom, it will go below that
item (see example in Parenting, below.)

Drag the item to where you want it.
Parenting:
Parenting is accomplished by selecting an object in the Item
List and dragging it onto the object you'd like it to be
parented to. In messiah, anything can be parented to
anything. Note: Parenting in place is done on the
Parent Items block in Setup-->Items. Click here for info.
|
|
|
|
|
Parenting. |
Two levels of Parenting. |
Parenting and moving. |
Locking/Unlocking:
Sometimes you don't want certain objects to be touched by the
animators. For example, you might have bones in a character
that are not meant to be animated-- perhaps they are controlled by
expressions, and setting keyframes for them would interfere with
the expressions. Messiah offers two kinds of locking to
prevent the accidental use of items: Soft Lock and Hard Lock.
To turn Locks on and off, click in the lock
field. Left-click to turn on/off a Soft Lock, and
Right-Click or Middle-Click to turn on/off a Hard Lock.

-
Soft Lock items can not be selected by clicking on the item in the World View, but they can be selected by clicking on them in the Item List. This is used for items that are not moved often during animation. For example, lights.
-
Hard Lock items can not be selected from the World View or the Item List. The only way to select a Hard Locked item is to turn off the Hard Lock. This is used for items that shouldn't be touched during animation. For example, placement bones or furniture.
Editing Values:
|
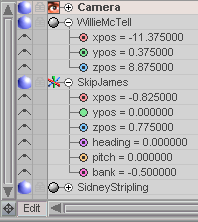
In this image, you can see that the rotation channels for WillieMcTell have been hidden. You do that on the Motion Block. The X, Y, and Z channels each have a keyframe on the current frame. SkipJames has all of the channels showing, and you can see that there is no keyframe on this frame for channel Y. Multiple Channel Items &
Key Edit For example, in this image, SkipJames might have a keyframe at frame 5, and that is the frame I was on the last time I had SkipJames selected. But now WillieMcTell is selected, so SkipJames' values will stay at what they are for frame 5 even if I play the animation or move the frame slider. If I double-click any value (for any object) and enter a new number, it will not make a keyframe, it will change the value for the selected keyframe. That works the same way as the Motion Block does when Frame Edit is off-- it shows the value at the current keyframe, and entering values will only change the current keyframe, not make a new keyframe (even if the yellow Current Frame marker is not at the keyframe). (The current keyframe is the one that is highlighted in yellow.) However, if you turn
Frame Edit on
(again, on Edit
Notes: |
Item List Filtering:
Perhaps one of the greatest work flow innovations in
messiah is its
unique Item List Filter
feature. What the filter allows you to do
is easily customize what is visible in the Item List. For
example, you can set it so that all locked items are hidden, or so
only the controls for one character are visible.
Notes:
1) Drag-and-drop parenting
is disabled when the Item List is filtered. This is to
prevent problems with hierarchies.
2) You can also create an
Armature to
control Item List
Filtering. Yo, I got your
Armature info
right here, buddy!
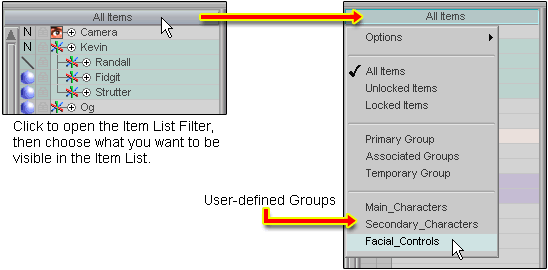
Here is what the various choices are:
-
Options - You can turn on Remember Current Item if you want. What this does is remember the current item you are animating, so the next time you choose this filter again it will re-select that item. For example, if you have a group for the IK controls of your character, and another group for the facial controls, Remember Current Item will make it so whichever item you used last in each of those groups will be the one that is selected when you choose that group again.
-
All Items - This turns off the filtering, and every item in your scene will be visible in the list.
-
Unlocked Items - Hides all Locked items. Note: If you lock an item while in Unlocked Items mode, the item will still be visible. You must turn the filter off, then turn it back on.
-
Locked Items - Hides all Unlocked items.
-
Primary Group - An item can belong to more than one Group. For example, you might have a bone that is part of a main group for the character, and also part of a sub-Group like "Arm_Bones". When you create the Groups you decide which is the "Primary" group for each item. When you select Primary Group in the filter, it will select the Primary Group that the current item is part of, and filter for that Group so it is the only thing visible in the list. So when you choose an item (that is part of a Group) in the World View, it and its Primary Group will be visible in the Item List. Note: Items can belong to more than one Group, so you could have a Primary Group that has a member who's Primary Group is not this one-- it's just a member, but its Primary Group is something else. If you select that item, the Item list will change to that other Primary Group, since that is the Primary Group of the currently selected item.
-
Associated Groups - If you select this, then all Groups that the current item is part of will be visible in the list.
-
Temporary Group - Sometimes you only need a group for a short time. For example, if you are making a character pick up a cup, you might make a temporary group for the hand and the cup. Use this to hide everything in the list except the Temporary Group items.
-
User Defined Groups - You can have as many Groups as you want. Choose which Group you want to filter for. In the image above, I'm about to choose the filter for Facial_Controls.
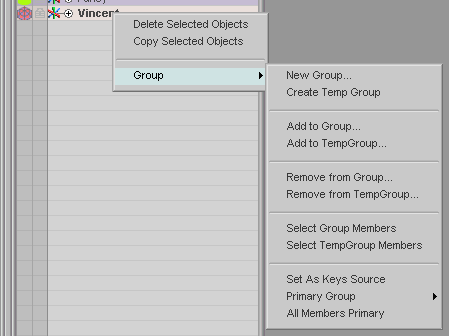
Groups are set up either in Compose, Setup, or from the Item List. To create groups from the Item List, right-click on one or more items in the Item List and choose Groups (see image below left). For more information about Groups, here (World Menu) here (Setup-->Groups).
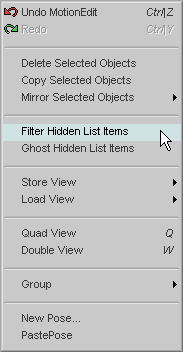
Item List Filtering is also tied in with the World Menu options for filtering items in the World View (see image above right). Filter Hidden List Items will hide all items in the World View that are hidden in the Item List. Ghost Hidden List Items will ghost the items that are hidden in the Item List. Ghost works best when the messiah GUI is set to DarkStar (see image below).
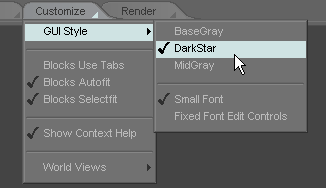
Ghost works best with the Dark Star GUI
setting.
Lights: To turn lights on and off, right-click on the light's icon. To change the type of light, middle-click on the light's icon.
|
|
|
|
Right-click for on/off. |
Middle-click to change type. |
Switching Cameras: If you have more than one camera in your scene, you can switch the active camera by right-clicking on the "eye" icon of the camera that you want to make active.
General Notes:
1) The state of the Item List-- open/closed
hierarchies, open/closed object channels, etc.-- is saved
with the scene. However, if you are Appending a scene it will not
load in the list state of the incoming scene; the currently loaded
scene overrides it.
2) You can scroll with your mouse wheel when the Item List is selected. This includes the other lists that the Item List becomes, such as the Effects List, the Expressions List, etc.
