|
|
|
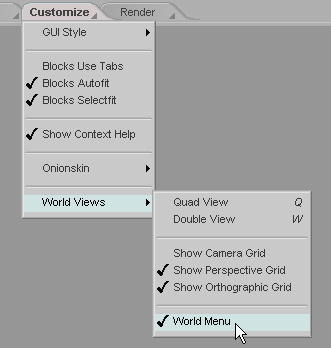
World Menu
World Menu: The World Menu is accessed by right-clicking in the World View (when the World Menu option is turned on). It contains some powerful work flow enhancing features. For example, it's where the Pose tool resides. Some people like having the World Menu option on, because they want to have access to it, while other people don't like it, because they like using the right mouse button for other things in the World View. For example, they might be using an Armature that uses the right mouse button.
Note:
Sometimes the World Menu can get in the
way. For example if you like using the right mouse button to
move things. So you might want to assign a keyboard shortcut
for it. I have mine mapped to the z
key. When you have it mapped to a key, you will see the
status of the setting in the message field on the bottom right of
the interface. To learn about assigning keys, see KeyCommand Manager. (I
recommend using the WorldMenu On/Off
command, which is at the bottom of the Interface list in KeyCommand
Manager.) You can also create a button with Armatures if you find that more
convenient.
|
|
|
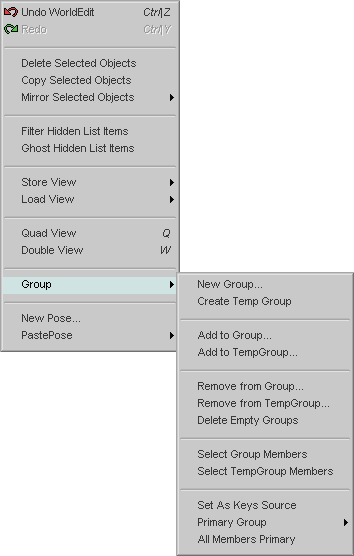
Undo/Redo - I'm going to go way out on a limb here and assume that you already know that Undo and Redo are for.
Delete/Copy/Mirror Selected Objects - Again, these should be self explanatory. Mirror has the extra feature of letting you choose which axis you want to mirror on.
Filter Hidden List Items - This works in conjunction with the filtering feature in the Item List. It allows you to hide items that you're not working with. For full information, click here.
Ghost Hidden List Items - This is similar to Filter Hidden List Items, but instead of hiding the filtered items, they are ghosted. For full information, click here.
Store/Load View - This feature lets you store (and retrieve) views, assigning them to the numeric pad. For example, you can set the Perspective View to a view that you like, then store that view to a numeric key, then bring that view up again by pressing that key. You can also store the views by pressing CTRL and the numeric key, such as CTRL 3. You can have a total of 10 preset views (0-9 on the numeric pad).
Quad View - Toggles the quad World Views on and off. Some people like having four views visible at once.
Double View - Toggles the double World View on and off. This gives you two World Views. That's why we called it "Double." Brilliant, aren't we?
Group - One of the most helpful work flow features in messiah is the Group system (also called Character Groups). A Group is a collection of items in your scene that you want to, well, "group" together. For example, you could make a group for all "left hands" or "all null objects" or "all facial-control sliders." Your scene can have as many groups as you want, and items can belong to as many groups as you want. So, for example, all of the IK goals of a character can be a group (Ethan_IK), but the foot goals can also belong to another groups (Ethan_Foot_Goals). So depending on which group you select, you'll either have all of that character's goals or just the foot goals. As you can imagine, this makes organization easy, plus it helps make the characters more understandable to other animators.
New Group - Select one or more item, then choose this to make a new Group. You will then be presented with the New Group pop-up, where you can give the Group a name and choose whether you just want to make the selected item(s) into a Group, or whether you want the item and its children (Branch), or the whole hierarchy that the item belongs to (Hierarchy).
Create Temp Group - Sometimes you just want a Group for a little while. For example, if your character is picking up a hat you might want to make a temporary Group with the hat and the hand controls.
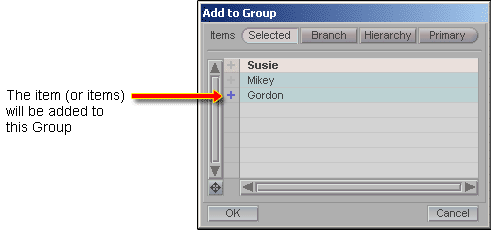
Add to Group - Select one or more items and choose this to add to an existing Group. You will be presented with the Add To Group pop-up, where you can choose which group to add to (click on the + icon for the groups you want to add to). You can also choose whether you just want to make the selected item(s) into a Group, or whether you want the item and its children (Branch), or the whole hierarchy that the item belongs to (Hierarchy). You can also choose Primary, which will add all members of this item's Primary group to the Group you are adding this too.
Add to TempGroup - Select one or more items and choose this to add to the Temporary Group. You will be presented with the Add To Group pop-up, where you can choose which group to add to. You can also choose whether you just want to make the selected item(s) into a Group, or whether you want the item and its children (Branch), or the whole hierarchy that the item belongs to (Hierarchy). You can also choose Primary, which will add all members of this item's Primary group to the Group you are adding this too.
Remove from Group - Select one or more items and choose this to remove the item from a Group. The Remove From Group pop-up has the same features as the Add to Group pop-up, but you turn on the red - icons to delete.
Remove from TempGroup - Use this to remove the selection from the TempGroup. You are presented with the Branch, Hierarchy and Primary options just like in the Add to TempGroup pop-up.
Delete Empty Groups - Occasionally you might delete all of the objects in a Group, or move them to a different Group, leaving an empty Group. Use this to delete the Group from your scene. Nothing else is deleted, just the Group (which, by default, will have nothing in it).
Select Group Members - Use this to select all members of the Primary Group that this item is in. Useful if you want to multi-edit them.
Select TempGroup Members - Use this to select all of the members of the TempGroup. Useful if you want to multi-edit them.
Set As Keys Source - This feature allows you to choose a Group member that will be used as the main source for motion keys. Currently, it is used by OnionSkin to derive frame keys when in Type->Keys mode; it may also be used by other areas in the future.
Primary Group - Use this to choose a Primary Group for this item. Since an item can belong to more than one Group, you must decide which one will be the Primary Group. There are several reasons for this, but the main one is that you might want to select this item and have it automatically select the Primary Group, so naturally you want the Primary Group to be the one you use most often with this item.
All Members Primary - This sets the Primary Group of the current item as primary for all members.
Messiah's Pose System makes use of the Group system to store poses for characters so they can be easily applied at a later time. In order to use Pose, the item must be part of a Group (see above, and here). Ideally, at least for a character rig, all of the items responsible for putting the character into that pose should be part of the Group (and it must be the Primary Group) For example, if the hands and feet are not in the same Primary group, it will be impossible to store a pose for the entire character.
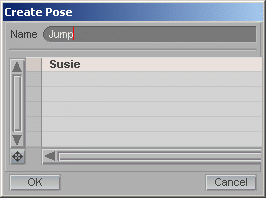
New Pose - When you select New Pose, the Create Pose pop-up will appear. Type the name of the pose into the Name field and press OK. In the list it will display the Primary Group for the item being posed.
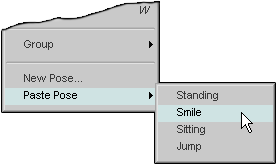
Paste Pose - To apply a pose select an item in the Primary Group and go to the frame number you want, then use Paste Pose and choose the pose you want to apply.
DrawMode - Lets you choose the Draw Mode of the selected item(s). This works the same way as choosing the Draw Mode from the Item List, but since you might have Item List filtering on, the item you want to change might not be visible there so you wouldn't be able to change it.
| Converted from CHM to HTML with chm2web Pro 2.82 (unicode) |