|
|
|---|
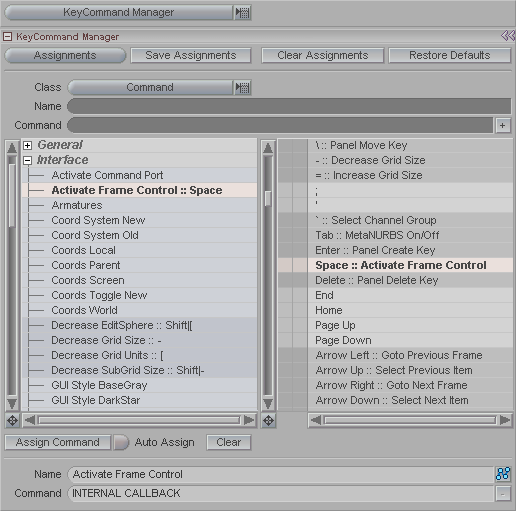
KeyCommand Manager is where you assign Quick Keys. You can assign virtually any command to a key here.
Assignments: This is where you can choose between various saved assignments. It can be useful for a variety of reasons. For example, you might want a different set of Qluick Keys for when you're animating versus when you are doing setup. Or you might want to have a group of people all using the same Quick Keys.
Notes: This list will only be populated if you have .kas files in your temp/messiah/defaults and/or messiah/modules/defaults directories. If you have files in your "temp" directory they will be listed after a "----------LOCAL SETTINGS---------" item in the pop-up. This is necessary because you may have a "Maya.kas" in both your "temp" & "program" directories.
Also note that loading any new settings only overwrites existing assignments. For example, if you have Z assigned and are loading a file that doesn't have a Z assignment, your current assignment will NOT be overwritten. If you'd like to have them overwritten, you must perform a Clear Assignments before loading the new assignments. This is a feature, not a bug-- it allows you to modify only a small number of keys, and with this you can have "combinations" of assignments.
Save Assignments: Press this to save the current Quick Key assignments. Note: this feature will only save to the "temp" directory (so you can use it). If you need to save to your "program" directory (so everyone on a network can use it), you'll have to copy the files there yourself. This is protection against users overwriting settings in a networked environment. If your assignment isn't saving, make sure you have a "defaults" folder in your messiah temp directory. Here's the path on a Windows 2000 or XP machine:
C:\Documents and Settings\USERNAME\Local Settings\Temp\messiah\defaults
Clear Assignments: Press this to remove all Quick Key assignments.
Restore Defaults: Left-click to return all Quick Key assignments to the previous default settings, or right-click to return them to the factory-original settings.
Class (pulldown): Use this pulldown to choose a class you'd like to add a command to. This tells it where to appear in the list on the left of the Assignment Window. Note: This is used when you want to create a new command. If you just want to reassign an existing command to a key, you don't need to use this.
Name (text field): Type a name for the new command. Note: This is used when you want to create a new command. If you just want to reassign an existing command to a key, you don't need to use this.
Command (text field): Type the actual command and all of its parameters here. Note: This is used when you want to create a new command. If you just want to reassign an existing command to a key, you don't need to use this.
Assignment Window: This is the big two-list area in the middle of the block. The list on the left contains the standard built-in commands that are available (additional commands can be entered in manually, of course). In the right list, the first column is for Shift (up arrow icon), which is for Quick Keys that require pressing Shift plus another key. The next column is for Control (Ctrl), which, naturally is for Quick Keys that require pressing Control plus another key. There are also some that require Shift & Control.
The light blue highlighted lines in the left list denote internal commands, and darker blue-gray lines highlight keys and commands that are currently assigned. Note: You can double-click any command in the left list to execute it.
Assign Command: Select a command from the list on the left and a key from the list on the right, then press this button to assign that key to that command.
Auto Assign: This will assign a key to a command when you press the key on your keyboard. For example, select a command from the list at left, then press a key on your keyboard and it will automatically be assigned. Of course, you should be very careful when Auto Assign is on, because it will overwrite existing Quick Key assignments without prompting you.
Clear: Press this to remove the currently selected Quick Key assignment.
Command (text field): This works similar to the Exp field on the Command tab. This shows the actual command that the currently selected command represents. You can edit the command in this field if you want.
Notes and tips:
1) Play and Customize sub-interfaces can
be accessed via commands.
For example: SetCurrentMode("Customize->KeyCommand Manager",
0)
2) When creating commands for KeyCommand, you're not limited to just single function calls. And you don't have to create scripts in order to do multiple calls. You can enter an expression just like you would for any variable. For example, I created a keycommand for KeyCommand Manager like so:
SetCurrentMode("Customize->KeyCommand Manager", 0) + ConfigureInterface(2, 0)
This line not only activates the Key Command Manager interface, it also sets the interface to the double-wide list (like the F3 key). In this way you are actually creating "inline macros."
3) messiah/modules/defaults can have key assignment files. Just like the commands.ccd system, you can now have a "network" version of the key assignments. These key assignments may be overridden on local machines with "temp" key assignment files.
|
Creating A Keyboard Shortcut From A Script |
Many scripts and commands can be tied to keyboard shortcuts. In this example you will tie a script to a key. This script is for sending multiple deformation meshes to a host application (Maya, 3D Studio Max, LightWave, Cinema 4D). This, of course, will only work if you are running messiah from that host at the time you use the key.
By default, you can select a deformation object, such as a character mesh, and press F12 to send it, along with its animation, to the host. But if you have several items that you want to send, you need to send them one at a time. This script/keyboard shortcut will let you overcome that limitation using a script written by Max Glick. Keep in mind that it only works for deformation, not transform. (Deform is what you want if your character's mesh should deform, such as if you are using bones to deform the mesh. Transform, or XForm is for when you want the object as a whole to move/rotate, like a spaceship, null, light, camera, etc.)
Instructions:
To make a keyboard shortcut for the script, first make sure the
script file is in your messiah/modules/scripts folder, then:
-
Go to Customize
 KeyCommand
Manager.
KeyCommand
Manager. -
In the Class pulldown, choose Object.
-
In the Name field, put whatever you want to call it, like: Multi-Item Connect To Host
-
In the Command field, put the name of the script, followed by ( and ). That is: fb_MultiSelToHost()
-
Press the
 button to the right of the
Command field.
button to the right of the
Command field. -
In the list on the left, open the Object list. You'll see your command name there. Select it.
-
In the list on the right select which key you want to use. You can use F12 if you want.
-
Press the Assign Command key. If you used F12 it will warn you that it is already in use, so click Yes to continue.
That's all. Now you can select multiple
objects and use F12 to send them to the host. Remember, it
only works when you have started messiah
from the host. See General
Info![]() Using messiah With 3rd Party
Apps for more information about this sort of thing.
Using messiah With 3rd Party
Apps for more information about this sort of thing.
By the way, this script is a good one to look at to see how scripting works. You can find it in messiah/modules/scripts and open it in any text editor.
Item List Filtering provides a major workflow enhancement by hiding things in the Item List that you don't need to animate. For example, if you are using IK you might not need an Item List that is filled with bones. You might want only the IK goals visible. To do that, first make a Group that contains the items you want to keep visible. To do that, use Groups, either from the Item List context menu, or from the Groups sub-tab in Compose and Setup. After your Group is created, follow these simple directions:
-
Choose a Class for this shortcut. The Class is where the shortcut will show up in the list on the left. I think General is a good choice, because there's not much there, so it will be easy to find.
-
In the Name field, give this command a name. For example: IK_Goal_Filter
-
In the Command field, type: ItemListSet("All Items") But replace the "All Items" with the name of your Group. Do not remove the quotes.
-
Press the
button to add it. -
Your command will be selected in the list on the left (highlighted in yellow). Now use the list on the right to select a key that you want to assign it to. It is OK to use a key that is already in use, though of course it will replace that existing shortcut, so be careful.
-
After you have selected a key in the list on the right, press the Assign Command button.
That's all there is to it! Now you can try out your new keyboard shortcut!
Note: You can create keys for your Groups, or for the standard filtering choices, such as All Items and Unlocked Items. When creating commands for your own Groups, such as in Step 3 above, type the name of the group exactly as you have named it, including the underscores (My_Cool_Group). To create a command for one of the standard choices, just type it in exactly as it appears in the Item List filter pop-up. For example: All Items (with a space), or Unlocked Items (with a space).