|
|
|---|
The Groups sub-tab is where you create and manage Groups (sometimes referred to as Character Groups). A Group is a collection of items in your scene that you want to group together. For example, you could make a group for all "left hands" or "all null objects" or "all facial-control sliders." Your scene can have as many groups as you want, and items can belong to as many groups as you want. So, for example, all of the IK goals of a character can be a group (Character_Group_1), but the feet goals can also belong to another groups (Foot_Goals). So depending on which group you select, you'll either have all of that character's goals or just the feet goals. As you can imagine, this makes organization easy, plus it helps make the characters more understandable to other animators.
There are four blocks plus a List area that make up the Groups tab: Create Save Refit Color Groups List Temporary Group
|
The Create Block |
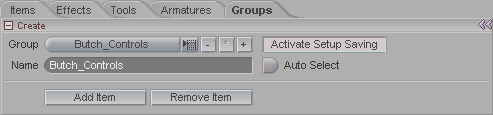
Group (pulldown list): Use this pulldown list to select which group you want to edit.
![]() :
These buttons will create or delete a group.
(The middle button is inactive.)
:
These buttons will create or delete a group.
(The middle button is inactive.)
To create a
Group: Select the items you want in the Item List,
then press ![]() . You can even add specific channels
to a Group.
. You can even add specific channels
to a Group.
To delete a
Group: Select the group you want to delete in the
Group pulldown, then press ![]() .
.
Left-click to delete just the Group, not any items from your scene.
Right-click to delete the Group and remove the members of that Group from your scene.
Activate Setup Saving: Turn this button on to bring up the Save block (see below).
Name (text field): After you create your group, use this field to give it a custom name.
Auto Select: When this is on, any time you select an item in the group, all items in that group will be selected. This can be very useful for getting a specific group of channels to show up in the Motion Graph so you can work with them as a group.
Add Item: Use this button to add an item (or items) to an existing Character Group. Select the group using the Group pulldown, then select the item(s) that you want to add, then press this button.
Remove Item: Use this button to remove an item (or items) from a Character Group. Select the group using the Group pulldown, then select the item(s) that you want to remove, then press this button.
|
The Save Block |

The Save block exists to give you a quick way to save your setups. Right now the only active button is Save Group As Setup. Select the Group you want to save, then press this button. Before you save the setup, arrange a nice view of it in the World View, because it will save a snapshot image for use in the Setups Palette.
|
The Refit Block |
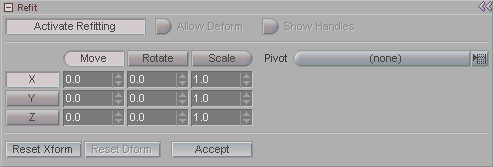
Refit allows you to reposition and/or resize a Group. For example, create a Group with multiple objects in different locations, then activate Refitting and use the Refit Edit Sphere that shows up in the World View to reorient the Group. While it was originally intended to allow for resizing setup data, such as skeletons, curves, etc., Refit can actually be used arbitrarily.
Activate Refitting: Turn this on to allow refitting.
Allow Deform and Show Handles are inactive.
Move, Rotate, Scale: These are for orienting and scaling the Group. You can use these controls or the Refit Edit Sphere that will appear when you turn on Activate Refitting.
Pivot: When Activate Refit is on, a Refit Edit Sphere will appear. By default it sits at 0, 0, 0 in world space. But if you want to refit the Group from the pivot location of a specific object in your scene you can select it here. The Refit Edit Sphere will jump to the pivot point location of the selected item and you can Refit to your heart's content. I can't think of a good reason to select something here instead of using the default, but maybe it's the kind of thing that you'll say "Wow, that's the best feature in the whole darn program!!!" So go ahead, have fun.
Reset Xform: Resets the orientation and scale settings to 0.
Reset Deform: Inactive
Accept: When you have finished making your orientation and scaling adjustments, press this button to apply them.
Using Refit:
1) Select the Group to
Refit from the Create
block in Groups. Click the Activate Refitting button.
2) Adjust the Transformation and/or Rotation values in the block or with the Refit Edit Sphere.
|
The Color Block |
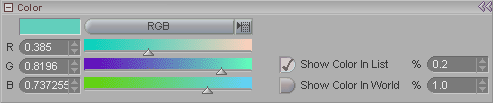
The color block is used to give each Character Group its own identifying color. For example, in the image above, the group is a light green. Some people find it helpful to make groups that are color coded, for example, all of the groups for the controls for the each of the characters' left side are in shades of orange, and the controls for the right side are shades of blue. That way you can look at the Item List and easily see what's what.
Show Color In List: When this is on, the color you make for the group will show up in the Item List, making it easy for you to see which Group an item belongs to. An item can be in more than one Group though, so it is important to keep in mind that in cases like that it will use the color of its Primary Group. You can see the way this feature looks on Butch_01 in the image below. Use the % numeric to set how strong the tinting is.
Show Color In World: Turn this on to allow the items in the World View to be tinted with their Group's color. Use the % numeric to set how strong the tinting is.
Both of those options are good to use because they make your setup much more intuitive and easy to use. Additionally, both options are set per Group.
|
The Groups List |
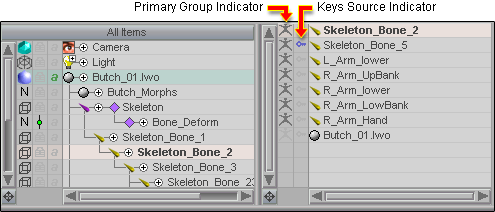
On the left is the Item List, just like when you are on the File tab or Animate tab, etc. The list on the right is the Group List. It shows all members of the currently selected Group, as well as whether this Group is their Primary Group, and what the Keys Source is for this Group.
Primary Group Indicator: This lets you know whether the currently selected Group is the Primary Group for each of its members. In the image above, you can see that the current Group is the Primary Group for everything except Butch_01. The first Group that an item is put into will be its Primary Group. If you put it into more Groups and want to change which one should be the Primary one, just select the Group you want as the Primary and click on the ghosted Primary Group Indicator icon for that object
|
Why would an item be in more than one Group? Simple. Here's an example: You might have a master Group that has the whole character in it, then sub-Groups such as a Facial Controls Group and/or an IK Controls Group. Since you can use Item List Filtering to hide everything except a specific Group, this feature comes in very handy; it keeps the Item List short and focused on what you're animating at the moment. |
Keys Source Indicator: This feature allows you to choose a group member that will be used as the main source for motion keys. It is used by OnionSkin to derive frame keys when the Type is set to Keys mode. For information about OnionSkin, click here.
|
Temporary Group |
There isn't a button for this, but you can create a temporary Character Group by selecting the items you want, then pressing CTRL-SHIFT-G. To recall the group again later on, press CTRL-g. Notes: This group will not show up in the Character Groups pulldown list. And it will not save with the scene. And you do not have to be in Setup to create it. For additional information about the Temporary Group, see the Group section of the World Menu in the link below.
For additional information, click here.