|
|
|---|

OnionSkin is a throwback to traditional 2D animation where the animator could see through the current frame they were drawing to the frame underneath it (the previous frame. Often this was done with the help of a lightbox, and therefore this is sometimes called lightbox instead of onionskin. (It's also called "that thing where you can sort of see the previous frames behind the one you're working on" but we felt that was just too long to fit on the tool selector pulldown.)
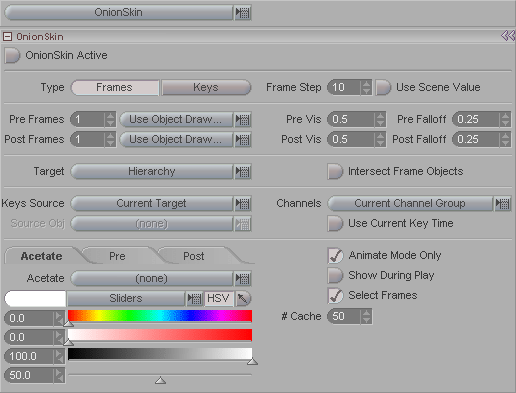
Don't let the plethora of buttons intimidate you. Once you get a basic understanding of OnionSkin it will all make sense. Note: This is one of those blocks where it is better to expand to the full tab (F3), because there are some important settings there.
The basic idea: Choose whether you want to see the previous (to the current frame) and post (to the current frame) Frames or Keyframes, then decide how far apart you want to space the frames (Frame Step). Then decide how many Pre and Post frames you want to see-- do you want to see the last 5 frames? 10 frames? Then decide whether you want to onionskin only the current item, such as a bone, or the entire character that the bone belongs to. Finally, choose how you want the Pre and Post frames drawn-- do you want them to look just like the current frame, or do you want them colored and/or drawn differently? In other words, just work your way down from the top of the block. That's all there is to it.
OnionSkin Active: This turns the OnionSkin feature on and off. Or, to phrase it another way, the OnionSkin feature is turned on and off by pressing this button.
Type (Frames/Keys): Choose whether you want to see previous (and post) frames or keyframes when OnionSkin is active. Generally, people use Frames.
Frame Step: How many frames to skip in drawing pre and post frames. For example, if you have it set to 3 and the current frame is 10, it will draw frames 4, 7, 10, 13, 16 (assuming you have the Pre and Post Frames set to 2-- see below). If the frame step is set to 4, it would draw 2, 6, 10, 14, 18.
Use Scene Value: When this is ON, it will use the Step setting under the Motion Graph. Usually people have that set to 1, which can make the onionskin frames get piled up and hard to distinguish, especially if the motion is slow, so it is usually a good idea to set a Frame Step on the OnionSkin block instead of using this Use Scene Value option.
Pre Frames: Sets how many frames prior to the current frame should be drawn.
Draw mode pulldown: Choose what Draw Mode you want to use for the onionskin's Pre Frames display. For example, you could have the current frame display as Smooth, and the Pre Frames draw as Points.
Post Frames: Sets how many frames after to the current frame should be drawn.
Draw mode pulldown: Choose what Draw Mode you want to use for the onionskin's Post Frames display. For example, you could have the current frame display as Smooth, and the Post Frames draw as Points.
Pre Vis: Sets the visibility of the Pre frames (how transparent they will be). The range is from transparent to solid: 0.0 to 1.0
Pre Falloff: Sets
how much the visibility of the Pre frames will fall off per
onionskin frame to 0 (transparent). This is a %.
So .5 would mean a 50% falloff.
Note: The falloff starts at what
the Pre Vis setting is, so if the Pre Vis setting is 0.5, then the
first Pre onionskin frame will be 0.5, and then it will use the Pre
Falloff setting to falloff from there.
Post Vis: Sets the visibility of the Post frames (how transparent they will be). The range is from transparent to solid: 0.0 to 1.0
Post Falloff: Sets
how much the visibility of the Post
frames will fall off per onionskin frame to 0 (transparent).
This is a %. So .5 would mean a 50%
falloff.
Note: The falloff starts at what
the Post Vis setting is, so if the Post Vis setting is 0.5, then
the first Post onionskin frame will be 0.5, and then it will use
the Post Falloff setting to falloff from there.
Target (pulldown): Use this pulldown to choose what should be onionskinned (it affects all selected items). The choices are:
-
Current Item - The currently selected item.
-
Hierarchy - The entire hierarchy that the current item is part of. For example, if you have a bone in a character selected, the entire character will be onionskinned. (Assuming that the bone you have selected is parented to the character, of course.)
-
Primary Group - The entire Primary Group that the current item is part of will be onionskinned. For more about Groups, click here.
Intersect Frame Objects: This disables depth buffer clearing for the onionskin frames. When it is on, the onionskin images might obscure each other and the object, depending on how close they are. When this is off, the onionskin images will always draw behind the object and the other onionskin images, like layers, with the actual object being the top layer.


Intersect Frame Objects ON
Intersect
Frame Objects OFF
As you can see in the images above, the difference can be great. There are times when you will want it on, and times when off is better. In the images above, for example, the ball is moving toward us. In the image on the left you can see that; there are some Pre frames (the dimmer ones on the right) then the ball itself (in the middle) and then some post frames (the dimmer ones on the left), so there is somewhat of a sense of depth. In the image on the right there is no sense that the ball is moving toward us. If anything, it looks like it comes toward us, then goes back. So in this case, if you want to get a better sense of the perspective you would want Intersect Frame Objects to be on. However, having it off can also be helpful in this instance, like if you are only interested in the horizontal motion.
Keys Source (pulldown): This will determine what keys will be used to derive the onionskin frame times when you have the Type set to Keys (see top area of block). The choices are:
-
Current Target - Use what is set in the above pulldown (Target). Generally, this is the option you will use. That's because usually you will want the onionskin frames to be of the object you are animating.
-
Current Item - Use the currently selected item.
-
Pick Object - Choose an item from the list below.
Source Object: When Pick Object is selected (above), use this list to select an object to be used as the Keys Source.
Channels Pulldown: Choose which channels to reference when the Type is set to Keys (see top area of block). Since you can have independent channels, you need to tell OnionSkin where to look for the Keys. The choices are:
-
Current Channel Group - Use the whole group that the currently selected channel is part of. For example, if you have the Y channel selected, it will look at the channels X, Y, and Z. If you have Pitch selected, it will look at Pitch, Bank, and Heading.
-
Position - Use only the position channels. (Also called translation channels.)
-
Rotation - Use only the rotation channels.
-
Motion - Use the position and rotation channels.
-
Object - Use the normal channels for the object-- all Motion, Pivot and Scale channels.
-
All - Use all channels, even the extended channels, if the object has them. For example the Camera has the normal channels for motion, but it also has channels for Zoom, Aperture, etc.
Use Current Key Time: This only applies when the Type (see way above) is set to Keys. When it is on, the OnionSkin will lock to the currently selected keyframe, even when you Play the animation or move the Current Frame marker.
Acetate, Pre, Post sub-tabs: These three tabs are where you set the colors (if you want) for the onionskin. Acetate is an overlay that can act as a sort of "ghost" effect for the onionskin frames. The Pre and Post tabs are for the color controls for their respective frames.
Acetate (pulldown): Choose whether you want to use the Acetate effect, and if so, whether it should draw over or under the target objects.
Animate Mode Only: Turn this on if you only want to see the onionskin effect while in Animate mode (the Animate main tab). This is usually preferable, since, for example, you probably don't need to see the onionskinning if you are texturing (for those of you with messiah:studio. Even when this is on though you will see the onionskin effect while you are on the OnionSkin block, otherwise it would be hard for you to set up.
Show During Play: Choose whether you want to see the onionskin effect while playing the animation. Sometimes it's good, sometimes it's not. Kinda like Star Trek sequels.
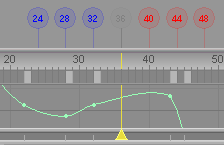
Select Frames: When this is turned on, you will see the frame numbers for the onionskin frames above the Motion Graph (see image below). This is helpful because it can give you a better understanding of exactly what you are seeing in the World View. In addition, you can click on the frame numbers and go to those frames. So if you see a problem in one of the onionskinned frames, you can instantly go to that frame by just clicking on its number.

Select Frames turned on.
# Cache: Set the maximum number of frames that can be stored in RAM.