|
|
|---|
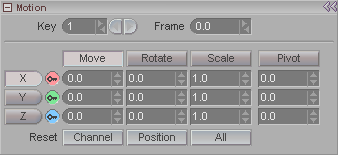
Key: Moves through the existing keyframe numbers. Enter a number in the entry field to go to a specific key or use the arrows to scroll through. Note: This is not referring to the frame number, but rather whether it's the first keyframe, second keyframe, etc. For example, the first keyframe might be on frame 0, and the second keyframe might be on frame 65.
Frame: Displays the frame number that a keyframe is on. Also, you can type a number in here to change the actual frame that a keyframe is on. For example, lets say you have keyframe #2 and it's on frame 33. Just type in 52 and now keyframe #2 will be on frame 52. It's a really fast way to accurately move a keyframe.
Name: Use this field to give names to keyframes. It can be helpful when scrolling through keys, especially if there are a lot of characters in the scene and some might be behind other objects. Naturally if you're working with those characters you'd adjust your view to see them, but there might be some instances where you just want to check the keyframes themselves. OK, that's not the greatest example. If you can think of a better one, let me know.
Move: When Move is selected, it will
activate the M hotspot in the middle of the Edit
Sphere in the World View. It will also make the channel
names below the button change to X, Y, and Z. (They will be H, P,
and B if Rotate is selected.)
Quick Key: 0 (will cycle through Move, Rotate,
Scale)
Rotate: When Rotate is selected, it will activate
the R hotspot in the middle of the Edit Sphere in the
World View. It will also make the channel names below the
button change to H, P, and B. (They will be X, Y, & Z if
Move, Scale, or Pivot is
selected.)
Quick Key: 0 (will cycle through Move,
Rotate, Scale)
Scale: When Scale is selected, it will activate the
S hotspot in the middle of the Edit Sphere in the
World View. It will also make the channel names below the
button change to X, Y, and Z. (They will be H, P, and B if
Rotate is selected.)
Quick Key: 0 (will cycle through Move, Rotate, Scale)
Pivot: When Pivot is selected, it will activate the P hotspot in the middle of the Edit Sphere in the World View. It will also make the channel names below the button change to X, Y, and Z. (They will be H, P, and B if Rotate is selected.) Note: Pivot is only visible when you slide the separator bar over, or press F3.
X, Y, Z (H, P, B for rotation): These buttons allow you to select a channel to move, scale or rotate an item. The button in yellow is the active one. You can enter numerical data in the fields at right when there is a keyframe for it. To the right of these buttons are the channel color dots. Here are some additional things to know about those:
-
The color of the dot represents the color of that channel on the Edit Sphere, Item List, and Motion Graph.
-
Middle-Click or Right-Click on the dot to turn it on or off on the Edit Sphere. This is a very useful feature. For example, you may have an item that is only supposed to be used with Pitch (no other motion or rotation channels). So why have all those channels appear on the Edit Sphere where you might accidentally do something wrong? Just remove them here, and the Edit Sphere will only show the ones you want.
-
When a little key appears in the dot (as in the sample image above) it means that there's a keyframe for that channel on the current frame.
Min/Max settings: This area is where you set minimum and/or maximum values. If you want to keep an item from moving or rotating past a certain value, this is where you enter that value.
Show MinMax in World: Turn this on to see your Min/Max limits in the World View (viewports).
Reset buttons:
Channel: Resets the frame of
the currently selected channel to its default, or Setup
position.
The name on the middle Reset button will depend upon which editing group you have selected (Move, Rotation, etc.). Here are the four possibilities:
Position: Resets the frame for all three translation channels (X, Y, and Z) to their default or Setup position.
Rotation: Resets the frame for all three rotation channels (H, P, and B) to their default or Setup position.
Scale: Resets the frame for all three scale channels (X, Y, and Z) to their default or Setup position.
Pivot: Resets the frame for all three pivot channels (X, Y, and Z) to their default or Setup position.All: Resets all of the item's channels at this keyframe to their default or Setup position.