The Play Controls (or Transport Bar) section is where, naturally, the controls to play the animation in the World View (Viewport) are. This section also holds the settings for your animation's In and Out points (see below), the frames per second you want it to play at, and much more. The Play buttons are also sometimes called VCR buttons, because they are similar to the buttons on VCR's (video cassette recorders) from back in the 20th century.
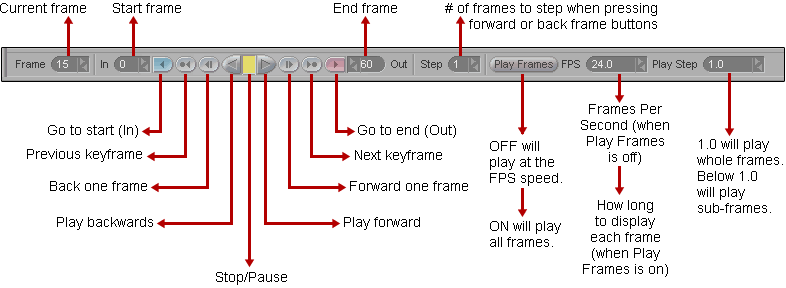
Frame: This is the current frame (where the yellow marker is in the Motion Graph).
In/Out: The In and Out settings do a couple of different things. Mainly they are your beginning and end point of the animation, so when you press Play, it will loop this area. It is also the range that will render. And it's also the way that you choose a range of frames to work with (see Distort Key Range and Transform Key Range). Also, if you're ever in Los Angeles or Las Vegas, In&Out is an excellent chain of hamburger restaurants, and I highly recommend them.
Play buttons (Play, Pause, etc.): These work like the buttons on a VCR or DVD. The ones facing right will go forward, and the ones facing left will go backwards. Note: You can also use the left and right arrows on your keyboard to advance forward and backward. It will respect the Step setting (see below), so if that is set to 1 it will go frame by frame. If Step is set to 3 it will advance forward and backward in steps of three: 1, 3, 6 and 6, 3, 1.
Step: Think "Frame Skip." If you set this to 5, then go one frame step forward, you'll actually go 5 frames forward, not 1. Note: Do not confuse this with Play Step (see bottom of page). Promise?
Play Frames: When this is off, as in the image above, the animation will play at the FPS that you have set, even if that means it will have to skip frames. That is good for judging the overall timing of the animation, but there are time when you need to actually see every frame displayed. To do that, turn on Play Frames. It will now play every frame, even if it has to slow down to do it. This is usually used for slow-motion playback to fine tune the animation (working in conjunction with Hold and Play Step; see below).
FPS: (This says FPS when Play Frames is off.) The FPS setting is extremely important for several reasons. First of all, if you are working on a project, it is important that you keep this number the same throughout all of your shots, because when the final animation is played, whether on film or video, it will play at a constant rate. If you animate to different FPS settings, then the animation will look too fast or too slow when played back. Also, this is the setting that tells the AVI saver what speed to play back at. Important: In order to maintain the FPS speed when playing the animation in messiah, messiah might have to drop frames. This is due to graphics card and CPU limitations (and it is dependent on your scene). If you must see every frame, even if that means playing it back slower, turn on Play Frames (see above).
Hold: (This says Hold when Play Frames is on.) When Play Frames is on, this lets you set how long each frame should be displayed (how long it should "hold" on the screen). A setting of 1.0 will hold the frame for 1 second. Set this to a very low number, like .005 to see the animation play fast.
Play Step: This is another setting for the way the animation will play when you press the Play button. A setting of 1.0 will play whole frames. For example, 1, 2, 3, etc. If you set it below 1.0 it will play subframes. For example, it can display frames 1, 1.1, 1.2, 1.3, 1.4, etc. One very good use for this is if you are in Play Frames mode and you have the Hold set to a high number. You can get a very smooth slow motion (so you can really see the animation well) if you set the Hold to 0.1 and the Play Step to 0.1. Experiment, play, have fun.