|
|
|---|

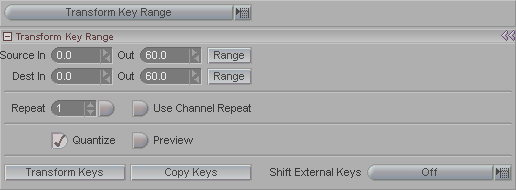
Transform Key Range is used to scale or shift an entire motion spline or just a portion.
Transform Key Range (pulldown list): This pulldown list contains four choices-- Copy Key Range, Key/Frame Editing, Distort Key Range, Transform Key Range. If you're reading this, then it's on Transform Key Range right now.
|
Important: This feature works in conjunction with the Active Edit and Channel Group settings. It is vital that you set those two features before you commit to the changes here (though you can undo them if necessary). |
Source In/Out: Set the range that you want to read the keyframes from. Pressing the Range button will set the In/Out to match the In/Out of the scene. You can also adjust the In/Out in the Motion Graph or Dope Sheet by dragging the pink box.
Dest In/Out: Set the range for where you want to place the keyframes. Pressing the Range button will set the In/Out to match the In/Out of the scene (which would be unusual to do). You can also adjust the In/Out in the Motion Graph or Dope Sheet by dragging the azure box.
-
Scaling The Frames: If the Dest range is larger or smaller than the Source range, the frames will be scaled to fit. (See Quantize, below).
-
Shifting Frames: If you want to shift the frames without scaling them, make the Dest range the same size as the Source range.
Repeat: You can have the range repeat keys. For example, if you make a ball bounce from frames 0-20, you can use Repeat to make it continue bouncing as many times as you want. Use Copy Keys when using Repeat. You will see a visualization of the repeated range in the Motion Graph/Dope Sheet. Important: To use Repeat you must turn it on: Click on the button that is immediately to the right of the numeric field.
Use Channel Repeat: When you use Repeat, the key's that appear in the Source range will be repeated exactly. But Use Channel Repeat will use each motion channel's repeat type to compute the repetitions. For example, if you have a channel set for Accumulate, the key's will accumulate in value for the repeats. (The setting for the channels is the End pulldown on the Spline block.)
Quantize: Turn this on to keep all keyframes on actual frames instead of floating point time. For example, with this on, you won't get a keyframe on frame 1.024, it will round off to 1.
Preview: To see what the Transformed motion will look like, turn this on and press Play.
Transform Keys: Click on this to perform the keyframe transformation based on the settings you have arranged.
Copy Keys: Click here to copy the keys from the Source range to the Destination range (including whatever scaling you have set). It will not do anything to the original keys, just copy them to the destination range.
Shift External Keys (pulldown list): External Keys are keyframes that are outside of the In/Out points. There are four choices in this pulldown list:
Off -- Makes it so external keys will not be shifted or transformed.
In -- Will let any keyframes before the In point be affected by the shifting/transforming.
Out -- Will let any keyframes after the Out point be affected by the shifting/transforming.
In & Out -- Is a movie starring Kevin Kline. It is also a setting that will make it so all keyframes will be affected by whatever shifting/transforming you may do.