|
|
|---|

Important: See the notes at the bottom of this page for some important information. Also, this is some wacky stuff here on this panel; it's a new way of editing ranges of frames so it's somewhat hard to fully but easily describe. I suggest reading through this page then making a simple 3 frame animation (like in the images below) and trying it all out.
Distort Key Range (pulldown list): This pulldown list contains four choices-- Copy Key Range, Distort Key Range, Key/Frame Editing, and Transform Key Range. If you're reading this, then it's on Distort Key Range right now.
Scale Value: Multiplies the keyframe values by the number entered here. For example, if you have an item that is at a Y value of 15 meters and you scale the value by 3, it will end up at a Y value of 45 meters. Note: This is based around the Axis (see below).
Scale Frames: Scales the number of frames between any selected frames by the amount entered. For example, if you have a keyframe on frame 10 and one on frame 20 and you scale the frames by 2, then you'll end up with a keyframe on 10 and one on 30. So instead of only 10 frames between the two keyframes, there will be 20 frames. Note: This is based around the Axis (see below).
Shift Value: This will shift the value by whatever you enter in. If you have an item that is at 5 meters from the ground, and you shift the value by 1, then it will be 6 meters from the ground.
Shift Frames: Will shift the selected frames by the number selected. For example, if you have frames 50-60 selected and you shift them by 10, they'll become 60-70. If you shift them by -10, they'll become 40-50.
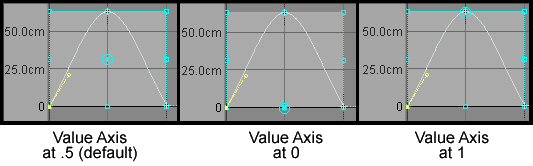
Value Axis: This is the "ground level" for the transform. If you have this set to 0, then any scaling or shifting of values (see above) will work just as you'd expect from entering in your numbers (in other words, just as in the examples given above). Frame Axis is the time element of the axis and Value Axis is the "intensity" element of it. See Axis notes & link at bottom of page.
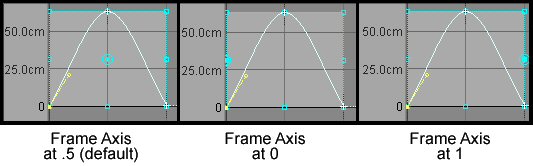
Frame Axis: This sets the "mid point" for the frame/time transform. Basically, this is the axis around which you'll stretch or compress time. For example, if you have a range of frames selected, say, 0-20, then when this is set to 0, the axis will be at frame 0. When it's .5 it will be at frame 10, and when it's 1 it will be at frame 20. Any value can be entered, but you're unlikely to need anything beyond 0 and 1. Frame Axis is the time element of the axis and Value Axis is the "intensity" element of it. See Axis notes & link at bottom of page.
Reset Transform: This will reset the values back to what they were before you went and fiddled with them.
Reset Deform: This will reset the deformation of the edit range box back to the shape it had before you ruined it. (Deforming is accomplished by right-clicking on the little blue boxes on the edit range in the motion graph and dragging.)
Visible Keys (pulldown list): This pulldown list lets you select which channels you want to affect.
Visible Keys: Will transform only the visible
keys in the motion graph.
Visible Channels: Will transform whatever channels are
visible in the motion graph.
Current Channel: Will transform the current channel
only.
All Channels: Will transform all channels for the selected
item.
Note: Visible means "editable", not literally "visible"--even keys that are off the side of the motion graph will be affected. After all, there's only so much room on the graph.
Active Object (pulldown list): Use this pulldown list to select what you want these changes applied to. The choices are: Active Object (just this specific item), Hierarchy (this item and all of its descendents), and All Objects.
Quantize Time: Turn this on to keep all keyframes on actual frames instead of floating point time. For example, with this on, you won't get a keyframe on frame 1.024, it will round off to frame 1.
Perform Key Xform: Click on this to actually apply the changes you've made on this panel.
Shift External Keys (pulldown list): External Keys are keyframes that are outside of the In/Out points. There are four choices in this pulldown list:
Off -- Makes it so external keys will not be shifted or transformed.
In -- Will let any keyframes before the In point be affected by the shifting/transforming.
Out -- Will let any keyframes after the Out point be affected by the shifting/transforming.
In & Out -- Is a movie starring Kevin Kline. It is also a setting that will make it so all keyframes will be affected by whatever shifting/transforming you may do.
Notes:
1) The edit
range is all keyframes from the in point to the out point. If
you want to select an area within that, just left-click and drag a
box around the frames you want to include (in the motion
graph). Dragging a box around the frames is a toggle--drag a
box to include, then drag it again to exclude.
2) The
adjustments can be made either by entering numeric values on the
panel here, or by dragging the light-blue box in the motion
graph. Click on any of the little blue hotspots and drag them
around. Also try right-clicking and dragging. That will
allow you to change the shape of the transform. For example,
you could ramp a motion down to 0 using right-click-drag.
3) When you
drag the box around in the motion graph, you'll see a
representation of what the final transformed motion will look like
(in black).
Notes about the Axis:
1) The
Value Axis and the Frame Axis are the same; in other words, there's
just one axis point. Moving it left and right affects how it
deals with time (frames) and moving it up and down affects how it
deals with values (distances, amount of rotation, etc.) The
entry boxes on this panel are just split so you can enter the two
values separately.
2) One way to
think about the axis is like a pivot point for the frame
range.
3) The axis can
be adjusted in the motion graph screen instead of (or in addition
to) entering in numbers for Value Axis and Frame
Axis. Just right-click on the light blue circle-dot in
the edit range and drag it to where you want it.
To see some sample images of how you can manipulate keyframes with Distort Key Range, click here.