In messiah virtually
everything can be animated; not just objects, but most attributes
as well. And everything uses the same system, so once you
learn it, you can use it everywhere. This section will give
you the basics of what you need to know for keyframing, whether
it's objects, bones, light colors, or whatever.
The first thing to know is that in
messiah all channels are separate.
But since not everyone likes to work the same way, you have plenty
of options for how to choose the channels that keyframes will be
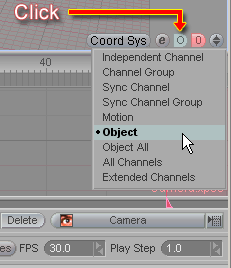
made on. Better yet, as you can see in the below right image,
the main control for this is sitting right at the bottom of the
World View, so it's always within easy
reach (you can also press g on your keyboard to
cycle through the choices). This control is called
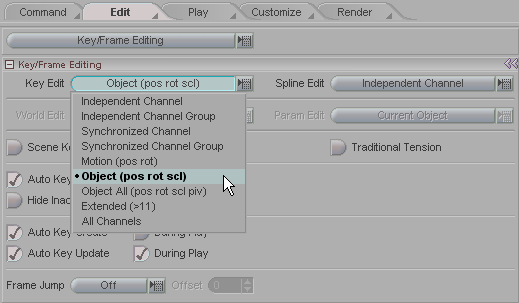
Key Edit. Its real home is on the
Edit tab, as you can see in the below
left image. That's where you will find several other
keyframing settings. For more information about those
options, click here.
|
|
|
|
You can either set the Key
Edit option on the Key/Frame
Editing block on the Edit tab
(above left), or using the pulldown on the lower right of the
World View (above, right). This
setting controls what channels get keyframes when you create or
modify a key. It works in conjunction with the Active Edit feature (see below).
|
 The Active Edit pop-up is located at the top left of the
Motion Graph. It lets you choose
what items to perform certain actions on. Click on it and
choose from the pop-up list. The Active Edit setting is used with things like the
Create Key pop-up (press Enter), Transform Key
Range, Distort Key Range and
others. It tells messiah what you want to apply those actions
to. The choices in the pop-up are:
Current Item -
Shows/applies to the current item only
Descendents - Applies to
the current item and its children
Hierarchy - Applies to
the current item and the entire hierarchy is part of (if it is part
of one)
Group - Applies to the
entire Group that the current item is
part of. Auto Primary Group -
When choosing a group that is
not the Primary,
that group will automatically be set as primary for the current
item
Selected Items - Applies
to the selected items
All Items - Applies to
all items in the scene
Use Item List - Applies
to whatever is in the Item List
(respecting the Item List Filter)
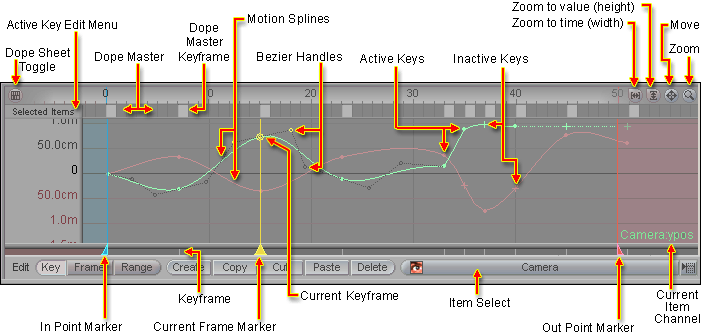
The Motion Graph
The Motion Graph is used
for all animation, whether it is objects, sliders, Camera zooms,
textures, etc. It sits at the bottom of the interface at all
times, and when you bring it up it doesn't cover the World View.
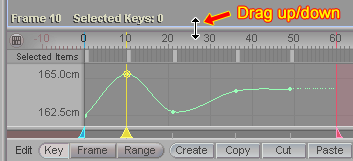
To enlarge it or shrink it, just drag from the divider
bar.

The image below might look a little scary, but
it's actually very simple. And rather than go into a lot of
detail here, just take a look, then try it out for yourself.
You'll see that it's very easy. Here's where you can
get lots of additional information: Motion Graph
Motion Graph
Basics

Active/Inactive
Keyframes: I'm going to assume that you already know
what a keyframe is. But messiah also has something called
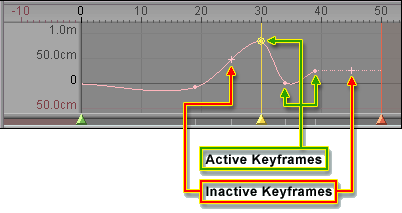
Inactive Keyframes. An Inactive
Keyframe is a keyframe that is not active on one or more
channels but is active on one or more others. For example, if
your Key Edit option (see above) is set to Independent, and you make a keyframe at frame 10 on
the Z channel, then there will
automatically be an Inactive Keyframe on all of the other
channels too. So if you go to frame 10 and select the
Y channel, you will see an Inactive Keyframe in the
Motion Graph and World View.


Inactive keyframes will not
affect the animation at all, but if you want, you can activate them
so they will. They become normal keyframes when
activated. All keyframes can be activated and de-activated at
any time, even while the animation is playing, and that's one of
the really great things about them. It really helps when you
want to see how a particular key is affecting the animation.
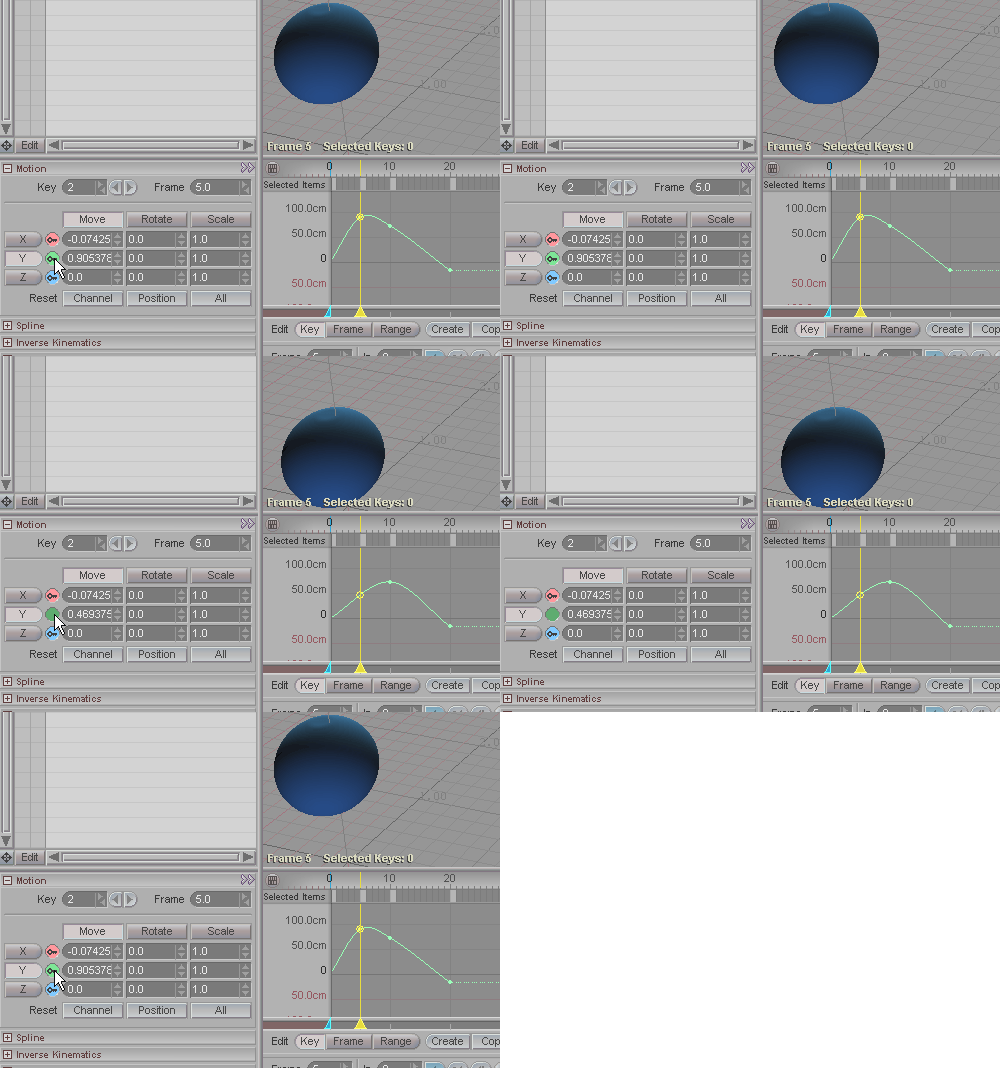
The image below shows a keyframe being activated and
de-activated. In this sample the animation is not playing,
but as I said, you can activate and
de-activate while it is. Note:
You can also set messiah to hide these
Inactive Keyframes, though we recommend not hiding them,
because it can be very helpful to see them. For additional
information, click here.

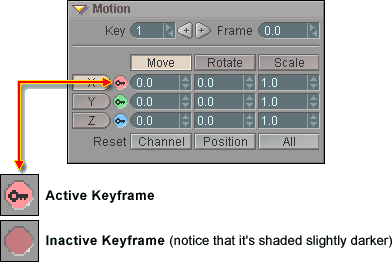
To do this, just go to the Motion block and
you'll see little colored circles to the right of the channel names
(X, Y, Z, etc.).
Key Modifier Buttons:
These little buttons are visible wherever there are channels.
For example on the Motion block where you set keyframes for
items. The colors are coded and are consistent throughout the
program, for everything from these buttons here, to the channels on
the Edit Sphere and Sliders, to the Motion
Graph, etc. For example, the channel in the images below
is for channel 1 (which is
xpos for things that use it as a motion channel).
Channel 2 is always light
green, channel 3 is light blue, etc.
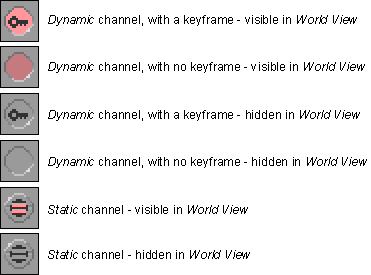
Visible/Hidden - Channels can be
visible or hidden in the World View gadgets (Edit
Sphere and Sliders). To hide or unhide,
right-click on the Key Modifier button for that
channel.
Keyframe
Active/Inactive - When there is a keyframe on the current
frame, a little key icon will appear in the Key Modifier
button. To make the key inactive, left-click on the Key
Modifier button. For information about active/inactive
keys, click here.
Static/Dynamic -
See next entry for information about this.
(Key Modifier
images below are enlarged for easier viewing.)

Static and Dynamic
channels:
There are two types of channels in messiah:
Static and Dynamic. Dynamic channels are
animatable. If you've used other animation packages you are,
no doubt, quite familiar with dynamic channels. If you're not
familiar with them, the simple explanation is that they are
channels that you can make keyframes for, and therefore
animate. But there may be certain items/channels that you
don't want to be animated. For example, you might not want to
animate the camera's Aperture Height, or the position
of a texture map. So these channels can be set channels to be
Static (some of those types are already set to
Static by default). When it's set to Static,
the channel will have the same value no matter the current
frame. So if you're on frame 30 and you modify the channel,
it will modify it for the whole scene, not just frame 30; in other
words, it won't make-- or let you make-- a keyframe.
 Middle-click to
change between Static and Dynamic. (The key
icon in the lower one means that there's a keyframe on the current
frame; it's not the "Dynamic" symbol. When there's no
keyframe on the current frame, there's no key icon, it's just an
empty circle.) You'll
see these Static/Dynamic settings for each channel in
messiah.
Motion Splines:
A motion spline is visual representation of the
values of an item at any given instant in time. When you look
at the Motion Graph you will see
keyframes at certain intervals, with a line flowing through and
connecting them. That line is the motion curve (or motion
spline). Actually, "motion" might not be the best word,
since it's not just motion that the splines are for. For
example, it could be a spline for a light intensity, or a color
intensity, or the camera's Zoom, etc. But it just makes
things easier to call it by one name, "motion spline."
The spline's shape, and the tools
available to shape it, are probably the most important things in
animation. In messiah, those tools reside on
the Spline block.
The Spline block is used
with all splines, whether By default all are set to TCB
(Tension, Bias,
Continuity), and with Euler angles. That is how most 3D software is,
so it shouldn't be anything new to you even though you might be new
to messiah. The basic idea of this
block is that it contains tools to help you shape the motion curve
as it flows through the keyframes. For example, do you want
the frames between keys to be linear (a straight line), or have a
nice ease-in and ease-out (curving) around the keys? Those
things determine how the motion plays. The other thing that
you set on the Spline block is the
End behavior of the spline. In
other words, what should happen after the last keyframe. For
example, you can have the motion repeat, or stop, or reset, etc.
For more information, click here.

Extended Channels:
Any time you see something like this:
 it means that you can animate that
channel. Just click on it to select it
  then animate it just like any other channel.
If you want to animate it, make sure it is set for
Dynamic (see Static
and Dynamic, above).
Deleting Keyframes:
To delete a keyframe, press the
Delete key or use the Delete button under the motion graph. If you
left-click on the Delete button you will
delete the keyframe based on the Key Edit
setting. So, for example, depending how you have that set,
you might just be deleting the key on that channel, or maybe only
that channel group (such as all motion, or all rotation), etc.
If you right-click on Delete, or
use the Delete key, you will delete the
key on all channels.
Well, that's the basics of messiah. All of the information on this page
and the GUI Basics page
is stuff you'll use throughout the program. It might
seem like a lot, but in practically no time it will become second
nature. Enjoy!


 The
The 