Learn It Once... Use It Often™ - GUI Basics
Messiah was designed to be powerful but as easy to use as possible. To facilitate that, a large number of features were designed to be used consistently-- and in a consistent way-- throughout the program. What that means is that there are a lot of things you only have to learn once but that you'll use all the time, no matter what area of the program you are using. This chapter will give you a basic overview of the Learn It Once... Use It Often system. If you are new to messiah we highly recommend that you read it all. It might seem like a lot of stuff, but that's a good thing, because it means you will learn a lot of useful things, since everything in this chapter is used over and over again throughout messiah. As a matter of fact, even if you've used messiah before it's a good idea to read this, because there are probably several things you didn't know (or have forgotten), or that are new.
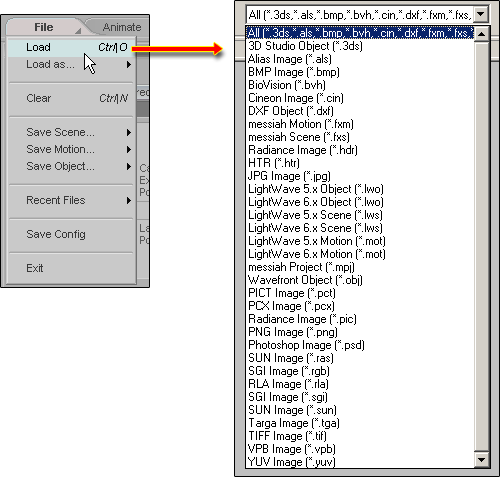
Loading Things With The File Context Menu: Right-click on the File tab and you'll see the File context menu. While a File menu is nothing new, we've enhanced the way Load works. In most programs there are several different Load requesters. For example, one for loading objects, one for images, etc. In messiah, the loader is intelligent, and can distinguish between the different types of items. Just tell it what you want to load and it knows what to do. For example, if you want to load a saved motion onto an item, just select the item and load the motion. The image below shows some of the file types that the loader can recognize and deal with.
Multi-Select Loading:
The file requesters in messiah support
multi-selecting. To do this, hold down the CTRL key
then click on the files you want. If you want a group of
items, select the first item, then hold down SHIFT and click
on the last one; it will select the two you clicked on and
everything in between.
Pulldown/Pop-Up Lists
(menus):
There are two types of menu lists in messiah. Standard pulldown lists, and new pop-up
lists. For short lists, the pulldown are fine, but with long
lists, like the Functions list on the Command tab,
the pop-up is better because it's easier to scroll (you can even
use your mouse wheel). With the pop-up, select which item you
want, then double-click on it. One cool little thing
about the pulldown lists is that you can
hold your mouse over them and press a letter on the keyboard.
That will make the list jump to the first item with that
letter. If you open the pulldown now, it will be at that
item, making it easier to get to items that might be far down in
the list. Additionally, each time you press the letter it
will go to the next item that starts with that letter. So if
you press t it puts Table_01 in view, then if you press t again it puts Truck
(well, assuming you have Table_01 and
Truck in your scene.) This is
especially helpful in the Functions list.
Opening and Closing Blocks:
The blocks can be opened and closed by clicking on their open/close
gadget (the + & -), or their name bar (such as Add Items
in the image below). On the Customize context menu there are settings for the way
blocks will open. (Also on that context menu you can set
messiah to use tabs instead of blocks.) Note:
If you have set the interface to Blocks Use
Tabs (on the Customize context
menu), this will not apply to you.

Normal List & Wide List (F2 and F3
areas):
The list/block area can be expanded or contracted, depending on
what you are doing. The default size is also called the F2
side or F2 size or F2 area. The image above
shows the F2 area for the Add Items block. But
some blocks have more parameters than can comfortably fit in such a
small area. So what we have done is split the features into
ones that are often or always used, and ones that are rarely or
infrequently used (the extended or advanced controls). To
expand the block, click on the expand gadget (see image below) or
press F1, F2, F3, or F4, or just grab the divider bar and drag it.
More Info.
|
How To Do Things In the Item List |
The list that runs down the left side of the interface is the Item List. In some parts of the program it has different names, such as the Expressions List when you are on the Command tab, but it always follows the same basic concepts. For example, when it is the Item List you can double-click on it to change the name of an item, while in the Expressions List you can double-click to change the name of expressions, or the expressions themselves, and in the Materials List (in Render) you can change the names of materials.
Selecting Items:
Items can be selected in one of four ways: 1) Clicking on
the item in the Item List on the left side of the screen,
2) using the down arrow on the keyboard when the Item
List is active, 3) clicking with the center mouse
button on the item in the World View, and 4)
selecting from the pulldown menu on the bottom right of the
screen.
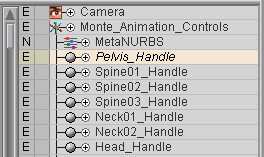
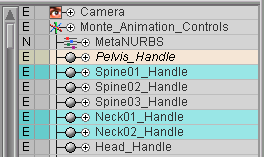
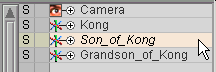
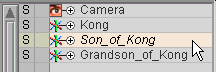
Left: One item
selected (highlighted in yellow).
Right: Multiple items selected (additional items in
blue).
Re-Naming
Items:
Items can be renamed by just double-clicking on them in the Item
List and typing the new name in.
Moving Items In The Item
List:
Items can be moved around in the Item List just by selecting
them and dragging them to where you want them. When you move
an item to the line between two other items so there's a blue
highlight bar at the top (as shown immediately below), it will go
above it, and not get parented to them. If you drag it so
there's a blue highlight bar at the bottom, it will go below that
item (see example in Parenting, below.)
Drag the item to where you want it.
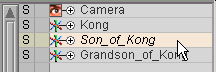
Parenting:
Parenting is accomplished by selecting an object in the Item
List and dragging it onto the object you'd like it to be
parented to. In messiah, anything can be parented to
anything.
|
|
|
|
|
Parenting. |
Two levels of Parenting. |
Parenting and moving. |
Locking Items From
Selection:
Quite often when you are animating, there are objects or other
items (like bones) that you don't want to animate. For
example, if you have an IK chain you want to animate the goal, not
the rest of the chain. Messiah allows you to lock out these items so you can't
accidentally select one and move it. Items can be "locked"
from selection in two styles.
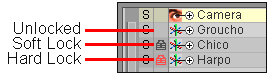
Soft-Lock - This is accomplished by clicking in the box on the column immediately to the left of the item name. A black lock icon will appear. You will now not be able to select this item in the animation screen, but can still select it from the column.
Hard Lock - Right-click or Middle-click in the box on the column immediately to the left of the item name. A red lock icon will appear. This item can now not be selected from either the animation screen or the column. It must be unlocked to be selected. To unlock it, just right-click on the red lock.
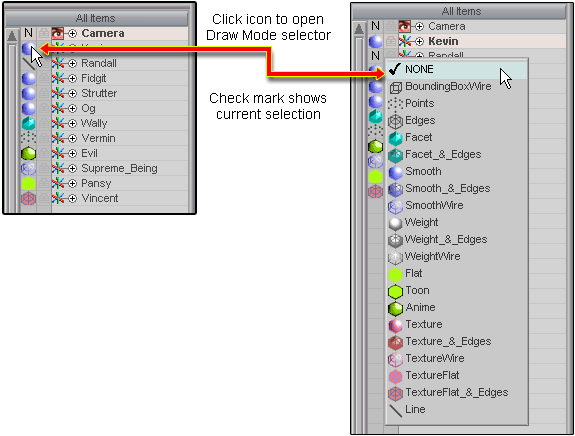
Draw Mode:
There are twenty one draw mode choices for items The image
below (right) shows each of them, along with the Item List icons
for each of them. In the weighted view, you can select a bone
and it will show what area of the model is affected by that
bone. Any influence from other bones is taken into account
for this, so what you see really is the actual influence
range.
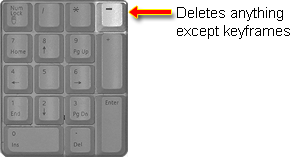
Deleting Items:
To delete anything except keyframes, press - (minus) on
the numeric pad of your keyboard. For example, this is
how you delete an object, or bone, or light, etc. from your
scene.
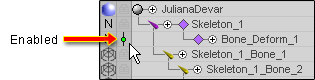
Enable & Bypass Switch:
This is a universal type of switch within messiah for enabling (so it will be used) or bypassing (so it will not be used) a variety of things. The images below show how it works, along with a couple of examples of them in different areas of the program.
![]()
Enable & Bypass in the Item List (left), in the Expressions List, (center), and in the Shader Flow (right).
|
Manipulating Things |
There are several ways of manipulating things, depending on what the thing is that you want to manipulate. For example, there is the Edit Sphere, the Channel Controls, the Motion Graph, the Motion block, Sliders, and more. Here's a quick rundown...
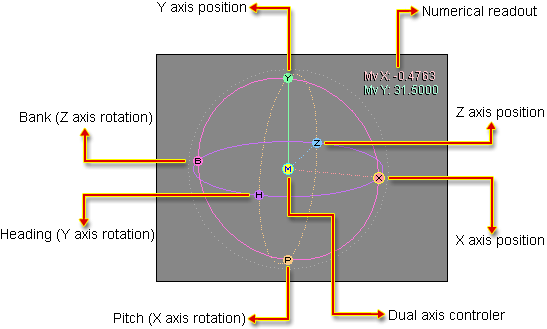
Edit Sphere:
The Edit Sphere can be used to control
most animatable things, such as the movement of objects of course,
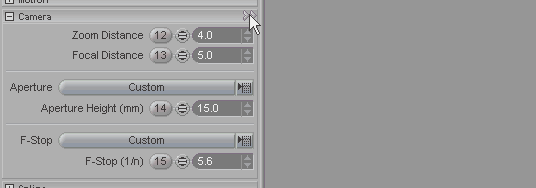
but also things like the Camera zoom.
(Some channels on the Edit Sphere
may be hidden, so you would need to unhide them in order to use
them.) Once you select a channel on the Edit Sphere
(like X or H), you don't need to click only on that to do the move
or rotate. As long as a channel (or even the center
point which controls two axes at once) is selected, you can perform
that function by clicking anywhere in the World View.
For more information on the Edit Sphere, click
here.
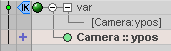
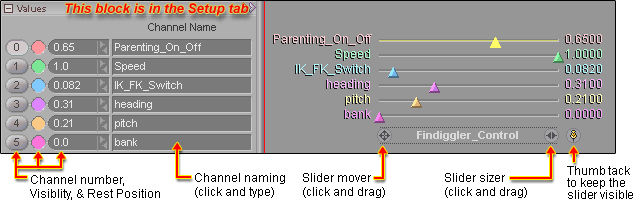
Sliders:
Sliders are used with various Effects, such as Motion Blender, and (more often) with Expressions. Using simple Expressions (usually point-and-click), you can control virtually anything in messiah, from the Camera zoom, to facial controls on a character, to parameters for lights, to textures (the latter two are applicable to messiah:studio only). The image below shows you the basics of Sliders. The left portion shows the Values block in Setup Mode. That is where you set a default position for the slider channels and give each of them a name. In Animate mode the name field won't be there, it will list the names you've entered next to the channel number.
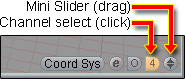
Channel Controls:
At the bottom right of the World View is the Channel Control section. There are a few important things this is involved with, but for now, the important thing to remember is that you can select a channel with it, then use the mini slider gadget to adjust that channel (in other words, to move the selected item).
Motion Block:
The Motion block is what you use for keyframing the position, rotation, scale and pivot of all items except sliders (see above for sliders).
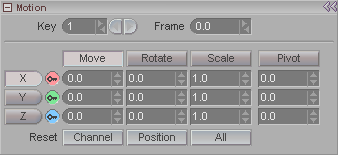
You can enter a number directly, or us the mini-slider gadgets next to each numeric field. If you click on the up or down arrows you will adjust the number in increments in that direction. You can also drag them up and down. The Key field shows you which keyframe is the current one. It is not a frame number, though-- that's what the Frame field is. In the image above, it is saying that the first keyframe for the object is on frame 0. Using the left and right arrows next to the Key field lets you move to the next or previous keyframe.
|
Blend Operators & Motion Processing Order |
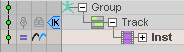
Blend Operators:
The simplest way to explain a Blend Operator is that it is a setting that you assign when two or more channels are being combined. You can say "add these items together and use that result," or "multiply these things and use that result," etc. Blend operators are used for things like expressions, certain Effects (like MetaWeight), shaders, motions (in Compose), etc. You'll see them everywhere.
Here are the available operators:
= Equal: Replace the existing value of the channel with what you are plugging into it.
+ Plus: Add this value to the channel.
- Minus: Subtract this value from the channel.
x Multiply (sometimes shown as * ): Multiply this value with what it is being mixed with, then use that result.
/ Divide: Divide this value by the one it is being mixed with, then use that result.
> Greater Than: Replace the existing value if it is lower than the value you are plugging into it.
< Less Than: Replace existing value if it is greater than the value you are plugging into it.
|
|
|
|
|
|
Blend in an Effect |
Blend in expressions |
Blend in Compose |
Blend with shaders. |
Motion Processing Order:
One more thing that you'll see all over are the Motion Processing Order icons. What these do is tell messiah when to apply certain motions or motion effects. You can see these in the two middle images above as they are used in expressions and Compose. The choices are:
![]() Apply to the motion before IK
is calculated.
Apply to the motion before IK
is calculated.
![]() Apply to the motion after IK
is calculated.
Apply to the motion after IK
is calculated.
![]() Apply after motion
(Calculate the motion, then apply this additional motion or
motion effect after it.)
Apply after motion
(Calculate the motion, then apply this additional motion or
motion effect after it.)
So, as far as the basic interface goes, what you've seen here is almost all you need to know, whether you are animating, rigging, or working with the renderer. Now let's take a look at the basics of keyframing. Click here to continue.
| Converted from CHM to HTML with chm2web Pro 2.82 (unicode) |