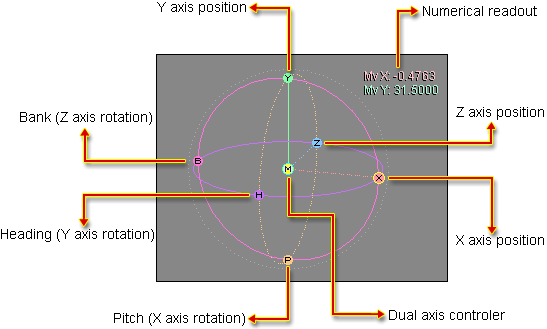
The Edit Sphere is used for moving items around in the World View (Viewports). Every item in your scene has an Edit Sphere, with the exception of sliders, which are actually their own "Edit Spheres".

Note: The dual axis control letter at the center of the Edit Sphere will change, depending on which group you have activated. "M" is for Motion, "R" is for Rotation, etc.
Moving Items With the Edit Sphere: To move items around, just click on one of the axis letters and start moving. If you want to work on more than one axis, select an axis then select the center controller. Once an axis is selected, a yellow highlight appears around it (for example, the yellow circle around the X and the light blue circle around the M in the image above). At that point, you don't need to click and drag on the actual letter to move/rotate, you can click anywhere on the World View.
Local/World Coordinates: When moving or rotating an item, using the left mouse button will move it in world coordinates; using the right mouse button will move it in local coordinates. Try it-- Pitch (P) the sphere down to about 45 degrees and then rotate its heading (H) using the left mouse button (world) and then the right mouse button (local).
You can think of local and world coordinates this way: If you are standing on the ground and I tell you to walk forward, you'll move forward and we'll both see that. However, if you are lying on the floor on your back and I tell you to walk forward, you'll move "forward" from your point of view (local coordinates), but "up" from mine (world coordinates)--assuming you can walk up walls. It is your rotation (standing or lying down) relative to me that makes us see things differently. If you are lying down, your Y axis (up and down, head to toe) becomes my Z axis (forward and back), and your Z axis becomes my Y axis.
Sizing the Edit Sphere: The size of the Edit Sphere can be changed by pressing { or } (that is SHIFT [ and SHIFT ] ) on the keyboard. The { will make it smaller, and the } will make it bigger. Note that you must hold the Shift key when pressing them or else you'll get [ and ], which adjust the grid units. For additional keyboard shortcuts, click on Keyboard Shortcuts in the list at left.
Hiding Channels In the Edit Sphere: Channels can be hidden by right-clicking on the little colored circle to the right of that channel's name on the Keys sub-tab on the Animate main tab. (Middle-click also works.) They can be turned on the same way. This is really useful if you only intend to move something on specific channels and don't need the entire sphere to be visible. Note: In the sample below, the black key icon in the channel circle (left images) indicates that there is a keyframe for the current frame. When there is no key icon it means that there is no keyframe set for the current frame.

Turning the Edit Sphere on and off: The Edit Sphere can be turned on and off by pressing the Esc key on the keyboard when the World View is active. It is recommended to have it off when using Realtime Modify for bones (Setup), because it will be easier to select the points at the end of the bones. Note: Esc will also turn the visibility of sliders on and off. So if you select a slider and it doesn't appear in the World View, try pressing Esc.
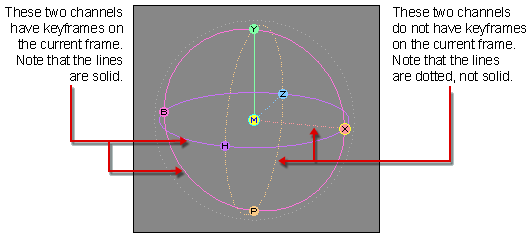
Visual Indicator of Keyframes: The Edit Sphere itself shows whether there is a keyframe set on the current frame or not (per channel). When there is a keyframe for a channel, that channel's circle is shown as a solid line. When there is no keyframe, it is shown as a dotted line.

Note: Lights and Cameras have some additional Edit Sphere channels, such as Light Intensity and Focal Distance. You'll find information for those on the Lights and Camera blocks.