|
T u t o r i a l - Leg & Foot IK |
|---|
Skill Level: Intermediate
Introduction:
One of the most basic elements in rigging a character is creating
the leg and foot IK. While there are as many methods for
setting this up as there are people who do it, here's a very quick
and easy way to get you started.
The actual sequence that you follow to set this up doesn't matter very much. You could create all of the bones and all of the nulls first, then put it all together, or you could do it like I'll show you here (and there are other ways too). I've chosen the sequence I'm using here because I believe it's the most common way that you'll actually set up your characters, building as you go. After all, you don't know how many bones and nulls (etc.) you'll need until you actually start setting the character up. The other advantage is that you can see what's going on while you're doing it.
The Concept:
The basic idea here is that you'll create a leg and foot setup that
uses multiple IK goals to control various aspects of it.
There are several End Effecters, each one being in a
different part of the leg/foot, and each one set with a different
IK goal. Of course you can create an easier setup, but as
with anything, the more controls you want, the more involved the
setup will be. In fact, this tutorial doesn't cover
everything that's possible-- it wouldn't be possible to have a
tutorial that covers everything, because the possibilities
are virtually limitless. And, of course, extra time spent in
setup almost always translates to time saved in animation, which is
important considering that the bulk of a production schedule is
usually animation.
One last thing before
beginning:
The length of this tutorial, and the number of steps involved may
make it look complicated, but it's really not. I've broken it
out into simple steps to make the process as clear as possible, and
that adds to the length (as do all of the images), but it is the
best way to learn it. Since the feet and legs are one of the
most important parts of any character setup, I felt this was the
best approach.
Creating the Leg and
Foot...
Notes: 1) You may want to start by adding a light so
you can see better. Add it from
Setup-->Items-->Add. 2) It is best if all null objects in this
tutorial are created from within Setup
(Setup-->Items-->Add).
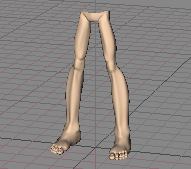
1) Load Legs.lwo from the Tutorials_General folder and turn on MetaNURBS for it.
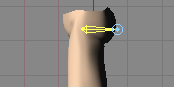
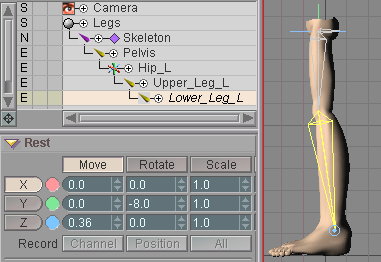
2) Add Bone_Deform, then add a bone. Rename them toPelvis, then move it up to1.0 on Y, and -0.03 on Z, so it's positioned nicely in the character. As a last adjustment, change the Length to0.1.
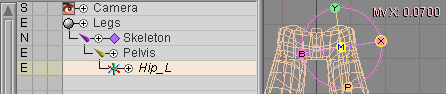
3) Create a null called Hip_L and parent it to Pelvis, then move it on X to 0.07 so it's at the top of the left leg and bank it to 9.0.
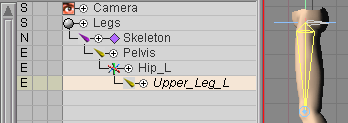
4) Create a bone and name it Upper_Leg_L, then parent it to Hip_L.
5) Set the Length of Upper_Leg_L to 0.36 and rotate it to 90 on Pitch.
6) Add a Child Bone to Upper_Leg_L and name it Lower_Leg_L. Now set it's length (or drag it out) to 0.54 and rotate it to -8.0 on pitch.
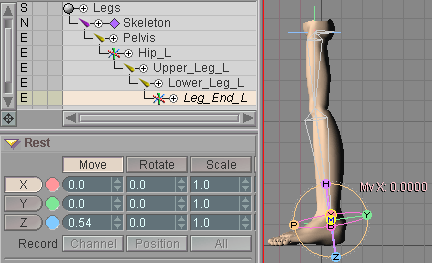
7) Create a null called Leg_End_L. Make it a child of Lower_Leg_L, then move it to the end of that bone, which should put it atZ 0.54 (because that is the length of the bone). This will be the main IK end effecter.
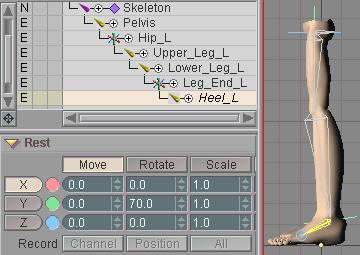
8) Add a bone and make it a child of Leg_End_L. Name this bone Heel_L. Now scale it down to 0.15 and rotate it to 70 on pitch, then set its X, Y, and Z position to 0.
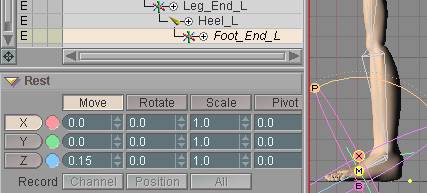
9) Create a null called Foot_End_L and make it a child of Heel_L. Now move it to the end of Heel_L, which should make itZ 0.15. This will be one of the IK end effecters for the foot. There will be more than one though, because this setup gives you a lot of control over the foot and leg.
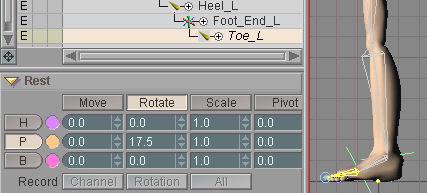
10) Add a bone and name it Toe_L, then make it a child of Foot_End_L. Scale this bone down to 0.16 and rotate it on pitch to 17.5, then set its X, Y, and Z position to 0.
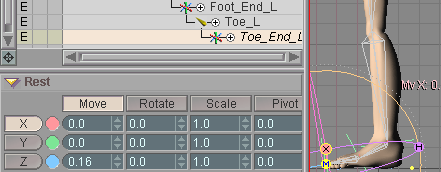
11) Now, as I'm sure you guessed, make a null called Toe_End_L and make it a child of Toe_L, then move it to the end, which should be Z 0.16.
That's all for the leg and foot themselves. Now it's time to create the IK setup.
IK Goals...
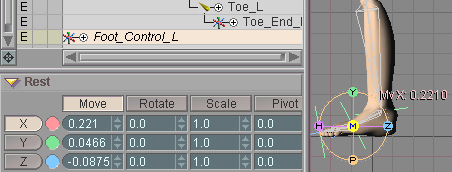
12) Create a null called Foot_Control_Land position it at theFoot_End_L null, which is where the Heel_Land Toe_Lbones meet. In my scene that is X 0.221, Y 0.0466, and Z -0.0875. Do not parent it to anything (if it is parented to something, un-parent it). This isn't really an IK goal, but we're going to parent the real IK goals to it, so this is what you'll generally move to position the leg, then use the other goals will fine tune it.
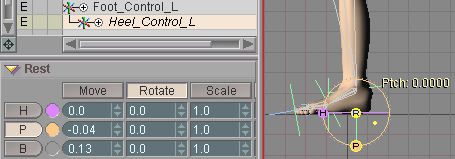
13) Create a null called Heel_Control_Land parent it to Foot_Control_L, then position it to be in the heel of the geometry. Here are my settings: X 0.0, Y -0.04, Z 0.13. This is also not a real IK goal, just a parent for the real goals. This control is used to rotate the foot if necessary. So turn off the other channels (X, Y, Z, and B) in the Edit Sphere by right-clicking on their Key Modifier buttons.
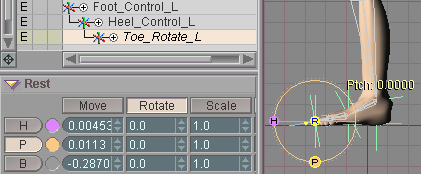
14) Create a null called Toe_Rotate_Land parent it to Heel_Control_L. Position it to be at the tip of the Toe_Lbone. Here are my settings: X 0.00453, Y 0.0113, Z -0.287078. This is also not actually an IK goal, but a parent of the actual IK goals, like Foot_Control_Lwas. The difference between this one and that one is just the position, and that this one is only used for heading and pitch. So turn off the other channels in the Edit Sphere by right-clicking on their Key Modifier buttons.
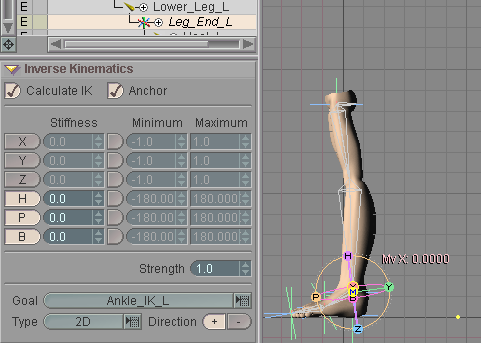
15) Now let's create the first real IK goal. Create a null called Ball_Rotate_Land parent it to Toe_Rotate_L. Position it at the joint between the heel and the toe bones. Here are my settings: X -0.0045, Y 0.0288,Z 0.1573. Now turn off all of the channels on the Edit Sphere except Pitch, by right-clicking on the Key Modifier buttons; you'll only need this item for Pitch.

16) So, here you are on Step 16, and you've patiently waited for some IK. Well, it's IK time. On the Animate tab, select Foot_End_Land go to the Inverse Kinematics block. Turn on Calculate IK and Anchor, then select Ball_Rotate_Lin the Goal list. You'll be a little surprised by what you see; I'm sure you weren't expecting that.
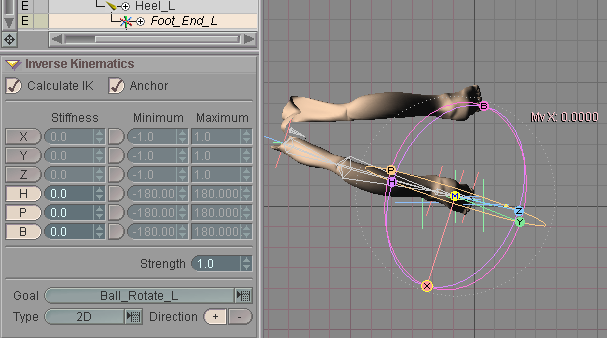
The problem is that the IK is working its way all the way up the leg and isn't stopping anywhere because it's not fully anchored. So the Pelvis and leg object are taking the rotations from the IK. In this setup, the real Anchor will be the upper leg bone-- nothing above that will be affected by this IK.
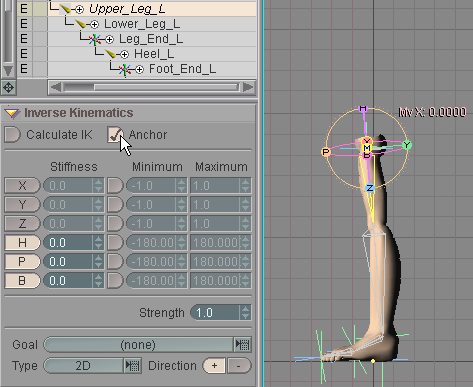
17) Select Upper_Leg_Land turn on Anchor in the Inverse Kinematics block. The leg should snap back into the correct position now.
18) Go back into Setup now and we'll add another IK Goal. Create a null called Ankle_IK_Land parent it to Ball_Rotate_L. Now position it to be at the tip of the lower leg bone. Here are my settings: X -0.011, Y 0.06955,Z 0.1324.
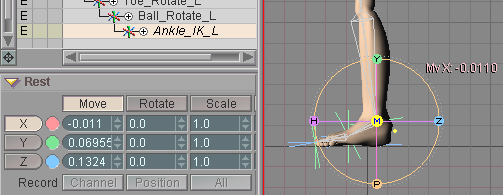
19) Select Leg_End_Lin the Item List, then on the Inverse Kinematics block turn on Calculate IK and Anchor, then select Ankle_IK_Lin the Goal list. You'll see the leg "snap" into a slightly awkward position. This is because the lower leg is solving the IK backwards (in other words, the leg bends the wrong way at the knee).
To fix this, select Lower_Leg_Land in the Inverse Kinematics block, click on the -- Direction.
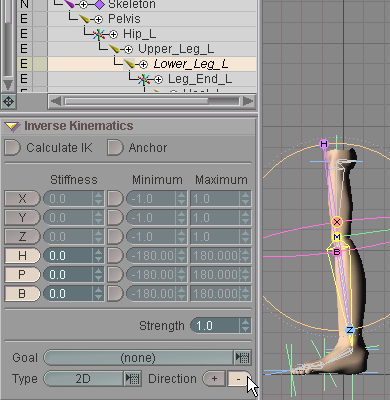
If you move the Ankle_IK_Lobject now you will see that the IK is working, but it's still acting strangely. Well fix that stuff next. Reset the position of the Ankle_IK_Lnull if you moved it, then go back into Setup.
20) Hard Lock the Ankle_IK_Lnull. That's not something that you'll be animating.
![]()
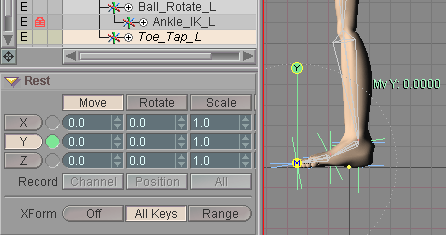
21) Create a null called Toe_Tap_Land parent it to Toe_Rotate_L. You'll be happy to know that you don't need to reposition it. It's fine right where it is. But turn off all of the channels on the Edit Sphere except Y, by right-clicking on the Key Modifier buttons.
And now let's wrap up the last of the IK stuff.
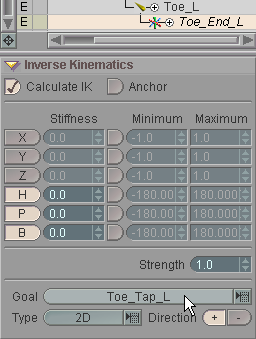
22) Select Toe_End_Lin the Item List and go to the Inverse Kinematics block. Turn on Calculate IK, and select Toe_Tap_Las the Goal.
So now the IK works for this leg. On the Animate tab, select the Foot_Control_Lnull and move it around. The leg should follow correctly. But before you play with the whole thing, let's finish up by creating the right leg.
23) Change the Draw Mode of the following objects to None: Hip_L, Leg_End_L, Foot_End_L, Toe_End_L, Ankle_IK_L. Note: The Draw Mode column now has icons instead of the letters shown here.
24) In Setup, multi-select Hip_L, Foot_Control_L, Heel_Control_L, and Toe_Rotate_L, then press the / button on the numeric pad of your keyboard. This will mirror the entire leg setup.
25) For the new leg and its IK goals, rename all of theL_1's to R's. For example, rename Hip_L_1to Hip_R.
Now when you go out to Animate, you're all set. Each leg has its own IK goals and they all work properly; try them out and see what they do. Actually, they're not perfect. If you move the Foot_Control_L(or R) goal around, you'll see that the foot can rotate in an unnatural way. That can be fixed with expressions if you want.
A completed version of this scene, General_IK_Intermediate_LegFootIK_01.fxs can be found in the Scenes\Tutorials folder.
Additional information:
There's more information about bones here: General Info -
Bones Bone block Skeleton
block Target Object Options
block General Info - IK (Inverse
Kinematics) Animate - Inverse Kinematics
block
| Converted from CHM to HTML with chm2web Pro 2.82 (unicode) |