|
|
|---|
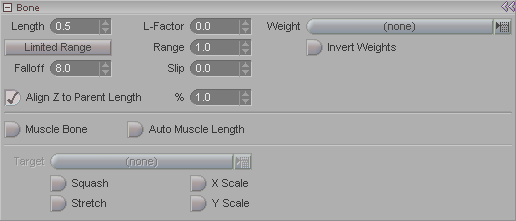
This block is used to set the parameters for each bone in the skeleton. The block will only appear when you have a bone selected.
Note: The parameters on this block can be applied to multiple bones at once.
Length: Displays the length of the bone in meters. You can also manually enter the length here.
Limited Range: Limited Range limits the bone's influence on the object. When this is turned on, a yellow "capsule" appears around the bone to show the maximum area which will be influenced by that bone. Areas outside this capsule are not affected. You can change the size of the range by clicking and dragging on the orange dot at the end of the capsule or by entering an amount in the field to the right.
Falloff: This is a setting that affects how the edge of a bone's influence falls off. A low falloff means that the edge of the influence area is sharp, so points that are even just barely outside the influence area are not affected by the bone. A higher falloff means that the edge of the influence area fades away, so the farther a point is from the edge of the influence, the less it will be affected. This may sound similar to Limited Range, but they are not the same: Limited Range sets the area of influence, and Falloff sets what happens as you go beyond that threshold.
Align Z to Parent Length and %: Keeps the bone's position relative to its parent when the parent is sized up or down. The default is 1, which places it at the tip of its parent. A setting of 2 puts it at double the size of the parent away from it's parent, and a setting of .5 puts it at half the size of its parent back from the end of the parent. Any value can be entered. In other words, when this is on and the setting is 1, you can size the parent up and down without having to reposition the child bone to get it back into place. Note, however, that this is referring to the setup mode, not to when you're animating.
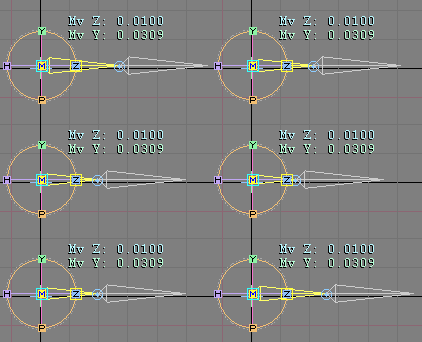
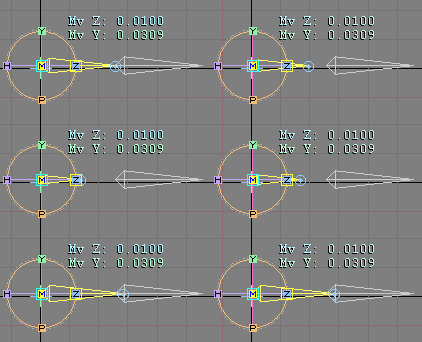
Left image: Align Z to Parent Length
ON. Right image: Align Z to
Parent Length OFF.
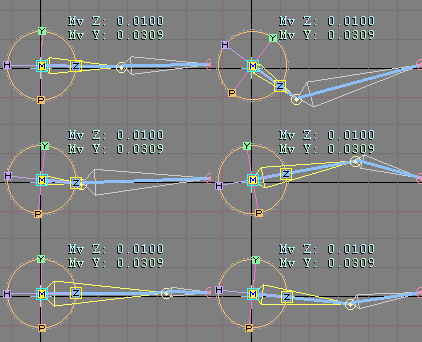
Realtime Modify and, Align Z to Parent Length ON showing
how Align Z to Parent Length keeps the bones
connected.
L-Factor: Applies a factor multiplier to the amount of influence a bone has with regard to its length. Still not sure? Well that's exactly what the programmers told me. After some digging, this is what I found out: Normally, a bone has a certain area of influence. When you make the bone bigger, naturally this area of influence grows too. What L-Factor does is to make it so not only does the area grow, but its influence is stronger. It doesn't "reach out" any farther, it's just got a stronger grip on what it already has. An L-Factor of 2 would make the area of influence twice as strong (remember, the size of the area would remain the same, but its strength would be greater).
Range: This is the numeric entry field for Limited Range (see above).
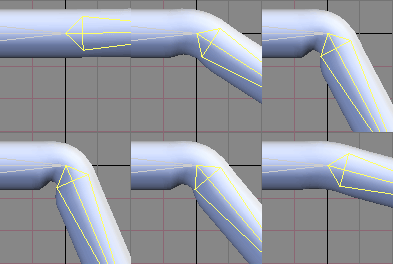
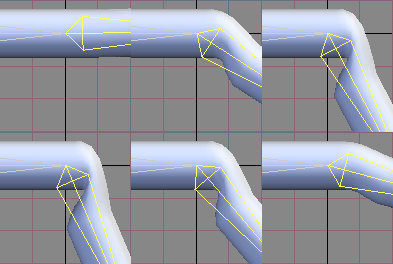
Slip: Slip lets you tweak the deformations around the joints. The higher the value, the less influence the bone will have on the joint (the fat end of the bone). Think of it like the influence slipping up or down so the other bone has more or less influence. Your results may vary from the images below, because it can depend on some of the other bone settings, such as L-Factor, and Falloff.
|
|
|
|
|
Slip at 0 on highlighted bone. |
Slip at 0.1 on highlighted bone. |
Slip at - 0.1 on highlighted bone. |
Weight (pulldown): Rather than use the weight field of the bones, you can use this pulldown to choose other weighting systems that are in your scene, such as MetaEffectors and Curves. One reason that you might want to do this is so you can use bones to animate, but override their weighting with another type of weighting (MetaEffectors, Curve points, etc.).
Invert Weights: Turn this on to invert the influence of the weight field listed in the Weight pulldown.
Muscle Bone: Turn this on if you want the bone to be a muscle. Muscle bones will stretch and compress like a real muscle. If a bone is a muscle, it needs a connection point, or "target". The pivot point (fat end) of the muscle bone is one connection point. Position that to where you want that end to attach, then create a target (usually a null object, but it can also be another muscle or bone, or anything) and position it to where you want the other end (the thin end) to attach. Then use the pulldown list below to set that as the target.
Auto Muscle Length: Use this to automatically set the length of the muscle bone so it reaches its target (see Target below). It does not squash & stretch the bone to fit, it adjusts its length. Using this feature is much easier than adjusting the length manually.
Note: The following items are only active if the bone is a muscle bone (see immediately above).
Target (pulldown): Use this pulldown list to select the connection point of the muscle. The pivot point of the muscle itself (the "fat end") is one connection point, but you need to set what the other end is connected to (see above).
Squash: Turn this on to allow the muscle bone to be "squashed" (compressed) when the overall length of the muscle bone deforms to less than its rest length. So as the bone gets shorter, it gets fatter.
Stretch: Turn this on to allow the muscle bone to be stretched when the overall length of the muscle bone deforms to greater than its rest length. So as it gets longer it gets thinner.
X Scale: When this is on, the muscle bone will scale along X when squashing and/or stretching. When it is off, it won't react along X.
Y Scale: When this is on, the muscle bone will scale along Y when squashing and/or stretching. When it is off, it won't react along Y.
