|
T u t o r i a l - Metamation |
|---|
Skill Level: Beginner.
Why?
OK, you've got an object that's a lot of polygons and if you
animate with it your system will be too slow. So you use the
low-res "cage" and animate that, then turn on MetaNURBS when
you render so it'll render the high-res one, right?
Right. But what do you do if you can't use
MetaNURBS? Metamation. LightWave's
Metaform Plus plug-in (written by pmG's programmers) can
subdivide and smooth an object in a way similar to MetaNURBS
but without some of its point/polygon restrictions. So an
object that can't be MetaNURB'ed, can be
Metaformed.
The Metamation effect was designed to let you work with the low-res version but render the high-res one.
The Project:
This tutorial will not cover how to use Metaform Plus,
because that's covered very well in LightWave's manual.
Instead, you'll learn how to set up the Metamation effect
with the good old T-Rex objects. That's not so bad, is
it? (By the way, a completed scene file of this tutorial is
located in the Scenes\Tutorials folder. It's called
EffectTypes_Metamation_Beginner.fxs.)
The Concept:
Here's all there is to it: Load the Metaformed object
(high-res) and add the Metamation effect to it, then load
the low-res version as a "cluster". Put your bones or other
effects into the low-res one and animate with that.
So let's begin...
Note: You may want to add a light too, so you
can see better. Add it from
Setup-->Items-->Add.
1) Load T_Rex_Metaformed_1Level_01.lwo from the Objects\T_Rex\ folder.
2) Make sure the T-Rex object
is selected, then go to the Effects sub-tab on the
Setup tab. Select Metamation from the pulldown
then click the ![]() button to apply
it to the object. You'll see it appear in the Item
List below the T-Rex object. You'll also see it appear in
the Effects List (the list on the right).
button to apply
it to the object. You'll see it appear in the Item
List below the T-Rex object. You'll also see it appear in
the Effects List (the list on the right).

3) On the Cluster Create block that appears below the Item/Effects List when Cluster is selected, click on Load Cluster/Object, and load T_Rex_LowRes_01.lwo.
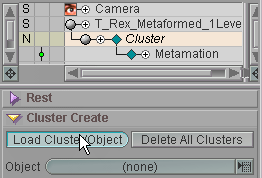
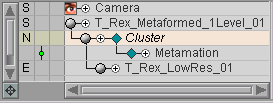
Click on Load Cluster/Object to load the low-res
T-Rex.
The low-res T-Rex in the Item
List.
4) Click over to the Animate tab and select Metamation in the Item List. You'll see the Metamation block appear below. There's only one parameter to enter there: the Subdivision Level. This number is the number that was entered in the Metaform Plus plug-in when the Metaformed object (high-res) was created from the low-res cage. I usually put that number in the name of the high-res object so I don't need to remember it. For example, the high-res object in this scene is called T_Rex_Metaformed_1Level. So enter 1 in the Subdivision Level field.
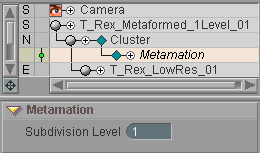
OK, that's about all there is to setting up Metamation, but now it's time for the final preparations.
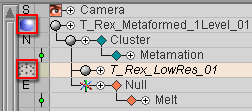
5) Set the high-res T-Rex to display mode None so it's hidden, and set the low-res one to Smooth. After all, you don't need to see the high-res version except in the render.

6) Select the low-res T-Rex and go back to the Effects sub-tab in Setup. Select the Melt effect and add it.
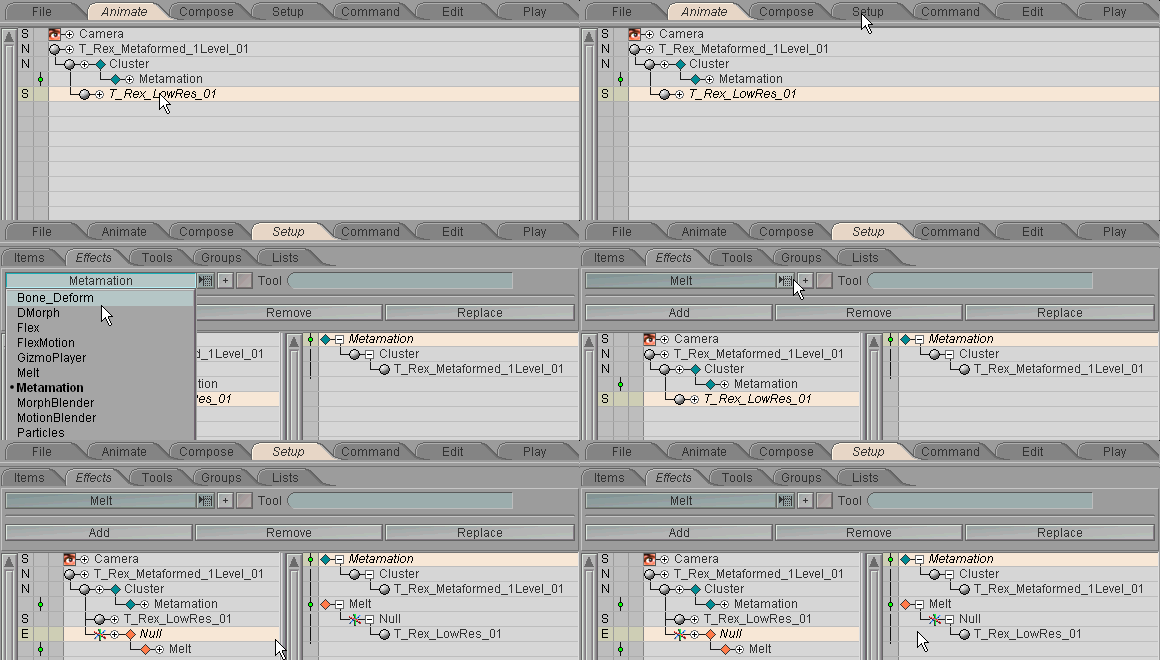
7) Now here's something to remember: If you exit Setup and begin animating, the Melt effect will not work on the high-res T-Rex. The reason is this: Metamation will look at the low res object and apply itself to whatever position or shape that has become as a result of effects, animation, etc. But as you can see on the Effects List, Metamation is set to happen first-- before Melt is applied to the low-res object. So Metamation will look at the low-res object and think that nothing has changed, because effects are applied in the order that they appear on the Effects List, from the top down.

So to get Melt to apply to the Metamation object, you must set Melt to happen first. That means that the low-res object will get melted, then Metamation will look at the shape of it and apply the high-res version to match that shape.
To change the order, just drag the Melt effect up to the top of the Effects List.
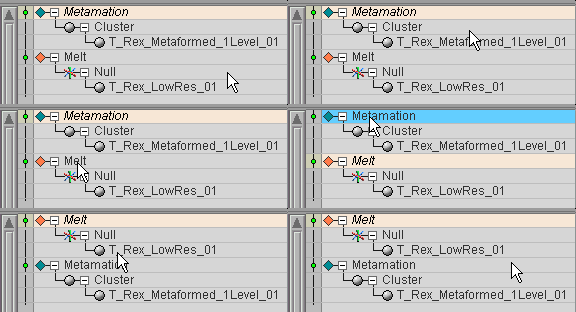
Arranging Metamation to come after the other effects is a very important thing, so don't forget that.
8) Go to the Animate tab now and move the low-res T-Rex down on Y. You'll see the Melt effect in action. But you'll probably also see that things seem to be moving a little slowly. We'll take care of that in a moment. For now, do this: change the view setting of the high-res T-Rex to Smooth, and the low-res one to Points.
Now move the low-res one up and down on Y. You should see the points of the low-res version, and the smooth-shaded high-res one melt into the ground. So Metamation and Melt are working fine. Now you may proceed to step 9. But be careful crossing the street.
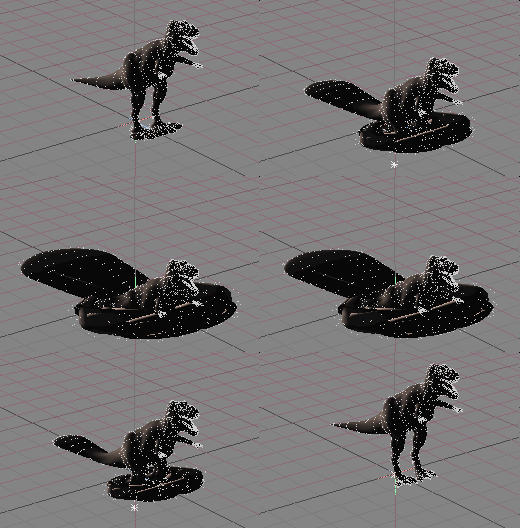
9) Step 8 showed you that everything is working right, so now we can get it set up so you can animate with it. Set the high-res back to N, and the low-res to S. Now bypass the Metamation effect by clicking on the bypass icon to the left of it in the Item List. What you will have now is the low-res object being affected by the Melt effect, and the high-res object hidden from view. And since we're bypassing (or temporarily disabling) the Metamation effect, messiah doesn't have to waste any CPU time calculating it, so everything goes faster.

Rendering:
When you render the object, you will need to turn on the
Metamation effect (in other words, "un-bypass" it).
You will also have to set the low-res object to not render, and
make sure the high-res one is set to render. That is done on
the Surfaces sub-tab on Render.
Outputting to a third-party
program:
If you are not rendering in messiah, shame on
you, you hurt my feelings. But you can still use
Metamation. Your Linked Scene will have the
hig-res (Metaformed) object in the third-party package
(Maya, 3DS Max, LightWave, etc.) and have messiah's
displacment plug-in applied. In other words, in LightWave,
for example, you would have the high-res object loaded and have
messiah:displace
applied to it. And in messiah you would have a setup
like the one you created here, so the low-res object would drive
the deformation of the high-res one, and that would drive the
deformation in LightWave.
Or you can use Save Morph Sequence to save out an object sequence and use that in the third-party program.
As you can see, I was kidding when I called this a "Beginner" level tutorial. Ain't I a kidder?
Additional information:
General Info - Metamation Animate -
Metamation block Setup - Cluster Create
| Converted from CHM to HTML with chm2web Pro 2.82 (unicode) |