
|
T u t o r i a l - Flex |
|---|
Skill Level: Beginner.
Flex is a deformation effect that allows you to bend, squeeze, mold, or twist an object using a spline. Think if it as using a spline instead of bones.
This Tutorial Will:
The Flex effect is easy to use, and this tutorial will show you the
basics of using it in a character. You'll learn how to use
the Curve and Bend blocks in Setup.
What You Will Do Here:
You will load a character object, add the Flex effect, then
add points to the Flex curve (spline).
So let's begin...
Note: You may want to add a light too, so you
can see better. Add it from
Setup-->Items-->Add.
1) Load Wormler_LowResB.lwo from the Objects/Wormler folder and switch to the Left view. You might also want to turn on MetaNURBS (press TAB) so the object looks better.
2) Make sure that Wormler_LowResB is selected in the Item List, then go to the Setup tab and click over to the Effects sub-tab.
![]()
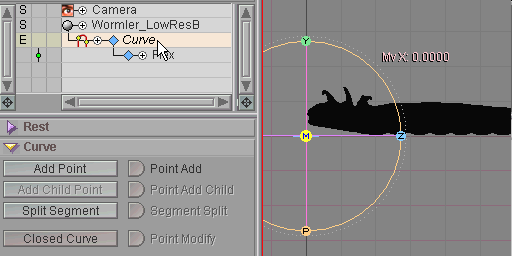
3) Select Flex from the
effects pulldown list, then press the ![]() button to add it
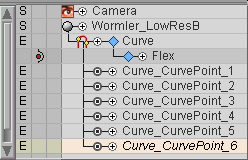
to the Wormler character. You'll see two items appear in the
Item List now: Curve and
Flex. Curve is the tool that the Flex
effect uses, and Flex is the effect itself. For more
information about Effects, Tools, and
sub-Tools (which we will get to in the next step), click
here.
button to add it
to the Wormler character. You'll see two items appear in the
Item List now: Curve and
Flex. Curve is the tool that the Flex
effect uses, and Flex is the effect itself. For more
information about Effects, Tools, and
sub-Tools (which we will get to in the next step), click
here.
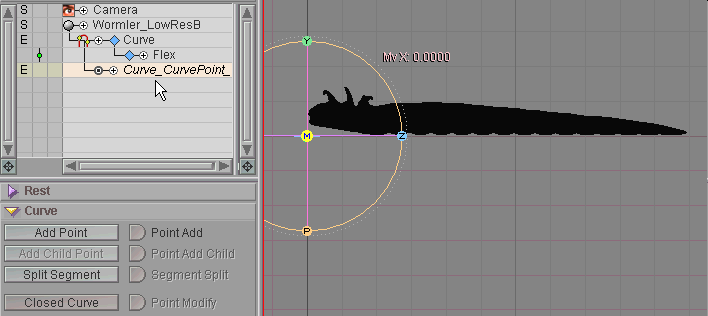
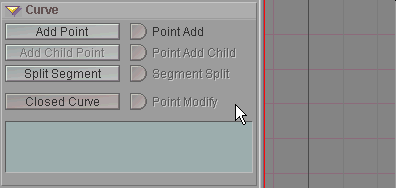
4) Now it's time to add the points that you'll actually use to animate. Select Curve in theItem List and you'll see the Curve block appear below. Click onAdd Point and you'll see that point appear in the Item List as well as on Wormler's head in the World View viewport.
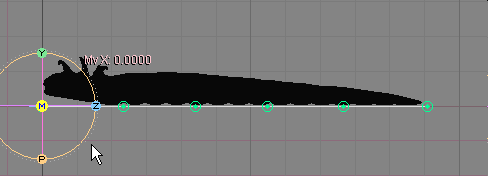
5) There are three ways to add more points now: the Add Point button, the Add Child Point button, or the Point Add (realtime point adding). We're going to use the latter, Point Add, so turn that on. Now you will create a point wherever you click in the World View viewport. But before you start adding points though, temporarily disable the Flex effect by clicking on the green bypass icon in the Item List. Now, create five more points along the length of the Wormler body. Don't worry about them being placed perfectly.
6) Clean up the placement of the points by setting all of their X and Y values to 0. This is all done on the Rest block.
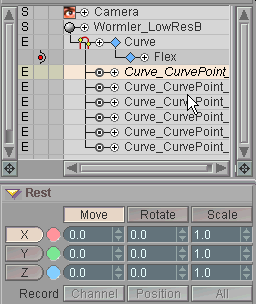
7) Just two more quick things to do: first, set the Precision to 10. That will make the calculations for the points more accurate. Next turn the Flex effect back on by clicking on the red bypass icon in the Item List. Note: This block is called Curve Options in newer versions of messiah.
That's all there is! Now just click over to the Animate tab and begin moving the points around. As you'll see, when you move the points it moves the body, just like if you had bones in there.
A completed version of this scene (EffectTypes_Flex_Beginner.fxs) is available in the Scenes\Tutorials folder.
Additional information:
There's more information about Flex here:
General Info -
Flex Curve block
Curve
Options Bend
block Point block
| Converted from CHM to HTML with chm2web Pro 2.82 (unicode) |