|
|
|---|

Though it is called Basic Shader, it is actually much more than that. The Basic Shader is an alternative to the Matte shader, which is messiah's default shader (you might know it as Basic Properties). This shader is intended for use when using translucency and sub-surface scattering, because it has several settings which are designed for calculating light depth.
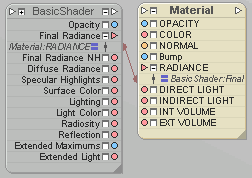
Important: The Basic Shader should be hooked up to the material by connecting its Final Radiance output to the RADIANCE input on the material. This is necessary in order for it to override the material's shader (i.e. Basic Properties). See image above right. Ideally you would want to use it with the Custom Shading material type (see Materials Tray). Note: The Bump setting and input on the material (Basic Properties) will still be used.
Color Picker: Use this to give the material a color. For information about the Color Picker, click here. Note: Color from the Basic Properties block only gets used, if you use Extnd color or Extnd shade (see Light Function, below). In those modes it blends from the color you've chosen here to the color on the Basic Properties block based on the depth you've chosen for the light extension into the surface.
Diffuse: Setting for the diffuse level of the material. This is how much light it will scatter. The lower the number, the darker the material will appear.
Specularity: Setting for the intensity of the specular (shiny) highlights. The higher the number, the more intense the highlight will be. Keep in mind, however, that specularity is a cheat: in real life there's no such thing. When you look at a shiny ball in real life and you see a shiny spot, you're actually seeing a reflection of the light in the room. So true specularity is a matter of reflection. But true reflections are more render-intensive, so the "specularity" cheat is a good compromise.
Glossiness: This sets how "tight" or "spread out" the specular highlights will be. The higher the number, the "shinier" the material will look. Naturally, this works in conjunction with the Specularity setting.
Reflection: Setting for how much of its surroundings the material will reflect.
Reflection Tint: Set an amount that the reflections on this surface should be tinted. 0.0 is no tint, and 1.0 is full tinting. The tint is the color of the material, as chosen above.
Highlight Tint: Set an amount that the highlights on this surface should be tinted. 0.0 is no tint, and 1.0 is full tinting. The tint is the color of the material, as chosen above. This is extremely important for doing colored metals, such as gold. With colored metals you don't want the specular to be white, you want it to be tinted to the color of the surface.
Radiosity Angle: Radiosity Angle is a combination out of two events. It changes the general direction of from where the radiosity gets gathered (which ordinarily is exactly along the normals of the surface) to the reflection angle between viewing ray (the camera) and surface.
The second event is the cone angle in which it gathers samples from the rest of the scene. The more you tweak this setting towards reflection angle, the more it gets sharper, less diffuse so to say.
Radiosity Tint: Uses the color setting (chosen above) to tint the radiosity as it is applied to the surface.
Light Function (pulldown): Use this pulldown list to determine how the lights will react when they hit a surface. Note About The Term Extended: Normally, light reaches a surface and that's that. Using the Extended settings, lights can reach into the surface, allowing for some amazing translucency effects.
Linear- This uses the normal light calculation. In other words, it turns translucency off.
Linear pow - Just like the Linear setting, but with the diffuse calculating exponentially. So instead of going linearly from 1.0 (lit) to 0.0 (shadow), it takes the result and squares it. It yields some interesting blending behavior if several lights come together on a surface. This option offers an interesting artistic choice, it's not meant to be real-world real. ("Pow" is short for "power.")
Extended - Simply transfers the light through the surface.
Extended pow - Exponential falloff for the Amount (like Linear pow). ("Pow" is short for "power.")
Extnd color - Transfers the light multiplied by the texture color of where it entered the geometry before reaching the currently shaded point. This actually reads the color of your material node (Basic Properties), so it can be different from the color chosen in the Basic Shader without needing to add any other node. You can always plug the same texture you hooked into the Basic Shader into the Color input of the material node.
Etnd shade - This not only reads the texture of where the light entered the geometry but also the full shading. It blends from the color you've chosen here on this block to the color on the Basic Properties block based on the depth you've chosen for the light extension into the surface.
Xtension Amount: This allows the light to be overcranked.
Xtension Depth: If you simply overcranked the diffuse lighting, you would get very dull effects, that wouldn't look right. So Xtension Depth is supposed to simulate the effect of light that would go through the surface to illuminate it in sections where the direct light can not go to under normal circumstances. Amount was telling us how far it extends on the curvature of the geometry, but Depth now gives us the opportunity to define how deep the light can go into the surface.
If it is set to 0.1 for instance, it will still be visible in polygons facing away from the light but gradually dim down for 0.1 meters away from the point where the light had entered the geometry to reach the point that is currently rendered. It is "volumetric" and does not scatter, hence it can be thought of as "volumetric translucency".
Based on the value you've set for it, it also has a separate output on the shader node that you can feed into a gradient to do color changes to the different depths you get on the surface towards the light. With this you can adjust sub-dermal color changes and such. This is extremely useful for creating natural looking skin, especially light colored skin, where you can see through the skin more. There are two different outputs for it on the node: Extended Light which gives you the actual light colors & intensities multiplied by that depth (so you can use this unaffected by the surface), and Extended Maximums, which makes it a lot easier to get understandable and consistent values for a gradient.
Xtension Strength: At times it is useful to have the Xtension strength independent from the diffuse levels. So if you want pure translucency, you can turn diffuse down to 0 and Xtension Strength up to 1.0. You can play around with in-betweens of course, but in texturing it is wonderfully useful to work with both independently.
Xtension Fresnel: This is there to simulate the thickness of a surface. As the light goes through glancing angles it will get absorbed more than if it was hitting normals that face the light (thinner membranes). It helps to create the impression of things like hollow plastic surfaces or leaves, etc.
Xtension Inset: Instead of an offset, this is basically offsets the currently shaded point into the geometry for reading the depth that the light had to travel through the surface. With this setting you can simulate complex looking translucency that may provide you with quite some realistic translucency material looks, such as skin, Jell-O, etc.
Shift Original Normal: This is the translucency inset. It offsets the position backwards along the surface normal to read the depth of how deep the light had to travel. A bump map/displacement usually changes the normals of a surface, but with this button you can force it to ignore the bump/displacement.