|
|
|---|

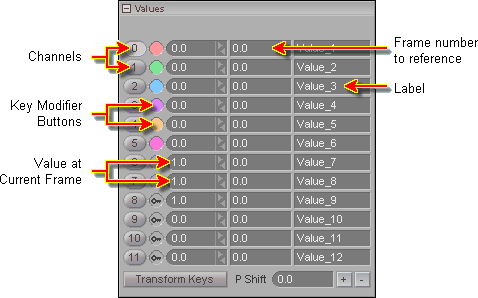
This block appears when you have ValueSlider selected in the Item List. It is used with the MotionBlender effect. You set your rest value (left numeric field), the frame that you want the channel to reference (middle field), and the label you want to name that channel.
For example, it you have a character pose (such as the mouth open) set up on frame -2 and you want slider channel 0 to put the character into that position, you would enter -2 in the middle field. And you could label this channel Mouth_Open.
If you want the channel to default to the mouth being open, in other words so when you press Reset for that channel it puts the slider all the way to the right (1.0) instead of the left (0.0), you would set it to 1.0 here in the left column. So with the settings in the image above, if you go to the Animate tab and select channel 8 and press Reset Channel, it will reset to a value of 1.0, not 0. But if you reset channel 9, it will reset to 0.0, because that is what it is set to here on the Setup tab Values block.
Transform Keys: Updates the keyframes of a slider channel when you modify the rest position of it here. The keyframes will retain all of their information, but they'll be offset by the amount you enter here.
For example, if you originally had this set to 0.0 and you went to the Animate tab and did some animation, then came back to Setup and changed it to 0.5, it would update all of the keyframes you made on this channel by adding 0.5 to them. So if you had a keyframe value of 0.25 it would now be 0.75. This is extremely useful for making global changes. In fact, if you have the Motion Graph open, you will see the change happen as you adjust the value here. Also, the new value will become the new rest (default) position, so when you're on the Animate tab and you press Reset, it will reset to this new value.
When Transform Keys is off, it will not affect any animation when you make a change here, it will just use the new value as the new rest position.
P Shift (Parameter
Shift): This lets you globally change the frame reference
numbers. For example, you might have character poses on frame
-1, -2 and -3, but then for some reason you have to shift them over
by 10, so now they are -11, -12 and -13. Well, rather than
having to go in and manually change all of those numbers, you can
just type 10 into the numeric field here, then press the ![]() button. (Or you could enter -10 and press the
button. (Or you could enter -10 and press the ![]() button.)
button.)
For additional information see General Info - MotionBlender and the MotionBlender tutorial.