|
|
|---|

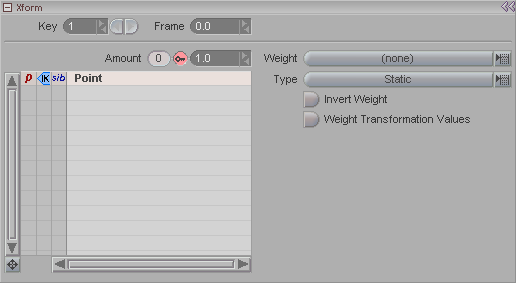
Note: This block appears when Xform is selected in the Item List.
Xform is a transformation effect that allows you to control points (on Curves) or motion. It can be used for Point animation, and various transformation effects.
Xform acts like the parent to any item it is targeted to, regardless of where it might be in the hierarchy. (Targeting is done on the Effects sub-tab in Setup.) If you just add the XForm effect to an object and transform (i.e. move, rotate, scale) its Null tool, it would be just as if that Null was a parent, no matter where it resides in the hierarchy. But the real power of Xform comes when you start using weights-- using a weight tool to tell the Xform effect how much of an object's points should be "parent transformed," that is, transformed by the parent (Xform, in this case). In other words, the weight will determine how much a target's points will "inherit" that Null transformation.
Key: Moves through the existing keyframe numbers. Enter a number in the entry field to go to a specific key or use the arrows to scroll through. Note: This is not referring to the frame number, but rather whether it's the first keyframe, second keyframe, etc. For example, the first keyframe might be on frame 0, and the second keyframe might be on frame 65.
Frame: Displays the frame number that a keyframe is on. Also, you can type a number in here to change the actual frame that a keyframe is on. For example, lets say you have keyframe #2 and it's on frame 33. Just type in 52 and now keyframe #2 will be on frame 52. It's a really fast way to accurately move a keyframe.
Amount: Sets the strength of the Xform effect. A setting of 1 will use the full amount of the Weight Tool selected in the Weight pulldown. 0 would use none.
Xform List: This list shows you what items this Xform effect is targeted to; in other words, what it will affect. Note that it refers only to the currently selected Xform instance-- you might have more than one instance of it, such as on another character. There are three columns on the left side of the list:
In the first column you can choose (by clicking) d or p. The d is for displacement, the p is for position. The p option is similar to the Axis Only option for bones; it will affect the position or rotation but not deform.
The middle column only matters when is p chosen. You can choose to have it affect the object before IK (blue arrow) or after IK (red arrow).
The last column allows you to affect a "motion" target's siblings. (Siblings are other items in the hierarchy that are at the same level in that hierarchy.) It makes it much easier to work with Curves and other collections of objects. Note: This option does not affect "displacement" targets.
Weight (pulldown): Use this list to choose what weighting system from your scene that you want to use. It will display all of the weight systems available in your scene.
Type (pulldown): The choices here are Static, Dynamic, and Combination. Static means that the Setup shape/position of the geometry and weight tool will be used to create the weight data. Dynamic means that the non-Setup data will be used (i.e. animatable data). Combination means that the Setup info and the animated info will be used.
Invert Weight: Inverts the weight field.
Weight Transformation Values: Instead of it weighting the transformation of the targets, this weights the transformation values before applying them to the targets. Without it, all transformations are linear. This is useful for getting a non-linear interpolation when performing rotations.