|
T u t o r i a l - Expressions - Sliders (Advanced) |
|---|
Skill Level: Advanced
One very powerful tool in messiah is its sliders. Most people think that a slider can or should only control one thing at a time, but this tutorial is going to show how one slider can control a whole series of events on multiple objects. You'll probably never need to do exactly what I'm showing you here-- a hatch opening up and a turret coming out-- but hopefully you will learn more about how expressions can be used, and how they are actually set up in advanced situations. And speaking of expressions, I hope you like them, because you'll be creating 21 of them here.
The idea in short:
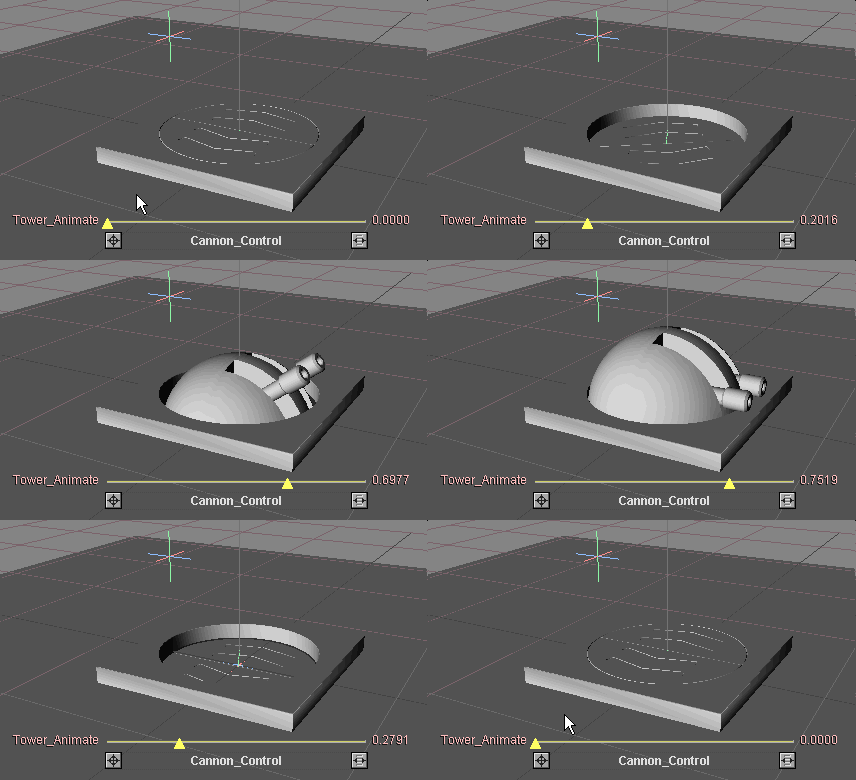
We are going to load an object and set up its environment, so that,
using expressions, one slider can control all the animation for
this cannon tower, like this:

Appetizer:
The first thing to do when approaching something like this is to
plan ahead. Draw out on paper the event sequence and
timeline. For me this ended up in a text file (see
Exp_Sliders_Advanced_Cannon.txt in the
Scenes\Tutorials
folder).
OK now that that’s done we get the end frame, which is 240. This value is the key to it all and we will need to use it only once.
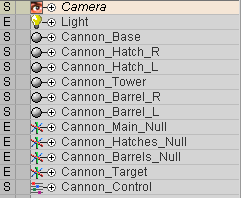
Next we will need to load the object Cannon.lwo. This object is in the messiah_content\Objects\Tutorial_General folder. Load all layers (this is a LightWave format, version 2 object). Next create four nulls and one slider. Now rename the nulls as in the image below. The nulls start with Cannon_Main_Null and end with Cannon_Target. Now rename the slider to Cannon_Control.
And now to the second part of the initial setup, the parenting. Set it up as the image shows:
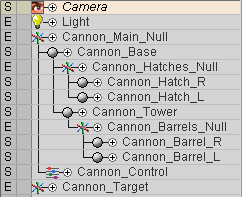
As you can see, I've added a light, just so I can see what I'm doing. Now there is only one thing left before we can start with the good stuff. As I said previously, we are going to control this whole sequence with one slider channel. This means that we currently have a lot of slider channels that will not be used, so lets hide them.
Go to the Animate tab and select the slider (Cannon_Control) in the Items List. Under the Values block you can now right-click on the colored buttons for all except xpos. When you are done with that middle-click on all except xpos to set them all to Static.
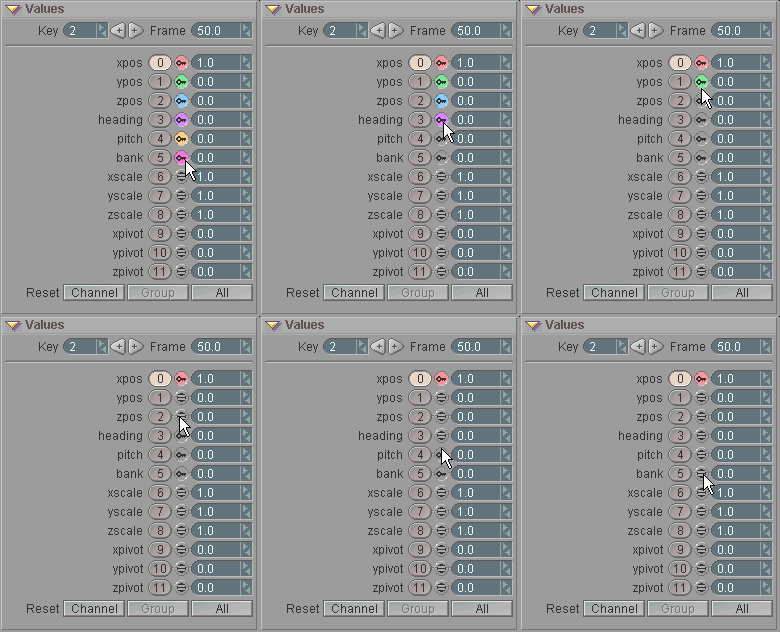
Now only xpos should be visible in the World View, and it should be the only one that’s set to Dynamic keyframes. Now let's change the name of the slider so it's more descriptive. Go to the Setup tab and select Cannon_Control in the Item List. In the Values block change xpos to Tower_Animate.

Now the slider makes sense (to me at least, and who cares about you— I’m the most important person in the world).
And last but not least, while still in Setup, we need to place Cannon_Barrels_Null at X = 0, Y =1.5 and Z = 0.5. That will place the barrels correctly as well, because they are parented to it. Now to the fun part.
Main Course:
| Hatches |
1. Go to the Command tab and press F3 to expand the view. Make sure all three blocks are open (Variables, Channels, and Expression).
2. Now click the New Variable button. Name this expression Control_Cannon_Tower and in the Exp field type Title. "Title" is something that messiah won't recognize, so it will cause an error for this expression. But that’s exactly what we want, because it will cause the name to be highlighted in red. It won't affect the running of anything, it will just make a nice heading for this section of the Expressions List, and if you ever forget what the expression is there for, you just have to read it to find out. (See the Expressions page in General Info for information about the error colors and what they mean.)


3. Press New Variable again and name it Cannon_Slider. This will be the controller that sets the time frame for the slider to cover (frame 0 to 240). Now you need to put the slider channel into the expression field. There are two ways to do this: manually type it in, or select the slider channel (Tower_Animate) in the World View and right-click on the button to the right of the Buffer field. The latter is the easiest way. However, lets look at this a little closer. When you use the "select the slider channel and right-click on the button" method, it will put this into the expression: [Cannon_Control:xpos] But that is only one of three ways of naming the channel in the expression. Here are the other each of the ways:
The first is simply: [Cannon_Control:xpos] Because it is the "xpos" channel of the Cannon_Slider, even though we've renamed that channel to "Tower_Animate".
The second is: [Cannon_Control:chan[0]] Because X position is channel # 0 (zero, or zed). (And Y is 1, Z is 2, etc.)
The third way is: [Cannon_Control:chan[Tower_Animate]] Because that's what we've named that channel (Tower_Animate). I'm using this way in this tutorial because even though it's longer, it makes it easier to read the final expression and know what's going on.

Now we have the the correct expression in the expression field. However, if we move the slider now the value will only move between 0 and 1. But as you remember we want it to go between 0 and 240 (240 being the last frame of our sequence). So just add *240 to the end of the expression in the Exp field, so looks like this: [Cannon_Control:chan[Tower_Animate]]*240.

You can check that this works by activating the Debug feature which is at the bottom left of the Expressions List. It's called Dbg. With that activated move the slider and you can see that the value in the Expressions List changes from 0 to 240 (even though the readout on the slider still says 0 to 1).

After you have verified it, turn off the Debug feature. It’s OK to leave it on, but it’s better to get into the habit of turning it off when you’re not actually using it, because it uses up CPU cycles.
4. Now it’s time for a more advanced expression. This one will use the Clamp function. The Clamp function limits something so it only goes between two values that you set. Create a New Variable, and name it Lower_Hatch_Null. This will be the expression that lowers the hatches as they rotate. On the Expression block, select Clamp from the Functions pulldown list (or use the pop-up list).
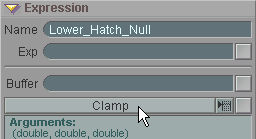
When you select Clamp you will be presented with three fields at the bottom of the Expression block:
The first field is where you enter what you want to clamp. In this case, we want to clamp the results of the expression we just made in step 3, so we enter: Cannon_Slider (the name of that expression) here.
The second field is the minimum clamp value (the lowest number it will allow), so set that to 0.
The third field is the maximum clamp value (the highest number it will allow), so set that to 60.
Now right-click the gray button on the right of the Functions pulldown list and you’ll see the expression appear in the Expressions List.
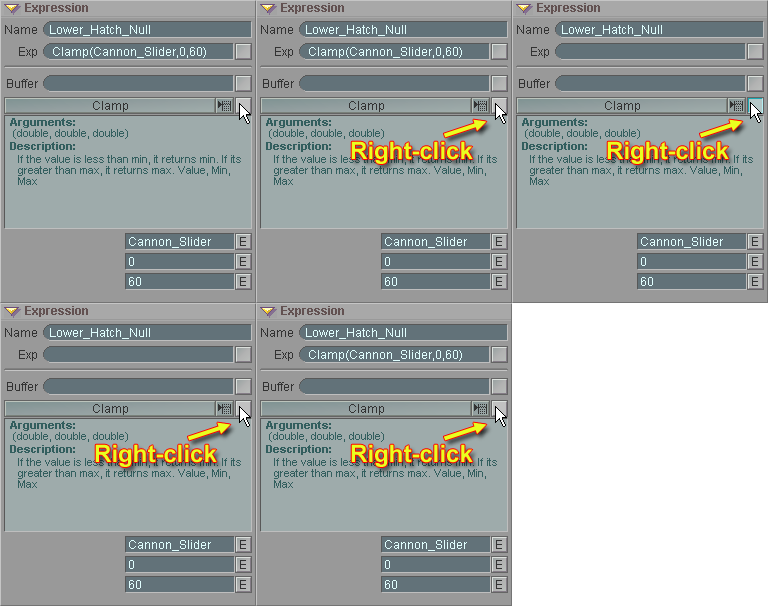
So it will force the value to a minimum of 0 and a maximum of 60 no matter what value the Tower_Animate slider actually gives. Our hatch will lower itself when the slider moves, but it will finish by frame 60. (If you keyframe the slider to move faster than 0 to 1 in 240 frames, like for example, 0 to 1 in 120 frames, it will move the hatches appropriately faster, in this case, having them moved down by frame 30; half of 60 since the overall frames, 120 instead of 240, is half.)
5. So far so good. But a value between 0 and 60 is somewhat difficult to calculate with so we are going to change that to a value between 0 and 1. We do this because that simplifies it when we want to rotate or move something, since we can then multiply with the max value we want. For example, later on, we might want to reference this expression but give it a range of 0 to 40. So all we'll have to do then is multiply the result by 40, because 1*40=40. If our starting value was 60, it would make it much more difficult to calculate.
So now we divide the Clamp function with the difference between 0 (the lowest value we've set for this Function) and 60 (the highest value we've set for this Function). To do this, just add/60 (which is "divided by 60") to the end of the expression in the Exp field and press Enter. This gives us Clamp(Cannon_Slider,0,60)/60, so now the Debug value should give you a value of 0 when the slider is all the way to the left and 1 when it is all the way to the right.
But we aren't quite done here yet. We want to lower Cannon_Hatches_Null from Y 0 to Y –900mm. So to do that, we multiply the current expression by –0.9, which gives us a final expression: Clamp(Cannon_Slider,0,60)/60*-0.9 (make sure you don't forget the - before the 0.9) However, even though the debug value is correct nothing happens to the object. Don’t worry. (But you should see that the readout is clamped at 0.9000 even when you move the slider all the way to 1.)

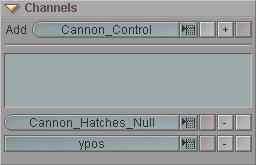
6. Now assign the correct channel to the expression by going to the Channels block and using the Add pulldown. Select the object we want to control, Cannon_Hatches_Null, and press the ‘+’ button. You'll see them appear in the pulldown at the bottom of the block. And on the pulldown below that, where it now says xpos, change it to ypos. Now when you move the slider the hatches should go up and down over the course of the first 25% of the slider's movement (you may need to set the objects' Draw Mode to Edges in order to see).
7. Now lets rotate the hatches as they lower. We'll rotate their heading by 180° (or 82.222°C for you folks across the ocean). Start by copying the previous expression and renaming it to RotateHatchNull. Then in the Exp field change the–0.9 part to (DTOR*180) including the parentheses. The DTOR function transform a Degree value to Radians. We need to do this because most of us think in degrees and not in radians but messiah calculates rotations internally with radians. So (DTOR*180) changes the 180° to 3.141593 which is the same in radians (and strangely enough is the same as PI ). This expression should now look like this: Clamp(Cannon_Slider,0,60)/60*(DTOR*180) Now all you need to do is select the ypos channel in the Expressions List (it's the last thing on the list right now) and change it to heading on the Channels block using the channel pulldown at the bottom.
![]()
8. Copy RotateHatchNull and change the name to OpenRightHatch. As you can tell, we're now going to open the right-side hatch. So we need to change a few things in the expression on this copy. Since the start of this action shouldn't be frame 0, because we want the hatches to open after they rotate, change the minimum value to frame 70 and the maximum value to frame 120 like this: Clamp(Cannon_Slider,70,120)
But, we still want a value of 0 to 1 to calculate with so we'll need some fancy math. We'll subtract 70 from the results of the clamp function so it brings the lowest value to 0. But now we'll get a value range of 0 to 50 (because 70 – 120 = 50), not 1, which is what we want the maximum value to be. This is easily fixed by dividing the result by 50 like this: (Clamp(Cannon_Slider,70,120)-70)/50 Notice that I've added an extra set of parentheses, opening them before Clamp, and closing them after the -70. That's because that whole section needs to calculate first, and in math, things inside parentheses get calculated first. (Click here for more general info about how expressions execute.) So now it takes the results of the Clamp function, subtracts 70, then divides that result by 50. It now calculates correctly and gives a result of 0 to 1.
But now the door only moves 1 meter yet it needs to move 4 meters so it completely clears the tube. You guessed it, just multiply this by 4. So here's how the final expression should look: (Clamp(Cannon_Slider,70,120)-70)/50*4 Now assign it to the xpos channel of the Cannon_Hatch_R object and you're all set.
![]()
9. Time for more copying. Copy the OpenRightHatch expression and rename it OpenLeftHatch. This hatch should move the opposite way so just change 4 to–4, so it looks like this: (Clamp(Cannon_Slider,70,120)-70)/50*-4 Now change the assigned object to Cannon_Hatch_L.
![]()
| Raised Tower |
10. Now that the hatch opens and closes with the slider, lets raise the tower and put fear into those blasted space pirates (space pirates are well-known to run away in fear of low polygon gun turrets). Start off again by copying the last expression and rename it to RaiseTower. Change the expression to: (Clamp(Cannon_Slider,120,180)-120)/60 This again gives us a value between 0 and 1, but the action will happen between frames 120 and 180 (after the hatches open).
The tower is supposed to raise 6.5 meters, so we need to multiply the expression result by 6.5. As you can see, making our basic expression give us a 0 to 1 range makes it easy to adjust it to the number we want. So here's what the expression looks like now: (Clamp(Cannon_Slider,120,180)-120)/60*6.5 Now just assign the correct channel for this expression: on the Channels block, set it for Cannon_Tower and ypos. But as you can see if you move the slider, it looks a bit odd. We should perhaps also lower it by 6.5 meters so that it starts underground and then comes up. To do that, we will just remove 6.5 meters by subtracting it, like this: (Clamp(Cannon_Slider,120,180)-120)/60*6.5-6.5
![]()
| Blazing Barrels |
11. OK, the tower is up but the barrels are getting in the way.
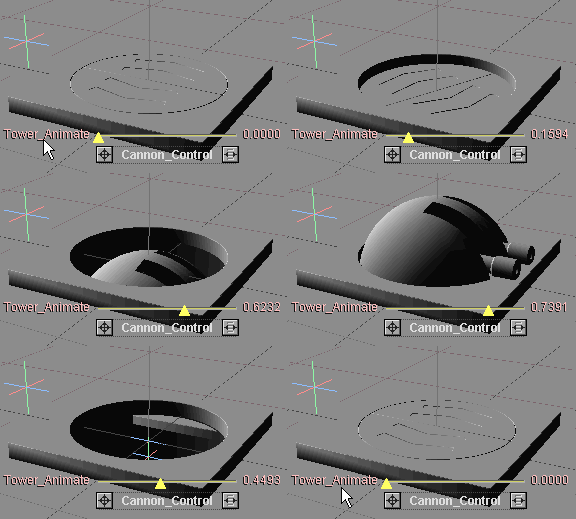
Stupid barrels. There are two things you can do to fix this. The way I prefer is to go into a modeling program and remove them from the object and forget they ever existed. Unfortunately, Mr. Bigtime Director (not his real name) wants them there. So we need to get them to point upwards at the beginning, then lower them at the end of the cycle, so they are ready to fire.
Again copy the previous expression, and this time rename it to LowerBarrels. We want this to happen between frames 150 and 180 so as you know by now, this is how that looks: (Clamp(Cannon_Slider,150,180)-150)/30 Since we want it to rotate 90° we simply add that to the expression and put in another set of parentheses, this time starting at the beginning and ending after the/30. In other words, surrounding the whole expression that you have so far. So do that, then add a new section-- one that rotates it 90°, using DTOR. Here's the expression now: ((Clamp(Cannon_Slider,150,180)-150)/30)*(DTOR*90)
Well this is all fine and dandy but it still starts out by pointing forward and now it ends pointing straight down. We need to change the start of the rotational pitch to –90° like this: ((Clamp(Cannon_Slider,150,180)-150)/30)*(DTOR*90)-(DTOR*90) Now assign Cannon_Barrels_Null as the object and pitch as the channel and we are scaring those pirates now (or scarring them if they're really tough).
![]()
12. But why just scare them when we can terminate them? Copy the last expression and change the name to TargetActivate. We want the targeting system to home in on the target null over time (in other words, after the tower raising sequence is finished) so we need to change the expression a little bit. First of all, the time section we're dealing with here is from frames 200 to 240 (the end), so we modify the expression with those numbers, like this: ((Clamp(Cannon_Slider,200,240)-200)/40). However, we're going to use the KeyFader function and this will give us a problem because for KeyFader, 1 is off and 0 is on (in this case, that is). So we need to reverse our activator. This we do by making it all negative and adding1. To do that, just put a – (minus sign) in front of it all, then add +1 to the end, like this: -((Clamp(Cannon_Slider,200,240)-200)/40)+1 There now we have reversed it so it goes from 1 to 0. Also make sure this expression is not assigned to any channel, this is merely there to activate the targeting system. To remove the channel (Cannon_Barrels_Null) just click on the – button to the right of the channel pulldown on the Channels block.
![]()
| Targeting! |
13. Create a new variable and name it Target_Tower. We're going to use the Target function, which makes one object point at another. In the function list select Target, and with the two pulldowns at the bottom select Cannon_Tower in the first and Cannon_Target in the second. Now right-click in the button just right to the Functions pulldown (where Target is selected). The expression should look like this: Target(Cannon_Tower,Cannon_Target) Voila! Your tower now looks completely screwed up. Congratulations! So now we need to set some restrictions for which axis should target the Cannon_Target and which should not.
![]()
14. Create a new variable and call it Control_Tower_Heading. In the Functions pulldown, select KeyFader. In the first pulldown select the object to be affected which is Cannon_Tower, in the next two fields just type 0. Then in the next pulldown, select the channel to be affected which is heading. Last is the fade value. This is the what we created the TargetActivate expression for in step 12, so that is what you type in that field. Now right-click that button to the right of the Functions pulldown to activate the expression. This is how it should look like now: KeyFader(Cannon_Tower,0,0,heading,TargetActivate)
![]()
15. Since we don’t want the pitch to move for the tower, we need to lock it. Do that by copying the previous expression, then changing the heading to pitch and TargetActivate to 1 just like this: KeyFader(Cannon_Tower,0,0,pitch,1) Oh and rename this expression to Control_Tower_Pitch_LOCKED.
![]()
16. Copy that last expression and change pitch to bank, then rename it to Control_Tower_Bank_LOCKED.
![]()
| Organizing |
17. We are now ready to organize all our expressions before we go further. So parent your expressions to match this image. Remember you can use multi-select to parent more than one at a time.
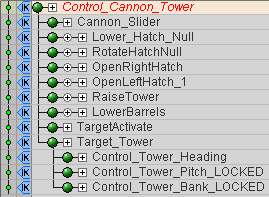
18. This simplifies our last steps. Now select the Target_Tower expression and copy it. As you noticed a requester pops up asking you if you want to copy this expressions descendants. Wow, that is just perfect, so go ahead and say Yes to that. There now we got a bunch of new expressions all with the wrong names. So rename them according to this list:
Target_Tower_1 should be Target_Barrel_R
Control_Tower_heading_1 should be Control_Barrel_Heading_LOCKED_R
Control_Tower_pitch_LOCKED_1 should be Control_Barrel_Pitch_R
Control_Tower_bank_LOCKED_1 should be Control_Barrel_Bank_LOCKED_R
Now all the names are correct but we still need to fix the new expressions we have. So change the expressions to match this list:
Target_Barrel_R
Target(Cannon_Barrel_R,Cannon_Target)
Control_Barrel_Heading_LOCKED_R
KeyFader(Cannon_Barrel_R,0,0,heading,1)
Control_Barrel_Pitch_R
KeyFader(Cannon_Barrel_R,0,0,pitch,TargetActivate)
Control_Barrel_Bank_LOCKED_R
KeyFader(Cannon_Barrel_R,0,0,bank,1)
19. Select Target_Barrel_R and copy it and all its descendants. Now remove the R_1 from the ends of the names and change them to L (such as Target_Barrel_L). And in the expressions for each of them, change eachR to an L.
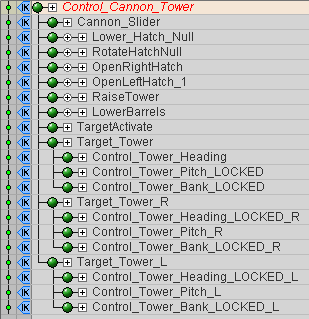
The final Expressions List
20. Now you're almost set. All that is left is to place the Cannon_Target null where you want the cannons to aim after they finish lowering. And don’t forget to animate the slider!
| Dessert |
So what you've done here is not only create an animation completely out of expressions (well, except for moving the slider), but you have targeted the turret and barrels so the expressions automatically update to follow the target null. Try it. Move the Cannon_Target null to a different place and then move the slider to activate the cannon. You'll see that it will open up and the turret will come out and aim the barrels at the null.
There's a completed version of this scene in the messiah_content\Scenes\Tutorials folder, so you can take a look at it if you have problems or further questions. The scene file is called Exp_Sliders_Advanced.fxs.
I hope this was as much fun to read as it was to write. Actually, I hope it was a lot more fun to read.
| Converted from CHM to HTML with chm2web Pro 2.82 (unicode) |