|
|
|---|
This block is where you set your output files and paths.
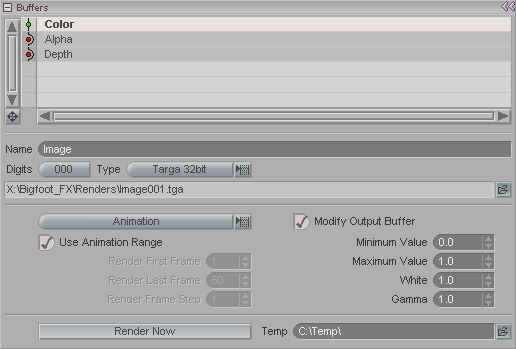
Buffer List: Select one of the image rendering buffers, such as Color or Alpha. When one is highlighted you can set the other parameters on this block for it. Each buffer type has its own settings below. Also, each buffer type has a render/bypsass toggle so you can turn rendering on and off per buffer. Note: The Alpha channel is included in the Color render too. The special buffer here is for if you only want the Alpha channel.
Name (field): Use this field to give a name to the images that will be rendered. It is a good idea to include a . after the name if you are rendering an animation. That way you will get file names like Creature.001.tga instead of Creature001.tga. It makes it easier to read.
Digits: Choose how many digits should be inserted to the filename. For example, if your image is called Bob. and you have the digits set to 000, the files will be named like: Bob.0001.tga, Bob.0002.tga, etc.
Type: Choose the file type that you would like the rendered images to be saved as.
Render Type (pulldown): Choose between rendering the current frame or an animation (series of frames).
Use Animation Range: When this is on it will render from the In point to the Out point. When it is off you can set the render range using the settings below:
Render First Frame: Choose the starting point to render from.
Render Last Frame: Choose the end of the render.
Render Frame Step: Choose whether to render every frame (1) or another frame step, such as 3, which will render every third frame.
Modify Output Buffer: Turn this on if you want to, well, if you want to modify the currently selected output buffer. When you activate this button, the options below are made available.
Minimum Value and Maximum Value: These are used to clamp the value of a buffer to specific settings. For example, you might not want the white to be completely white, or the black to be completely black in an Alpha channel. I don't know why you'd want to do that, but I'm not going to argue. I'm sure you have your reasons.
White: Adjusts what is considered to be the maximum white value. You're telling it what white means, based on the intensities in your image. The renderer is floating point, so pure white is a value much higher than 255, 255, 255. You can easily have something that's 450, 450, 450. So if the white value were to be simply clipped at 255, anything over it would be pure white. But there might be times when want more room in the white area, so a 255 surface and a 390 surface will not look exactly the same. Or even times when you want to lower the point at where something is considered pure white. Normally you can just leave this setting at 1.0, but you can play with it and see what it does to your image if you raise or lower it. It's especially helpful with Alpha and Depth channels.
Gamma: A setting of 1.0 is linear, meaning that whatever value comes in as a color stays the same as it goes out. The lower the number, the darker the final image.
Render Now: Press this to begin the render. I'm really hoping that you didn't need me to explain that.
Temp: Set your render temp directory here. The temp directory is where chunk files are stored (see Management block). Also, if you have Save Preview Image turned on this is where it will render to.