|
|
|---|
See Map Type (below) for additional
buttons/options.
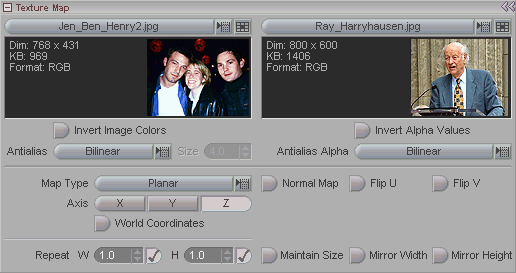
This is where you load your texture map images and set the mapping type. Note: This block works in tandem with the Transform and Spline blocks.
Image (pulldown): Load your images here and choose which image you want to use. The one on the left is for the actual image, and the one on the right is for a separate alpha image, if you want one. The pulldowns have several functions:
Load Images - Load single or multi-selected images. Note: For image sequences you only need to load the first one. To set it as a sequence, you must go to the Image Manager on the Play tab.
Reload Image - Reloads the currently selected image. This is useful if you have made a change in the image.
Auto Reload Images - When this is on, it will automatically reload an image that is modified outside of messiah (like in Photoshop). It is extremely useful for keeping your scene up-to-date.
Delete Image - Deletes the currently selected image from your scene.
Delete All Images - Deletes all images from your scene.
Below those options is a list of images in your scene. To select one, just scroll down and click on it.
Image Tray: All the way to the right of the Image pulldown is a checkerboard button to access the Image Tray. The Image Tray is a pop-up that displays the images in your scene. To select an image, just double-click on it.
;)
Invert Image Colors/Invert Alpha Values: Uses the negative of the image. This is often used when working with alphas, especially if the color image (the image on the left) is being used as the alpha (the image on the right).
Antialias Image/Alpha: Chose which type of antialiasing method you want to use (or choose none). Spot Scale is a new antialias type that usually provides the best results (though at a very slight hit in rendering time). When you choose Spot Scale the sample Size field will un-ghost. Usually a setting of 2-4 will suffice.
Map Type: Use this pulldown list to choose which type of mapping you want the image to be applied with. The choices are:
-
Planar - This is used for two-dimensional objects, like the ground.
-
Cylindrical - This is used for cylinders and tubes. The image is mapped around a specific axis.
-
Spherical - This projects the image in a spherical format.
-
Cubic - This projects the image onto four sides.
-
Cubic (XSI) - Similar to regular Cubic but does it in the way that users of SoftImage XSI would be used to.
-
Cubic (RIB) - Similar to regular Cubic but does it in the way that users of Pixar's Renderman would be used to.
-
Front Projection - Projects the image from the camera. Note: If you are using the Texture Map for a background image (on the Background material) you should use Front Projection. And, of course, make sure the Background surface is turned on in the Surfaces list.
-
UV - Uses U/V coordinates to map the image.
-
HDR Image Light - Uses the intensity values in the image to cast light. You would use this to take an HDR sky image and have it illuminate your scene (apply the HDR image to the Environment material).
-
Tool - This lets you use Procedurals and Curve objects for mapping. When using Procedural objects, there are new mapping types available (see Tool pulldown in image below). Curve is very useful for mapping tube-like objects and should reduce the need for uv mapping. It's also very useful for certain special effects. The tools are useful also for a visual reference for mapping, and they can be animated easily
![]()
Tool (pulldown): Choose which of the tools you want to use as the map type. (This option only appears when the Map Type is Tool.)
Ignore Image: When this is on, it will not use the image's weight in the calculation of the tool's field. For example, if you use Procedural you can also set an image on that tool to be used in the calculation of the weight. But you may not want to use the image weight when using that Procedural for Texture Map mapping. Note: The Tool's field is still used in the calculation of the Texture Map opacity/alpha.
Auto Select: This will make it so the Tool (Sphere, Curve, etc.) will automatically be selected (in the World View) every time this Texture Map node is selected. This makes it like having a texture manipulator.
Auto Hide: When this is on it will set the tool's Draw Mode to None when the Texture Map node is not selected.
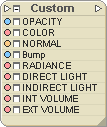
Normal Map: This option will compute the color values as normals. In other words, the color values in the image are used to indicate the direction that the normal faces relative to the actual face of the polygon it is being mapped to. It is especially useful for using Normal maps from ZBrush. Important: This is for use with the NORMAL input on the Material. Since the default material does not have a NORMAL input, you must create a new Full Shading or Custom Shading material (Surfaces or Materials sub-tab), then apply that material to your surface (Surface sub-tab). You will see the NORMAL input below the COLOR input on the node (see image below).
Notes:
1) When using Normal maps,
if you've rotated or animated your objects via effects (e.g.
BoneDeform, Bulge, etc.), the normals will not be correct.
This is because the Normal map
values are replacing the true surface
normal that's calculated based on the state of the geometry.
You should use displacement/bump mapping, instead.
2) You can change the opacity of the Texture Map (or other shader that's providing NORMAL data) if you want. That output will be blended with the current surface normal (which may have already been modified by Bump). This also means that you can layer Normal maps, but you really need to know what you're doing to use it effectively. :-)
Flip U, Flip V: Some applications that output uv maps may actually have the uv's flipped on v (e.g. Zbrush). Use Flip V to combat this problem and eliminate the need to flip in an image editing program. We've thrown in Flip U for good measure. Note: These options are also compatible with the other mapping methods. U flips on one axis, and V flips on the other.
Axis: Choose which axis you want the image to be mapped on. For example, the top of a table would be mapped on the Y axis. Think of it like a movie projector-- which axis should the projector be aimed down to hit the surface correctly?
World Coordinates: Locks the texture map in space, so if the object is moving the texture will just stay there. It's like walking in front of a movie projector. You see the image on yourself but it doesn't move with you.
Repeat W and H: Set the image to tile vertically or horizontally. Or not. You can set the width and height repeat separately. Set the number of repeats you want, or set it to 0 to repeat endlessly. Of course, first you have to individually turn Repeat on, which you do with the little buttons to the right of their respective numeric fields. (See image at top of page; both repeats are on.)
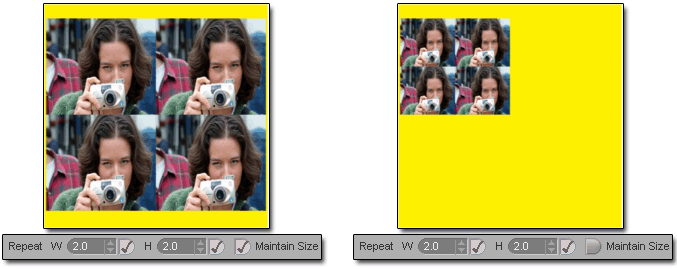
Maintain Size: Let's say you set the Texture Map size to 1, 1, 1 and you turn both Repeats on. Do you want a 1,1,1-sized image to repeat, or do you want the image to be repeated (based on the Repeat numbers) within a 1,1,1 area? The images below show how this setting works. As you can see, in the one on the left, the Texture Map is set to a certain size and the image tiled at that size. In the one on the right, the image is scaled to fit into the Texture Map size. Note: The size is set on the Transform block.
Mirror Width: Turn this on to make the images mirror left/right when they repeat.
Mirror Height: Turn this on to make the images mirror top/bottom when they repeat.
Notes:
1) The available image formats are:
bmp, alias, cineon,
OpenEXR, jpg, pcx,
pict, png, psd,
rla, sgi, sun,
targa, tiff, vpb, and
yuv. Each format uses its native bit depth
format (8 bit, 16bit, floating point, etc.), messiah does not need
to downsample.
2) messiah is fully compatible with 16bit image formats, such as those exported from ZBrush (see next note).
3) ZBrush users - To get optimum rendering results in messiah: Within ZBrush increase the apparent smoothness by increasing the Displacement map subpixel accuracy. The default is 0 and the highest is 4. By increasing the Subd level of the model within ZBrush to Level 5 using a Displacement map subpixel level of 4, a very smooth rendering can be obtained in messiah.