|
|
|---|
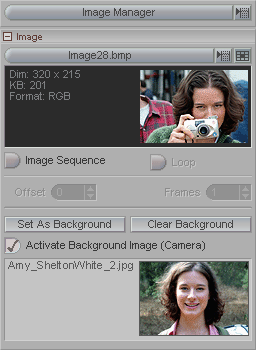
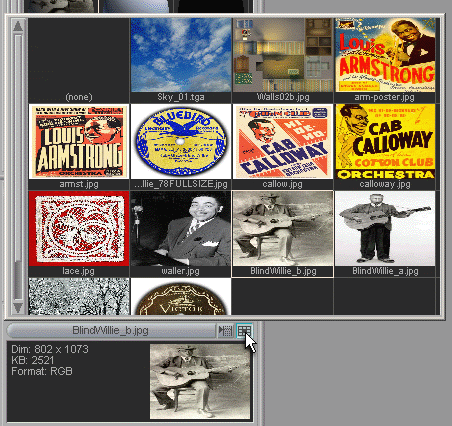
Image Manager lets you load images for use as a background or for materials (with messiah:studio).
Image (pulldown): This pulldown has several functions:
Load Images - Load single or multi-selected images. Note: For image sequences you only need to load the first one.
Reload Image - Reloads the currently selected image. This is useful if you have made a change in the image.
Auto Reload Images - When this is on, it will automatically reload an image that is modified outside of messiah (like in Photoshop). It is extremely useful for keeping your scene up-to-date.
Delete Image - Deletes the currently selected image from your scene.
Delete All Images - Deletes all images from your scene.
Below those options is a list of images in your scene. To select one, just scroll down and click on it.
Image Tray: All the way to the right of the Image pulldown is a checkerboard button to access the Image Tray (see image above, right). The Image Tray is a pop-up that displays the images in your scene. To select an image, just double-click on it.
Image Sequence: Turn this on if the image you are loading is part of a sequence and you want to use that sequence instead of only the image you loaded.
Loop: Turn this on if you want the image sequence to loop. Note: In Rev8b this is not active.
Offset: Set the start frame for the sequence. For example, if your image sequence starts with Helen.001.jpg, that frame will go into frame 1 of your animation. But there are times when you might want to push the sequence. If you set this to 5, then image 5 will appear at frame 0. Keep in mind that if you don't have an image number 0, your background at frame 0 will be black. You can, if you want, offset the sequence by 1 to make image 1 appear on frame 0.
Frames: Set how many frames the image sequence is. You can use this to make it so only a portion of the frames are used, such as frames 1-76.
Set As Background: Uses the currently selected image as the background image for the scene. (messiah:studio users, see note #4 below.)
Clear Background: Press this button to remove the background image.
Activate Background Image (Camera): Turn this on to enable the image to be seen in the World View when the view is set to Camera.
Notes:
1) The available image formats are: bmp, alias, cineon, OpenEXR, jpg, pcx, pict, png, psd, rla,
sgi, sun,
targa, tiff, vpb, and
yuv. Each format uses its native
bit depth format (8 bit, 16bit, floating point, etc.),
messiah
does not need to downsample.
2) messiah is fully compatible with 16bit image formats, such as those exported from ZBrush (see next note).
3) ZBrush users - To get optimum rendering results in messiah: Within ZBrush increase the apparent smoothness by increasing the Displacement map subpixel accuracy. The default is 0 and the highest is 4. By increasing the Subd level of the model within ZBrush to Level 5 using a Displacement map subpixel level of 4, a very smooth rendering can be obtained in messiah.
4) For users of messiah:studio only: Setting an image to be the background image here will not make it render as the background-- this background image is just for visual aid in animating. To render a background image, go to the Materials sub-tab on the Render tab. Choose the Background material and apply an image to it by adding a Texture Map. Set the Map Type to Front Projection. And make sure the surface is enabled on the Object block on the Surfaces sub-tab.