Loading & Using A Scene
To put it at its simplest, there are two ways to go about using messiah: 1) Load a scene and start animating it, or 2) Start with a blank scene and go forth from there. As the title bar above suggests, this page will show you how to load a scene and begin animating. Along the way, you'll see what many of the buttons and features do.
|
Part 1: Loading The Scene |
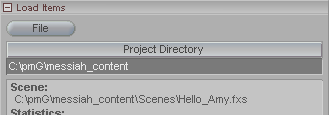
Start messiah. (I told you this would be easy.) Now set your Project Directory to wherever you have the messiah_content folder. In the example below, that folder is in C:\pmG. Click on the Project Directory button and use the file requestor to navigate to where your messiah_content folder. (For more about Project Directory, click here.)
Now that messiah knows where to find things, let's load a scene. Click on the File pulldown on the upper left of the interface or right-click on the File tab.
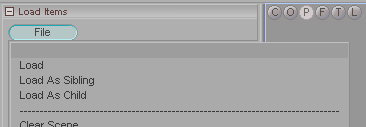
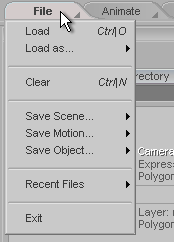
This is where all loading and saving for scenes is done. It's also where you load and save objects. You'll notice, however, that there aren't separate buttons for loading different kinds of things. That's because it's an intelligent loader and it'll load any acceptable format without you having to tell it what that format is. Choose Load.
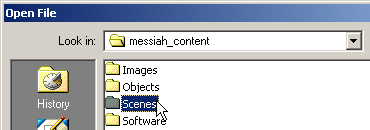
Open Scenes
(double-click).
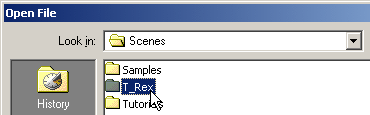
Open T_Rex
(double-click).
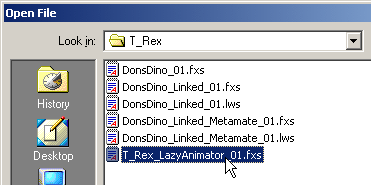
Select T_Rex_LazyAnimator_01.fxs.
Once that's selected, click on Open (or just
double-click on the file name). You'll see the Scene
Status window open and show the scene loading.
|
Part 2: Animating |
Welcome to Part 2, animating. Guess what you'll be doing here? OK, start by clicking over to the Animate tab at the top of the interface. This tab is where you'll spend most of your time when animating. The two important blocks here are Motion, and Spline. The Motion block displays the keyframe settings and lets you input data directly if you want. The Spline block lets you adjust the motion spline that you'll see in the Motion Graph and World View.
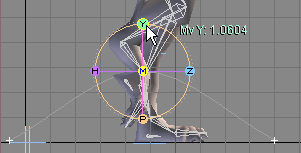
Items can be selected in the World View by middle-clicking on them. In a moment, you'll select the T-Rex's right foot (the rear one) by middle-clicking on the IK goal at the bottom of his foot. It's the back green line. But first a word about what an "IK goal" is.
IK - With your right hand, grab your left hand and lift it up. You'll see that your whole left arm moves with it, following the hand it is attached to. To raise your hand and arm into the air, you just drag the hand.
FK - With your right hand, grab your left forearm and rotate it at the elbow, then grab your left upper arm and move it. In other words, with FK you move each part of the body into position. To raise your hand and arm into the air you have to position the upper and lower arms individually.
So, here's what it looks like on our T-Rex...
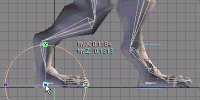
Now it's your turn. Set your view to L (if it's not already). The view selector is on the top left of the World View. Now middle-click on the base of the foot, like in the image above. Now move the foot around to try it out, then put it back to roughly where it was. I'll wait.
Good. Now, let's do a little walking. We're going to be animating at film speed, 24 FPS (frames per second), so make sure that the FPS setting at the bottom right of the interface is set for 24.
Check the Key Edit indicator on the bottom right of the World View, that's the third button from the right. It should be set to A ("All"). If it doesn't, click on it and select All Channels, or press the "g" button on your keyboard a few times until it does. What this setting will do is create a keyframe on all of the channels for that item when you make a key. It doesn't have to be set to All, but for what we're doing right now it makes things easier.
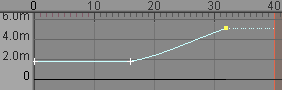
Now move the yellow Current Frame marker to frame 16. Select the Z channel on the Edit Sphere you were just playing with and move the foot forward until it's in front of the left foot (like it's taken a step forward).
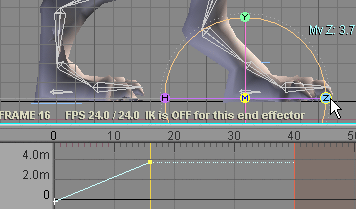
Right foot forward on frame 16.
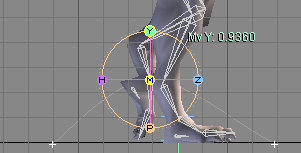
Select the IK goal for the left foot (you can see it in the image above as the blue line just below the foot) by middle-clicking on it. Click on Create (just below the Motion Graph, toward the left). That will create a keyframe for the left leg. Move the Current Frame marker to frame 32, then select the Z channel of the Edit Sphere. Slide that foot forward, so it's in front of the right foot, just like you did before. You should now have three keyframes for that item (0, 16, and 32).
Three keyframes for the left foot IK goal.
Play the animation to see what you've done so far. What you should see is the T-Rex sliding his feet along as he takes two steps. Now let's make it look better.
Select the right leg's IK goal again, Then move the Current Frame marker to frame 8. Select the Y channel on the Edit Sphere and lift the leg up so the foot is off the ground.
Right foot is up on Y for frame 8.
Now select the IK goal for the left foot again. Go to frame 24 and select the Y channel on the Edit Sphere. Move the foot up, just like you did for the right foot.
Left foot is up on Y for frame 24.
You should have a total of four keyframes for the left foot (0, 16, 24, 32) and three for the right (0, 8, 16). Now play the animation and you'll see the T-Rex walk. It's not perfect, but it's a start.
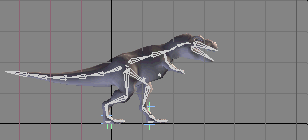
The walking T-Rex.
Congratulations! You just completed your first animation in messiah! I told you it wasn't anything to be afraid of, didn't I? Here's a recap of what you did:
1) Select the
item you want to keyframe.
2) Go to the frame you want the keyframe to be on. (Steps
1 and 2 can be done in either order.)
3) Position your character to how you want it to be at that
frame.
4) Go to the next frame you want a keyframe on and position the
character.
5) Etc.
If you want to to some experimenting, try adjusting the keyframes inside the Motion Graph. Click on a key, then move it up and down. Look at what happens in the World View. Now right-click and drag the keyframe left and right. Play the animation and see what the changes you made did. You can play it back at different speeds by changing the FPS. The higher the FPS, the faster it will play.
Now you're ready to move on and create your own scenes. (Or you can play around with the T-Rex some more if you want. Go ahead, have fun. Live a little!)
And thus ends this exciting page.
| Converted from CHM to HTML with chm2web Pro 2.82 (unicode) |