|
S l i d e r s |
|---|
Sliders are one of messiah's handiest and most versatile tools. They can be used to control virtually anything. The basic idea is that actions are tied to the individual slider channels, and these can then be keyframed.
Creating Sliders:
From the File
tab: Use the pulldown on the
Add Items block to select
Slider, then press the Add button.
From the Setup tab: On the
Items sub-tab, choose New Item, then use the pulldown on the
Add block. Select Slider then press
![]() .
.
Once created, expressions are used to do the actual
behind-the-scenes work.
Naming:
The slider (also called "slider set") name can be changed by
double-clicking on it in the Item
List. The image below shows a slider which has been
renamed to Findiggler_Control.
Individual slider channels can be renamed in Setup mode by entering a new name in the field to the right of its numeric input/display (see left side of image below). Remember not to put any spaces in names; use the _ (underscore) instead. Also, you can NOT move channel names. For example, you can NOT rename the xpos channel to be ypos. If, for some reason you want to do that you must use different names. For example you can use z_pos instead of zpos. The reason for this is that internally, messiah still uses the default channel name (zpos, xpos, bank, etc.), so those names are reserved. If you name a different channel xpos, it can cause an error. But as I said, if you want to do that, just use a different syntax, like z_pos or Z_Position. For some additional information, see "Using Slider Channels in Expressions," below.
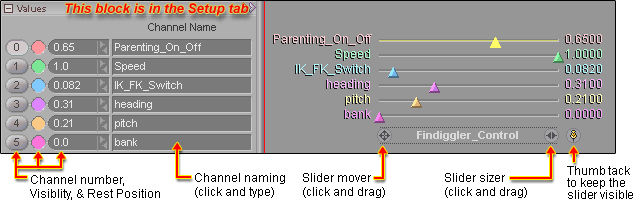
Positioning and Sizing the
Sliders:
Sliders can be moved around and resized just by clicking and
dragging on the slider control buttons for move and size (see image
above).
Keeping Sliders Visible
Onscreen:
To keep a slider visible even when it is not the currently selected
item, click on the little thumb tack icon located on the bottom
right. (See image above.) Note: If your slider is part of a Group, and you have Item List
Filtering on, and the Group that
the slider is part of is hidden, the slider will be hidden even
though it might be thumb tacked. This is not a bug, it is by
design-- manipulator drawing is only available for non-hidden
items, otherwise it gets confusing and disorganized.
Rest position:
The rest position of the slider channels is set on the Setup
tab on the Values block (see image
above). The rest position is the position that the slider
channel will go to when you press the Reset buttons on the
Values block on the Animate tab. For example,
you may have a slider set up for the character's eyes-- move the
slider left and the eyes go left, move it right and the eyes go
right. So normally you'd want it right in the middle.
If you set the rest position to be in the middle (.5), then
whenever you press the Reset button while animating, it will
go to the middle, instead of to 0.
Hiding Entire Slider Set:
Sliders work like the Edit Sphere: to hide them,
select the World View (by clicking anywhere in it) and press
Esc (Escape). Press Esc again to bring them
back. If your sliders aren't showing up, check to see if the
Edit Sphere shows up when you have an object selected.
If it doesn't, press Esc.
Hiding unneeded channels:
The individual channels can be hidden from view if you don't need
them. To do this, middle-click or right-click
on the little colored circles to the right of the channel number on
the Values block in the Animate tab.
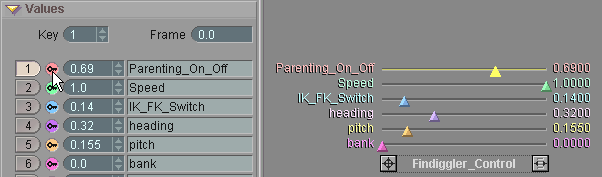
Edit Frame Option:
The Edit Frame setting on the
Key'Frame Editing block has an important
effect on the way Sliders work.
When it is off, editing the sliders
with the channel controls will adjust the current keyframe.
When it is on, it will adjust the
key if the Current Frame marker is on a
keyframe, or create a keyframe if it isn't. (Adjusting with
the slider itself will always create a keyframe if there isn't one
already.) Also, when you play the animation, Edit Frame off will show the slider channel at the
current keyframe, with a ghost marker moving along it, while
Edit Frame on
will actually move the slider channel (see images). I highly
recommend that you read the Edit Frame information on the Key/Frame Editing block.
Note: Slider channels
controlled via expressions can not have those values represented on
the slider. The values you see are always representative of
the base slider channels. The slider channel values as
represented in the expression list will always display the result
of slider channel modification.

Edit Frame off (left) and Edit Frame
on (right).
|
Sliders With Expressions |
Sliders Controlling Other
Sliders:
Sliders can be set up to control other sliders-- even to make
them operate in an additive fashion. For example, one slider
can control another one, but if you have the child slider set to
halfway, the parent slider will add to it.
For example, the three animations below show one slider being controlled by another slider. On the "slave" slider you won't actually see the slider channel move, but if you look at the Expressions List with Debug on, you'll see that the values are being affected.

The top slider is controlling the bottom one. The blend
operator is set to =, so the bottom one
matches the top one exactly.

This is the same setup as the picture above. As you can see,
having the "slave" slider set to a
value (0.2000) has no effect on the results, because the blend
operator is =, which overrides it.

Here the blend operator is set to +, which means it will add the
"control" slider's value to the value
of the "slave" slider. As you can see, the value for the
"slave" is equal to the value of the "control"
plus the value of the "slave." There are other blend
operators too, like minus, multiply, etc.
Sliders To Turn Expressions On and
Off:
There are several ways to use sliders to turn expressions on and
off. Here are the two easiest ways:
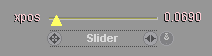
1. Use the KeyFader function.

All procedural motion (expressions) applied to the Train
object will be turned on & off when the xpos channel
of
the slider is animated. When xpos is at 0, it will
allow
procedural motions, and when it is at 1 it will not.
2. Use the slider channel in the expression's "on/off" value field. For example:
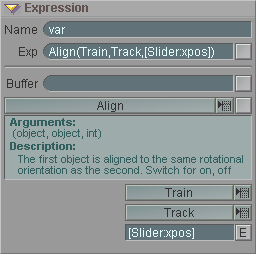
The xpos channel of the slider will turn the
Align
expression on & off. Off will be when the
slider
is at 0, and On will be when it is at 1.
Adjusting the range of a slider:
By default, sliders work from 0 (all the way to the left), to 1
(all the way to the right). If you want a slider to cover a
different range, just use the PercentStep
function. Here's what the expression would look like if you
wanted to make a slider that would move between -1.5 and 2.6
instead of 0 and 1: PercentStep([SliderName:ypos],-1.5,2.6)
What means is this: PercentStep (you can type this word or select it from the Function pulldown list), then in parentheses, put the slider name, a colon, and the specific slider channel (in brackets), then a comma, then the minimum number (the one for when the slider is all the way to the left), another comma, and the maximum number (the one for when the slider is all the way to the right). Note, however, that the slider itself will still read 0 to 1. But the actual values it passes along will be correct; you can check this by turning on Debug.
If all you want to do is change the high number, you can just use the regular slider output and add a multiplier to it. For example, if you want it to go from 0 to 100, just add *100 to the end, like this: [SliderName:ypos]*100
Using Slider Channels In
Expressions:
There are four ways to reference a specific slider channel in an
expression. Here's a breakdown of each way:
-
[SliderName:ypos] This is the default way. If you right-click on the Buffer button, this is the way it will put it in.
-
[SliderName:chan[ypos]] This is the recommended way of doing it as opposed to method #1.
-
[SliderName:chan[2]] This method references the channel index (number) rather than the name. The index numbers are displayed next to the channels. For example, xpos is 0, ypos is 1, zpos is 2, etc.
-
[SliderName:chan[MySliderChannelName]]This will reference the name you have given to a slider channel, if you have given it a name. This method is good because it makes it easy to look at the expression and know what it is doing. And it also shows why it is good to give sliders (and everything) descriptive names. For example, if you name the slider channel Eyebrows_Up you can look at the expression and instantly know what it is for.
It is important to understand one thing about naming slider channels and referencing them in expressions: Do not use the "reserved" names for channels when you name other channels. For example, do not name the bank channel to zpos because you will not get the result that you want. If you rename the bank channel to zpos and then have an expression that references the zpos channel, it will reference the REAL zpos channel, not the "bank" channel.
0 xpos
1 ypos
2 zpos The expression [SliderName:chan[zpos]] will always use this channel (zpos/channel 2).
3 heading
4 pitch
5 bank The expression [SliderName:chan[5]] will always use this channel (bank/channel 5).0 xpos
1 ypos
2 Eyes The expression [SliderName:chan[zpos]] will always use this channel (zpos/channel 2).
3 heading
4 pitch
5 zpos The expression [SliderName:chan[zpos]] will NEVER use this channel (bank/channel 5).