
|
T u t o r i a l - Texturing - Basics |
|---|
Skill Level: Beginner.
Applying textures to you objects in messiah is easy, but if you're used to another package, or if you're completely new to 3D, it might seem complicated. This tutorial will attempt to take the mystery out of it and to start you on your way to exploring all of the amazing things you can do here. We'll be working with the "Monte" character that comes on the messiah CD. Note: This tutorial may look long, but that's because I'll be explaining a lot of things and using very small steps. The actual "do this, then do that" aspect is actually very simple.
Your mission:
Texture Monte in preparation for rendering. You'll
really just be scratching the surface of texturing, but once you
get the basic ideas down, it'll be easy for you to get more
advanced.
How to do it:
1) Start messiah and load Texturing_Monte_Starter_01.fxs. It's in
\Scenes\Tutorials
folder.
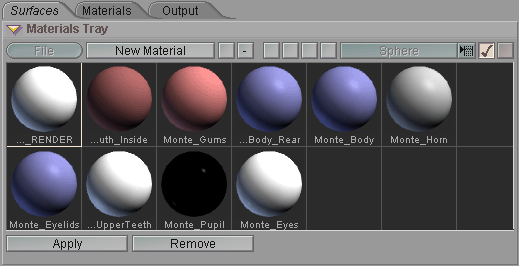
2) Go to the Render tab. You'll see the sample spheres in the Materials Tray block. Each of the spheres represents a different named surface on the object. In other words, the object is made up of polygons (1478 of them), and each polygon is labeled with a name. There are six names on Monte, each of which has a render sphere in the Materials Tray. For example, his horns are labeled as Monte_Horn, and his eyelids are labeled as Monte_Eyelids.
The colors that you see were set in LightWave 3D's Modeler. Different modeling packages may work differently though and you might not be able to set basic properties there, but that doesn't matter because you will ultimately do your texturing work in messiah. The important thing is just to have various named polygons. Well, there are times when it's acceptable, or even desirable to have only one name. For example, a globe might only need one name.
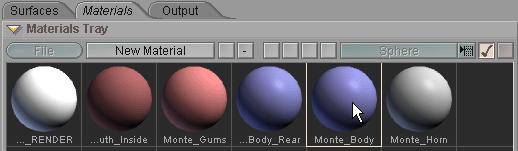
3) Click over to the Materials sub-tab and select the Monte_Body sphere by clicking on it.
When you click over to Materials, you'll see the Shader Flow appear below the World View, above the Motion Graph.
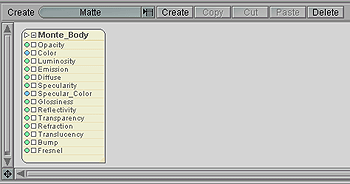
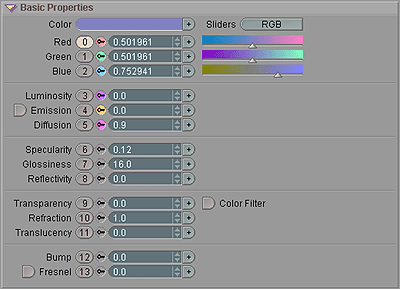
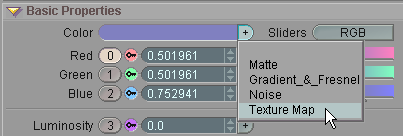
And below the Materials Tray block you will see the Basic Properties block. This is where you set-- guess what?-- the basic properties of the material. That's things like color, glossiness, reflectivity, etc. Right now, as you can see, the color is purple. What you're going to do is apply an image map instead of using that color. Note: You might want to press F3 on your keyboard to expand the Block side (the left side) of the interface so you can see some of the additional tools that are there. You might not need them for this tutorial, but it's good to get an idea of what's there.
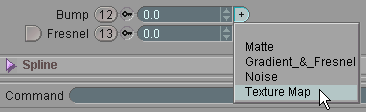
4) Now it's time to apply the
image map to Monte's body. Click and hold on the ![]() button to the right of the
Color field. You'll see the texturing options that are
available for that channel. The choices are: Matte,
Gradient_&_Fresnel, Noise, Texture Map and
so on. Move your cursor down and select Texture
Map. When you release the mouse button you'll see a
Texture Map node appear in the Shader Flow, connected
to the Color channel of the Monte_Body node.
button to the right of the
Color field. You'll see the texturing options that are
available for that channel. The choices are: Matte,
Gradient_&_Fresnel, Noise, Texture Map and
so on. Move your cursor down and select Texture
Map. When you release the mouse button you'll see a
Texture Map node appear in the Shader Flow, connected
to the Color channel of the Monte_Body node.
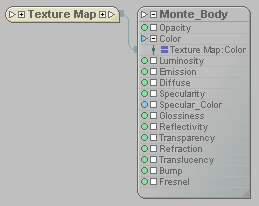
5) When the Texture Map node is selected, which it will be when you create it, you'll see the Image block appear.
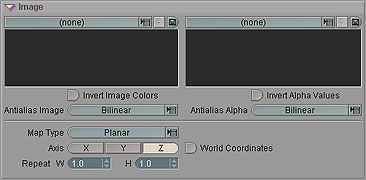
The right side is for an alpha image, which can act like a cookie
cutter so only
part of the image is applied to the surface. We won't be
using that in this tutorial.
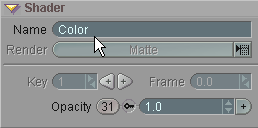
This, and the Transform block below it, is where you set all of your parameters for the texture map. But first, give it a new name in the Name field on the Shader block. Let's call it Color. Type that name in, then press Return or Enter.
6) Time to load the image. Click on the image pulldown above the black area in the Image block. Select the image called Monte_Front_Color_01.jpg that's in the messiah_content\Images\Monte folder. You'll see it appear in the window just below that button.
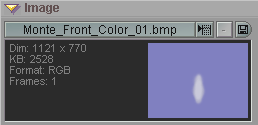
7) The image is loaded (and it's not a very exciting one), but now you need to tell it how it should be applied, and how big it should be to cover the character correctly. There are ten ways to apply an image map, which you can see if you click on the Map Type pulldown. The one you want is Planar. What the Planar type does is project the image as if it was a movie projector that was projecting the image onto your character. All you need to do is tell it which direction to project from and how big to project it. So select Planar in the Map Type pulldown.
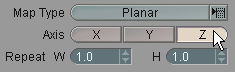
Now you need to select an axis to map it on (in other words, the axis to project it down). Monte is modeled along the Z axis, that is, he is facing along Z, so the axis you want is Z. If you choose Y, it will project from over his head, like a light on the ceiling. If you choose X, it will map from his side. So pick Z and it will project onto his front. It doesn't matter whether your character is facing frontward or backward, because you're just choosing the axis-- it will actually apply the image map to whichever side has polygons, or both if the surface exists on both sides. On Monte the back has a different surface name, so this will only show up on the front.
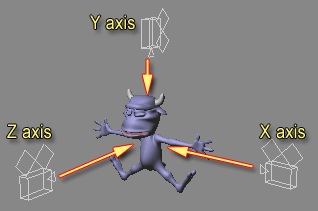
OK, pretend that the cameras are "texture projectors" and now
you'll (hopefully) have an idea about how the planar axis
works.
8) What you have so far is an image that is set to map along the Z axis. Now you need to tell it how big it should be. There are basically two ways to do this: manually, and automatically. You might wonder why you would want to do it manually when it seems like automatic would be much quicker and easier. Well, the main reason is that automatic can only do one thing, and that is make the map cover the whole object. Think of it like a movie projector that automatically figures out how big the screen is and sets its lens to fill it up. But there are plenty of times when you want the image to be bigger or smaller on your object. For example, if you have an image map of lipstick, you probably want it just on the character's lips, not over the whole face.
In this case though, we do want it to size it automatically. So on the Transform block, turn on Compute Center. That will calculate where to center the image (based on the bounding block size of the surface). Then click on the Get Size button. This will calculate the maximum width (X axis), height (Y axis) and depth (Z axis) of the polygons that make up that surface and use those numbers as the size of the image map. Don't worry about Z. Planar mapping is 2D, so there's no depth to deal with. It is calculated with Get Size but unused in this example. Note: In this tutorial you should not turn on Surface Size, because that will compute the size based on the bounding box of the surface, but the texture was painted to the object's size, not merely the surface's size.

A portion of the Transform block.
That's all for the color image map. Now lets add some bumps, with a bump map.
9) We'll
add the bump from the Basic Properties
block. So select the Basic
Properties block, then click on the ![]() button next to the Bump channel and
choose Texture_Map. Again, you'll see a new node, but this
one will be connected to the Bump channel on the
Monte_Body
node.
button next to the Bump channel and
choose Texture_Map. Again, you'll see a new node, but this
one will be connected to the Bump channel on the
Monte_Body
node.
10) Load the Monte_Front_Bump_01.jpg image and set it for Planar Z, then turn on Compute Center, and click on Get Size. Now rename the node to Bump in the Shader block. Bump is slightly different than Color, in that you'll want to adjust how "strong" the image will be. In other words, should the wrinkles be deep or shallow. You do this by adjusting the Bump setting on the Basic Properties block for the Monte_Body material. Make the Bump setting .006. Note: The Bump setting is in Meters, so 1.0 is one meter, 0.01 is one millimeter, etc. You can play around with the numbers when you're finished and do some test renders to see how they affect it. You have my permission. But make sure all of your homework is done first, and clean your room.
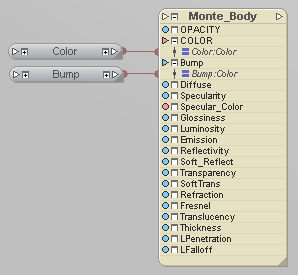
That's all folks! Here's what your final Shader Flow should look like.
And now you're ready to render. A completed version of this scene (Texturing_Beginner_Monte_01.fxs) is available in the Tutorials\Scenes folder.
| Converted from CHM to HTML with chm2web Pro 2.82 (unicode) |