|
T u t o r i a l - Expressions - Sliders (Intermediate) |
|---|
Skill Level: Intermediate.
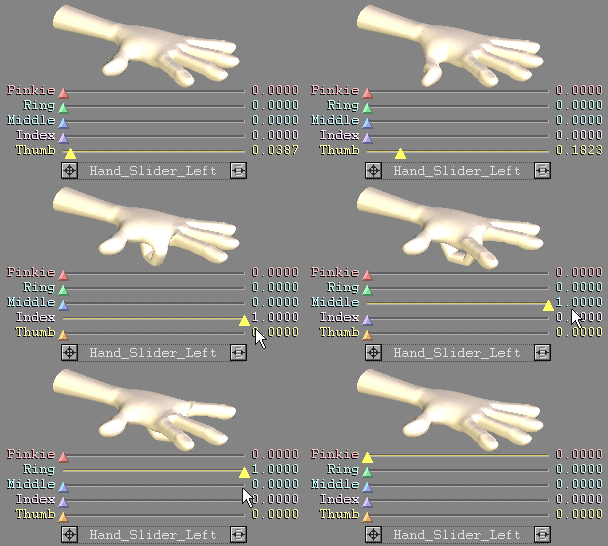
There are several ways to set up a hand that can be animated using sliders. This method uses expressions. It's slightly more complicated than using MotionBlender, but it's a good exercise in using expressions. Try it out before you start; load Expressions_Sliders_Intermediate_01.fxs from the Scenes\Tutorials directory. The controls to play with are Hand_Slider_Left, and Wrist_Left.

What we're going to do here is actually very simple:
Load a hand object.
Add bones to it.
Attach sliders to the tips of the fingers.
Add an expression that will curl the fingers as the tips are adjusted with the sliders.
| Part 1-- Creating The Skeleton: |
In this section, the hand will be given a skeleton and we will set up the hierarchy. Note: You may want to start by adding a light so you can see better. Add it from Setup-->Items-->Add.
1) Add a null called World_Null. This will be used to position the final hand.
2) Add a slider and name it Hand_Slider_Left, then parent it to the World_Null you created in step 1. Name the channels Pinky, Ring, Middle, Index, and Thumb.
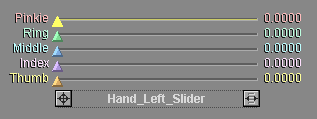
3) Create another null and call it Setup_Null. This will be used to contract the hierarchy beneath it so your Item List won't be cluttered up with all the objects and bones. You won't need to animate the bones themselves anyway.
4) Load Hand.lwo from \Objects\ Tutorial_General. Turn on MetaNURBS so the hand looks more like it should. It's a very low polygon object, so it shouldn't slow you down with MetaNURBS on.
5) Add the Bone Deform effect.
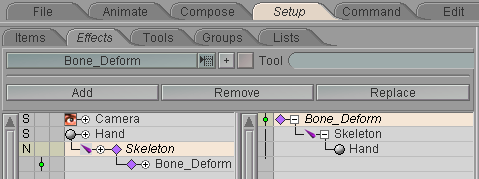
6) Set your view to "Top" and start adding the bones. Begin at the back of the arm (where the elbow would be) and make a bone that goes to the wrist.
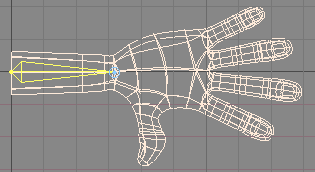
7) Add a child bone and make it very small. This will be the wrist bone.
8) Add the bones leading out to the end of the Pinkie finger, starting with a large one that's parented to the wrist bone.
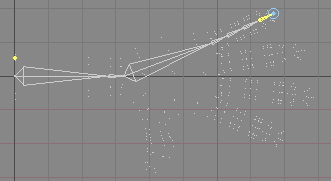
9) Now do the same thing for the other three fingers. Make sure that the base bone of each (the big one in the palm) is parented to the wrist bone. And for this tutorial, each finger has five bones.
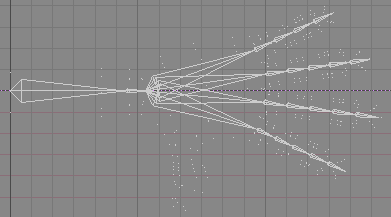
10) Now add the thumb following the same procedure.
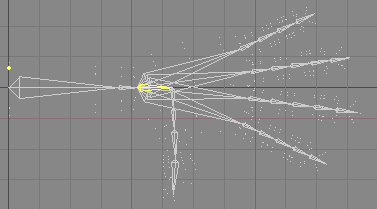
11) The last part of the bone setup is naming the bones. This isn't necessary as far as getting the hand to function, but it will help you understand what you are looking at when you view the Item List. It's always a good idea to make the Item List as easy to understand as possible; what may be easy to remember now (such as Skeleton_Bone_1 is the palm) may be quite confusing two months down the road when you look at it again. Here's what the bones for the arm and Pinkie can be named:
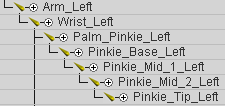
It's up to you whether you want to organize the names by finger, bone or side. For example, you could have:
Tip_Pinkie_Left or Pinkie_Tip_Left or Left_Tip_Pinkie, etc. There are actually nine different ways these can be named by rearranging the three words. You might even want to add the word "Hand" at the beginning. Just choose whichever one makes the most sense for you, and be consistent. For this tutorial though it's probably best to use what I have just so it's less confusing.
Congratulations, you've just set up a hand! Now continue on and set it up so the fingers are controlled by sliders.
| Part 2-- Creating The Expressions and attaching the sliders: |
13) Select the slider (Hand_Slider_Left) in the Item List, then select the Pinkie channel (the top one) in the World View.
14) Go to the Command tab and add a New Variable from the Variables block. Name this expression Pinkie_Left_Slider.
15) Right-click on the gray box that's to the right of the Buffer entry field. You should see this appear in the text field and in the Expressions list above: [Hand_Slider_Left:xpos]
![]()
16) Now
it's time to make the Pinkie slider control the rotation of the Pinkie tip bone. On the Add pulldown of
the Channels block, select Pinkie_Tip_Left
and press the ![]() button. Tip: if you select the bone you want in the World
View it will automatically be selected in this
pulldown. Then
select pitch from the channel pulldown list on the bottom of
the block. It should look like this when you are
finished:
button. Tip: if you select the bone you want in the World
View it will automatically be selected in this
pulldown. Then
select pitch from the channel pulldown list on the bottom of
the block. It should look like this when you are
finished:
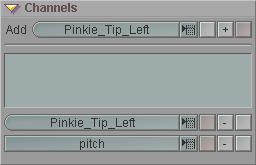
17) Repeat steps 13-16 for the rest of the fingers. Note, however that the thumb is a special case; it needs to rotate on more than one bone and for more than one channel. Set its tip to the heading channel and the bone right below the tip to pitch. And set the Channel Modifier of Tip_Thumb_Left bone to - (minus); that will make sure it bends in the correct direction by subtracting the slider's value from the bone's own value. You can see the bones and the rotations they need in the image below.
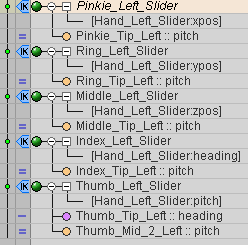
At this point, if you move the sliders, the tips of the fingers should move. Now it's time to make the fingers curl.
We will be using a function called InheritEnd, which allows you to set a start and an end item of a chain. By animating the item at the end of the chain, you can control a flexing effect that ranges through the chain, all the way up to the start item. It is somewhat similar to IK in that the tip of the item controls its parents (up to its root). The difference is that you don't move that end item, you rotate it, and that causes its parents rotate as well.
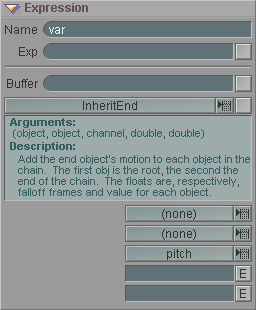
Here are five arguments to fill in for InheritEnd:
Select the root item using the pulldown list.
Select the end of the effect chain using the pulldown list.
Select the channel that you wish to control.
The falloff frame. This sets the function to wait a specific number of frames before the effect executes. This value is usually set to 0 unless you actually do want it to wait.
The value parameter. This is an interesting setting. It can be thought of as the "curve control". Usually, the value you enter would be between -1 and +1. The effect will act more like an arcing curve at 0 and will assume a tighter curl, similar to a question mark (?), as you reach -1.
And now, back to the tutorial
steps...
18) Add a New Variable and name it Pinkie_Left_Curl, then select
InheritEnd from
the functions pulldown list. Now you'll see the five spots
where the arguments get entered. Fill it out and apply it
like this:
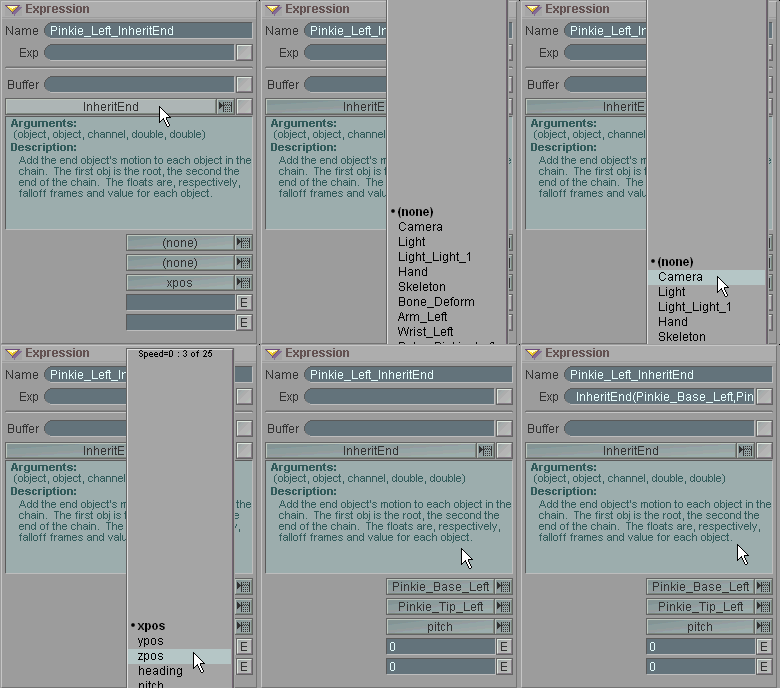
19) Now add new expressions for each of the other fingers and fill in their arguments. (Or you can just use Copy and then change the expression's name, then manually change the expression's arguments in the Exp field.) Note that the thumb is, once again, slightly different-- it uses heading instead of pitch, and I experimented and found that .3 worked better than 0 in the final value parameter (try it with 0 and see what it does). Here's what the final expressions should look like in the list:
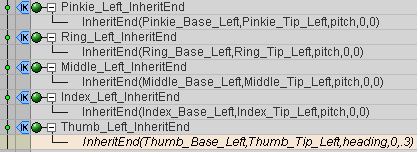
That's all there is to it! If you've done everything correctly (and if I've done everything correctly), the fingers should curl when you move the sliders.
Extra Credit:
If you want to try one more thing, how about adding one more slider
channel that will control all of the fingers and make a fist?
Here's how:
1) Go to Setup and right-click on the Key Modifier button for channel 5 (bank) of the slider to make it visible. Now rename it to Fist and drag it to the top of the Expressions List.
2) On the Command tab, create a new variable and drag it to just below Thumb_Left_Slider in the list. Name it Fist.
3) Select the Fist slider channel, then right-click on the button next to the Buffer field of the Expression block. This will put that slider channel into the expression. So the expression will be: [Hand_Left_Slider:bank]
4) Now on the Channels block, Hand_Left_Slider should be on the Add pulldown. Press the + button to apply it, then choose Pinkie as the channel. Repeat this step for Ring, Middle, Index and Thumb.
5) Set the Channel Modifier for each of the channels you added in step 4 to + (instead of =, which is the default). This makes it additive, so you can use individual finger sliders or the Fist slider. However, this method isn't perfect, because if you have a finger slider all the way at 1 and then you turn the Fist slider all the way to 1, it will move the that finger too far.
So what you'll have now is that the position of the Fist channel of the slider will be read and applied to each of the other channels. You will not see the other sliders moving, but you will see the results as if they were. (Just make sure this expression is at the top of the list.)
Notes:
A)The slider expressions (the ones that control the fingertips)
must come before the InheritEnd expressions in the
Expressions List. This is because messiah
calculates the expressions from the top down on the list. So
the slider expression will tell the finger tip what to do, and then
the InheritEnd expression will tell the hierarchy what to
do.
B) When animating with the sliders (for fingers and for any other use of sliders), pay attention to how your keyframes are generated. Some people like to have the Key Edit mode (on the Edit tab--> Key/Frame Editing, or with the g keyboard shortcut toggle) set to Independent, while others prefer All Channels. I vary between both. Sometimes I like having a keyframe set for all of the sliders each time I move one. Other times I don't. Try it out and see what you prefer when animating sliders.
| Converted from CHM to HTML with chm2web Pro 2.82 (unicode) |