|
T u t o r i a l - FK-IK Blending |
|---|
Skill Level: Advanced.
There are some times when you want to use FK (Forward Kinematics), and other times when you want IK (Inverse Kinematics). Unfortunately, both of those times are often during the same animation. Well, as you'll see here, that's not a problem.
This method is also very useful if you are setting up a character for two animators who work differently. For example, some people like using FK for arms, but others like IK. Now you can make both happy with only one setup. This can be used as an IK on/off switch.
Important Note Before You Begin: When using expressions, not only does spelling count, but so does case. Typing BenTurpin is not the same as benturpin.
| Part 1 - Setting Up The Skeleton: |
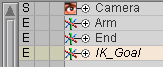
1) Go to Setup and create three null objects: Arm, End, and IK_Goal.
2 )Add a Slider called IK________FK. (Using this name will give you a visual indicator of what each end of the slider is for.) Now highlight the entire name in the name field and press Ctrl-c to copy it. You'll use this later.
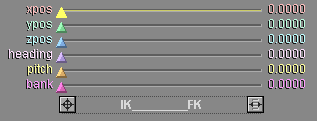
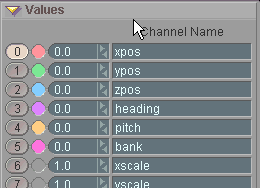
3) On the Values block, change the "xpos" label to IKFK. Now right-click on the Key Modifier buttons for channels 1-5 (ypos to bank). This will turn those channels off on the slider, so all that you'll have on the screen is the one channel you'll need.
4) Select Armand add the Bone_ Deform effect (Effects sub-tab).
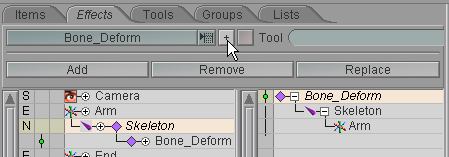
5) On the Skeleton block, add three bones (just click on Add Child Bone three times). After you make them, set the Length of Skeleton_Bone_1to 0.5. This will be our "shoulder."

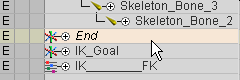
6) Parent the End null to Skeleton_Bone_3 by dragging it onto it in the Item List, then move it to the end (the thin side) of the bone, which is Z 1.0 if you want to enter it numerically in the Rest block. This is the End Effecter -- the end of the IK chain, the item that is told to follow (move towards) the IK Goal.
| Part 2 - Setting Up The IK and Expressions: |
7) The IK... Select Skeleton_Bone_1 and go to the Animate tab. On the Inverse Kinematics block, turn on Anchor. Now select the End null and turn on Calculate IK, then select IK_Goal in the Goal pulldown list. You might also want to hard lock it now, because you won't need to select it any more. Note: I also selected Skeleton_Bone_3and on the Inverse Kinematics block clicked on the Direction to be - (negative) instead of + (positive). This will just affect which direction the "elbow" bends to, so it would really depend on the character you are setting up, and what direction it is facing.
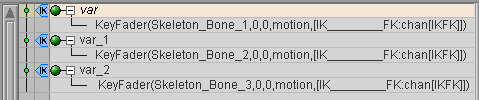
8 )The Expressions... Press F3 on your keyboard to expand the List side of the interface (or you can just drag it out with your mouse), then go to the Variables block on the Command tab and click on New Variable.
![]()
9) Now lets apply the KeyFader to the bone chain.
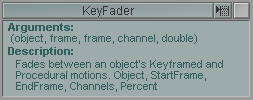
On the
Expression block, select KeyFader from the
function pulldown list. Now enter fill in the arguments then
apply it:
1) Skeleton_Bone_1
2) 0
3) 0
4) motion
5) Type
[ then press Ctrl-v to paste the slider name
that you copied in step 2, then type :chan[IKFK]]
It should end up like
this:[IK________FK:chan[IKFK]]
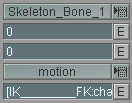
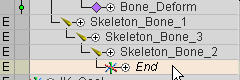
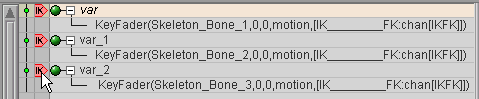
10) On the Variables block, click on Copy, then in the Exp field of the copy (var_1), change Skeleton_Bone_1 to Skeleton_Bone_2 and press Enter. Repeat this step and make the new one Skeleton_Bone_3. You have to do this for each item that you want the KeyFader to control.
Here's what you should see on the Expressions List when you're done:
11) Set the expressions to happen after IK. To do this, click on the blue IK arrow icon once. It will change to a red arrow facing the other direction (toward the expressions). What this will do is say "calculate what's happening with IK, then apply this expression to it." And "this expression" will override that IK.
| Part 3 - Using It: |
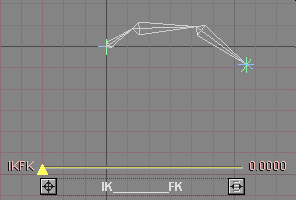
12) Go to frame 0 and make sure the IKFK slider is at 0 (all the way to the left). Keyframe some animation with the IK_Goal. The arm should follow it around when you move it.
13) When you're finished animating the IK_Goal, go back to frame 0 and press play. The arm will follow the goal. Now, while it's playing, adjust the IKFK slider up and down. You'll see that when it's all the way at 1 the arm will stop moving and go back to its default position. If you want, you can stop the animation now and with the IKFK slider all the way at 1, animate the individual bones (FK). Then play the animation and switch between the IK and FK animation with the IKFK slider. Of course, the slider itself can be animated so you can choose between IK and FK at any point in your animation. You can even blend between the two. A completed version of this scene, General_IK_Intermediate_IKFK_Blending_01.fxs, can be found in the Scenes\Tutorials folder.
Have fun!
Note: If you were using a real character, you would load that in instead of making an "Arm" null.
Additional information:
General Info - IK (Inverse Kinematics)
General
Info - Functions (IK) Animate - Inverse
Kinematics block
| Converted from CHM to HTML with chm2web Pro 2.82 (unicode) |