|
Now that you've got the basics of loading a scene and using the interface, let's go a little more in-depth and create a scene from scratch. This setup won't be nearly as sophisticated as the T-Rex scene that you worked with in the last part, but it will give you a good idea of how the software works and get you on the road toward creating setups like that for yourself. Before we start, clear the scene so we can start from scratch (using the File menu or the File pulldown). If you want to save the animation you made in the last part, go to the File pulldown on the File tab (where you loaded the scene last time) and choose Save Scene As... then give your scene a new name and save it. (Don't forget to save the scene in this section as you go too. And increment the saves upward, so you can go back to a previous version if you want. For example, save the first one as Butch_Test_01, then the next one as Butch_Test_02, etc.)
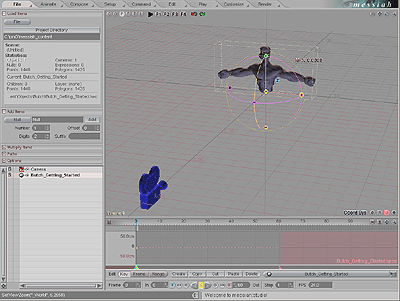
From the File pulldown, load the Butch_Getting_Started.lwo object. This is located in the messiah_content\Objects\Butch folder. When it loads, this is what you'll see:
Now let's hide the camera so it doesn't get in the way. Click on the Draw Modes in the Item List (image below) and choose NONE.
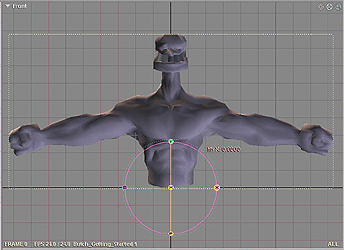
In the World View window, select the Front view ( F ), then zoom in so Butch fills the screen. You'll probably need to use the move gadget too (the view gadgets, zoom, move, rotate, are on the top right of the World View). Get Butch nicely centered.
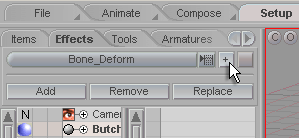
Now it's time for the setup. You're going to put a skeleton into Butch. To do that, you'll use the Bone_Deform effect. Bones are probably the most-used effect in all of 3D animation, so it makes sense to start learning to use them as early as possible. (For example, the T-Rex in the previous section used bones.) Click over to the Setup tab at the top of the interface. The first thing you'll notice is that a red line appears around the World View. That's just a visual cue to keep you aware that you're in Setup. Go to the Effects
sub-tab. With Butch
selected in the Item List, choose Bone_Deform from
the Effect pulldown list at the top and press add button
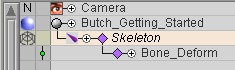
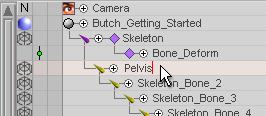
Here's what will show up in the Item List after you add the Bone_Deform effect:
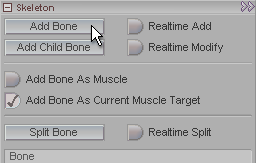
What you're seeing is actually two components-- an Effect (Bone_Deform), and a Tool (Skeleton). And there's a third item which we'll add in a moment, a sub-Tool (Bones). Before we get to that though, let me briefly explain what each of these things is. The easiest way to describe it (though this is somewhat of a generalization) is that an Effect is what you want to do (Melt, Soft Body, etc.), and a Tool is method by which you'll do the effect (Skeleton, Curve, etc.). Some Tools have sub-Tools (Bones, Curve Points, etc.) and in those instances, the sub-Tool is usually what you actually animate. Don't worry if that hasn't all sunk in yet. The more you use messiah the more you'll understand it. In the meantime, let's add some bones to our character, OK? In the Skeleton block, click on Add Bone once.
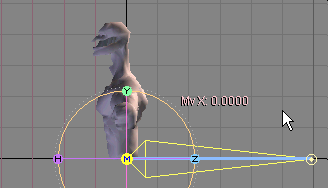
You'll see that it places a bone into the character and the Item List (Skeleton_Bone_1). You're looking down the end of the bone though, so you need to reposition it. Simple. Change your view to L (Left) and adjust the view with the View Controls to get everything centered. Turn on Realtime Modify (that's at the bottom, on the Skeleton block) then click and drag on the end of the bone (the thin end, on the right in the image below) and bring the bone vertical, up to about the middle of the hand, then turn it off.
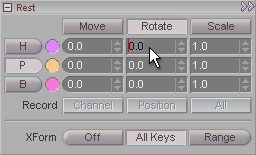
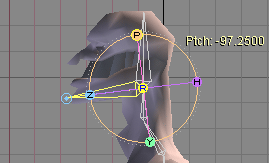
You could also do this two other ways: Rotate the Edit Sphere with the P (Pitch) channel, or enter the rotation directly in the numeric field in the Rest block. Anyway, just make sure you've got all other Move and Rotate channels set to 0, and the Pitch set to - 90.
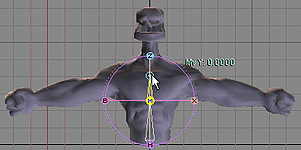
Now let's create the rest of the spine, the neck, and the head. Just like you saw with modifying the bone's position, there are a couple of ways to go about this. The most fun way is to "draw" the bones into the character. So switch back to the Front view and turn on Realtime Add in the Skeleton block. What happens now is that wherever you click in the World View, a bone will be created that starts at the previous bone, and ends where your cursor is. So, position your cursor just below Butch's collar bone, above the breast, and centered from left to right, and click. (If you want to delete the bone to try again, just click on it in the Item List and press the - key on your numeric pad.)
Now make a bone that goes to the base of the neck, then two short ones in the neck, ending at the base of the head, and finally one that extends to the top of the head.
Go through the bones, except the first one, and zero (or zed) out all of the rotations. To do this, just click on each bone in the Item List, and enter 0 in all of the Rotation fields on the Rest block (use the TAB key to move to the next entry).
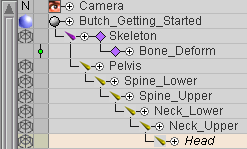
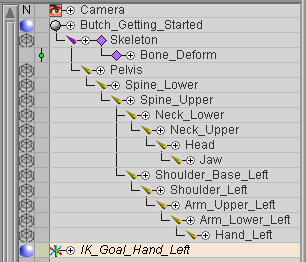
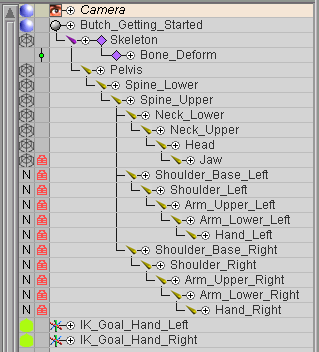
Here's what your Item List should look like now, with all of the bones you created:
As you can imagine, a fully boned character will have quite a long list and it can be pretty confusing. But there are things you can do to make it easier to use and understand. The first is to name the bones for what they are. Let's do that now. Double-click Skeleton_Bone_1 in the Item List and type Pelvis then press Enter.
Now name the other bones like this:
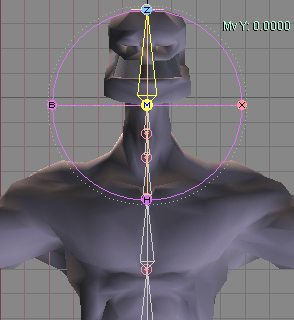
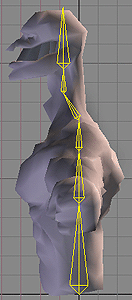
That makes it much easier to understand, doesn't it? (Don't really answer, because I can't hear you.) Now we need to make some adjustments to the rotational positions of the bones, so switch to the Left view. As you can see, the bones don't go up the center of the neck and head, so you've got to reposition them. Starting with Neck_Lower, rotate them on Pitch until they look like this. If you need to change the lengths of them, turn on Realtime Modify and just click & drag them to the right length and position. Here's what the it should look like when you're done. I've highlighted the bones so you can see them better.
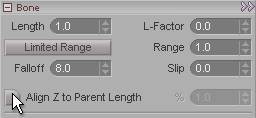
Since his jaw juts out so far, we're going to need one more bone in the head to hold it when the head moves. (Note: There are several controls on the Bone block that might make this unnecessary, but to keep things simple, we'll just use another bone.) Select the Head bone and click on Add Child Bone in the Skeleton block. Turn off Align Z to Parent Length on the Bone block.
What that feature does: When it's on, if you scale a bone, the child of that bone will stay at the tip. In other words, it will keep the child bone aligned to the length of the parent. But in this case we don't want our child bone at the tip, we want to move it, so turn that option off. Grab it with the Z channel on the Edit Sphere for that bone and move it down so it lines up with the Head bone. Now grab the P (Pitch) channel and rotate it until it sticks straight out the front of the mouth.
Rename this bone to Jaw. (You won't be able to open the character's mouth because this object was modeled with a closed mouth.) That does it for the head, neck and spine!
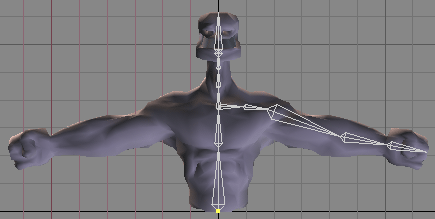
It's time to add arms to the setup. We'll do the left arm now. Ready? OK, switch to the Front view and select the Spine_Upper bone. Click on Add Child Bone. Now turn off Align Z to Parent Length for that new bone and position it with the Z channel so it's roughly at the base of the Spine_Upper bone and then rotate it on H (Heading) so it's aiming to the shoulder (perpendicular to the spine). Add a child to it. That's your shoulder setup. (See image below). Now add another child and position that so it goes to the elbow (again, using H to rotate it). (The elbow is kind of hard to see in this object, but since this is just a tutorial, it doesn't matter if you don't get it perfect.). Then add a child to that, and use H to position it to the wrist. One last child will be the hand. If you need to modify the lengths of the bones, just grab the blue dot and drag it to the size you want. Here's what it should look like when you're finished:
Now rename the bones. Just double-clock on them in the Item List and enter a new name. You can't have spaces in names, but you can type with spaces and when you press Enter messiah will put underscores ( _ ) there.
As you saw in Getting Started Part 1, there are two ways to control a character, IK (Inverse Kinematics) and FK (Forward Kinematics). We'll set up IK for this one. That means you'll move a Null object (IK Goal) around and the arm will follow, instead of individually animating the arm bones.
On the Items sub-tab, go to the New Item block (you might need to use the pulldown menu at the top to get it). Double-click on the Null icon in the item palette. Now rename it in the Item List. Call it IK_Goal_Hand_Left. Drag it to the bottom of the Item List so it's not parented to anything.
This IK goal will be what you animate when you want to move the arm around, so now it's time to make the arm follow it. Click over to the Animate tab and select the Arm_Upper_Left bone. Now open the Inverse Kinematics block and turn on Anchor for this bone.
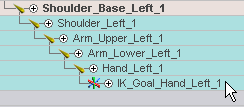
Next, select the Hand_Left bone and turn on Calculate IK for it, then select IK_Goal_Hand_Left for its Goal. You should notice that the arm will jerk over to the null as soon as you do that.
If you move the IK goal around now, you'll see that the arm follows it. But if you switch to the Left view, you'll see that there's a problem. The elbow bends the wrong way! This is simple to fix, but I wanted to show it to you first so you'd know about it in the future. Select the Arm_Lower_Left bone and click on the -- Direction button on the bottom right of the Inverse Kinematics block. Now when you move the IK goal around, the elbow will bend in the proper way.
Almost finished. Now we need a right arm.
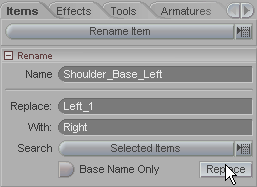
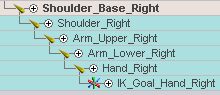
Click over to Setup again. In the Item List, grab the IK_Goal_Hand_Left and parent it to the Hand_Left bone. Select the Shoulder_Base_Left bone and click anywhere in the World View. No press the / key on the numeric pad (not on the main keyboard section). This will mirror the entire left arm and the IK goal over to the right side. Now, that the setup is done, rename the right arm bones and goal. The fastest way to do this (instead of individually in the Item List) is to go to the Rename Item block on the Items sub-tab. First multi-select the items you want to rename. Select Shoulder_Base_Left, then hold SHIFT and click on IK_Goal_Hand_Left_1. In the Replace field, put Left_1 and in the With field, put Right. Set the Search pulldown to Selected Items, then press Replace.
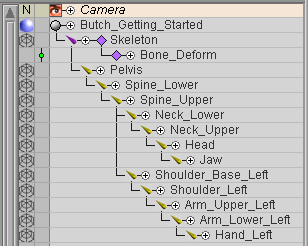
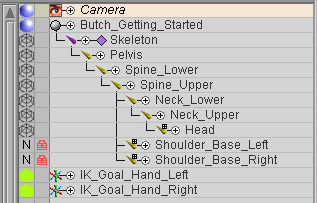
Grab the IK_Goal_Hand_Left in the Item List and pull it back down to the bottom of the Item List so it's not parented to anything. Do the same for IK_Goal_Hand_Right . (Note: I only had you parent the IK goal so it would be part of the hierarchy that would be mirrored. That saves a couple of extra steps.) Now it's time for some cleanup. Since you won't need to move the arm bones themselves, let's Hard Lock them. Right-click in the box to the right of the Draw Mode boxes in the Item List. Do this for the Jaw bone and all bones below it in the Item List (it's all arm bones there). Now let's hide the arm bones since there's no need to see them in the World View. Hold down the CTRL key and click in the Draw Mode box (the left-most box in the Item List) for Shoulder_Base_Left and choose NONE. Then do the same for Shoulder_Base_Right. (Holding down the CTRL key makes the Draw Mode change affect that item and its children.) I like making the Draw Mode for the Goals "Flat" because it makes them stand out in the Item List. Lastly, change the Draw Mode of the Camera to make it visible again. Here's what your Item List should look like now:
As a last bit of cleanup, collapse the head hierarchy, and the two arm hierarchies. Just click on the little bone icons for them. Here's what your final Item List should look like:
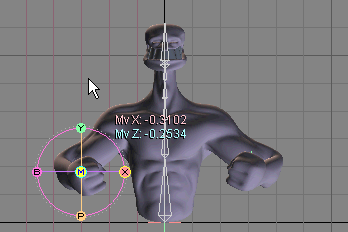
And here's what it should look like when you use your character. I turned on MetaNURBS® (subdivision surfaces) for this so it would look better. To do that, select the Butch_Getting_Started object in the Item List, then press Tab on your keyboard.
Well, if you made it this far and it's all working, CONGRATULATIONS! If something's not working, don't worry. Just go back through the steps and you should be able to find out what's wrong. One note: This isn't a very complex setup, so it's not perfect. For example, if you move the hands behind him it might not do the right thing. Also, the shoulder isn't accurate, because when you move his arms up, his collar bone and shoulder stay where they are instead of angling up. But if you keep his arms in front of him and don't move them up too high, it's not bad. One more note: Don't take this tutorial to be "the only way" or "the best way" to do a setup. Everyone has their own methods and tricks, so there's no right or wrong way. And I'm not the greatest setup guy in the world. The End |
|---|