|
|
|---|

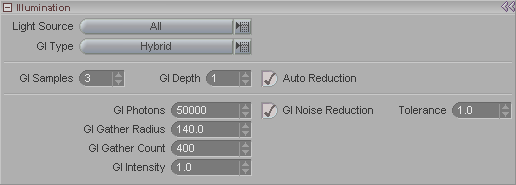
The Illumination block is where you choose how messiah should calculate the lighting of your scene. Note: The Hybrid setting for GI Type in the image above is only selected there so none of the settings will be ghosted. The Hybrid setting will increase your render time, so do some tests to determine the GI Type that suits your scene.
Light Source (pulldown): Choose which lighting method you want to use. Choices are:
Direct: Uses traditional simulated lights (ray tracing).
Environment: Uses the Global Illumination method.
All: Uses both.
No Bounce Light: This gives the look of giant area light from everywhere, and renders faster than regular area lights or Global Illumination (Environment). It won't be perfect for all situations, so try a test render to see how it looks in your scene.
GI Type (pulldown): Choose the type of Global Illumination calculation to use. The choices are Monte Carlo, Photon, and Hybrid. The difference between Monte Carlo and Photon is basically that Monte Carlo sends a ray from the camera to a point in the scene and then sends out rays from there to find out what light is falling on that point. In essence it's asking for the light information. Photon Mapping sends rays from the lights into the image and then bounces around, giving light information to everything it hits.
The Hybrid setting uses a combination of Monte Carlo and Photon Mapping. Monte Carlo will use the bounces that the Photon Map makes, rather than sending out its own rays.
GI Samples: How many rays to send out per pixel.
GI Depth: This tells the light ray how many times it should bounce off something to return a color. This is something that you are better off leaving at the default (1). Setting it higher is generally not worth the extra rendering time, except in extreme circumstances.
Auto Reduction: Reduces the number of samples that subsequent bounces will sent out (GI Depth controls the number of bounces). There is almost never a reason to turn this off. The more bounces there are, the more samples get sent out, so obviously if this is turned off it can significantly increase your render time, but the quality might not improve very much at all (it will depend on the scene).
GI Photons: The number of rays to send out in order to calculate the interactions.
GI Noise Reduction: Experimental -
Turns on the Tolerance.
Tolerance: Experimental - This is
for smoothing out noise at low sample settings. The higher
the setting, the more like it is
without GI Noise Reduction.
This setting is very much based on the scene, and what your
Photons, Radius, and Count are set
to. Don't be afraid to set the Photons to a high number; even at a setting of 2
million, it's still fast. And setting the Tolerance to 1.0 is a good place to start.
Which I guess is why that's the default. Imagine
that.
GI Gather Radius: Maximum size (radius) of the area that it will look at to try to gather up the photons to make up an averaged intensity from. In other words, it will say "OK, I'm looking at this area and there are this many photons. Let me put them together and see what that comes out to."
GI Gather Count: Sets how many photons to try to gather up. This works in conjunction with the Gather Radius. It will stop the calculation when either it meets the Gather Count number or when there are no more rays within the Gather Radius.
GI Intensity: Controls the brightness of the Global Illumination light.