|
|
|---|
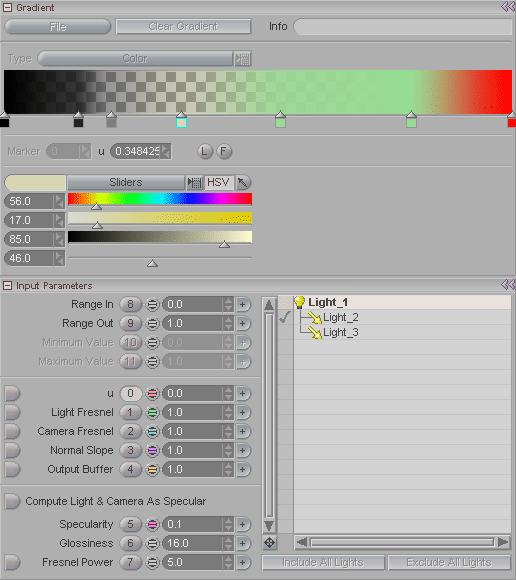
The Gradient_&_Fresnel shader, as its name suggests, is actually two shaders in one: a gradient shader and a fresnel shader. They are combined into one because they are most commonly used together. i.e., while fresnel is quite useful all by itself, gradient is useless without some form of input. And since fresnel is the most common input to gradient, they are combined into one for efficiency and to reduce the complexity of the shader flow. The three blocks that make up this shader are: Gradient, Color, and Input Parameters.
|
Gradient Block |
Color (pulldown): Inactive.
Gradient Window: This is where you create the gradient. To create a marker, just click in the area right below the window (the area where you see the markers in the image at left). Click and drag the markers left and right to move them. To delete a marker drag it down. To copy a marker just select it, then right-click where you want the copy to be. When a marker is selected you can adjust its parameters in the Color block below.
Marker: Inactive.
u: Displays and sets currently marker's position on the gradient. In the example at left, the current marker is all the way on the right, which is 1.0 on the gradient.
L: Sets the current marker to Linear, so the gradient between it and the one to its left will be linear.
F: Sets the current marker to Flat, so there will not be a gradient between the current marker and the marker to its right. This is similar to the "Stepped" setting for animation keys.
Color Picker (pulldown): Choose which type of color picker you want to use for designing Gradients.
|
Input Parameters Block |
Range In/Out: By default a gradient is from 0 (left) to 1 (right). Using the Range In/Out settings you can pick a portion of the gradient to use. For example you might only want to use the middle portion, or you might want to animate the area of the gradient to use.
Note: The following five items must be activated to use. The activation buttons are on the left of each. See image below for samples of some of these settings.
u: Lets you choose a specific part of the gradient to use.
Light Fresnel: Uses a light (or lights) to control how the gradient is seen. In other words, the gradient is based on the light(s) hitting the surface. The results, in terms of what part of the gradient will be used are: 0 (left side)= no light 1 (right side)= most light
Camera Fresnel: Uses the view from the camera to control how the gradient is seen. In other words, the gradient is based on the angle of the surface to the camera. Facing away from the camera is 0 (left side of gradient), and facing the camera is 1 (right side of gradient).
Normal Slope: Uses the direction of the polygon (the "surface normal") to control how the gradient is seen. This is based on world space. Straight up is 1, down is 0.
Output Buffer: Experimental feature not active yet.
Compute Light & Camera As Specular: There may be times when you want to control the gradient based on specular highlights. The most common example of this is when you need to control the specular color of a material. If you activate Light and Camera Fresnel you can use this feature to compute the specular value. Use the accompanying Specularity and Glossiness channels to control the specular just as you would on the material.
Specularity: Adjusts the intensity of the specularity when using Compute Light & Camera As Specular.
Glossiness: Adjusts the intensity of the glossiness (how "tight" the specular hit is) when using Compute Light & Camera As Specular.
Fresnel Power: This is used to flatten or exaggerate the gradient spread calculated by camera fresnel. (Activate this setting with the button on the left.)
Light List: Choose the lights to affect the Fresnel. A check mark means that the light will be used (like the Key_Light in the image above).
Include All Lights: Activates all lights in the list for use with Fresnel.
Exclude All Lights: Deactivates all lights in the
list from being used with Fresnel.
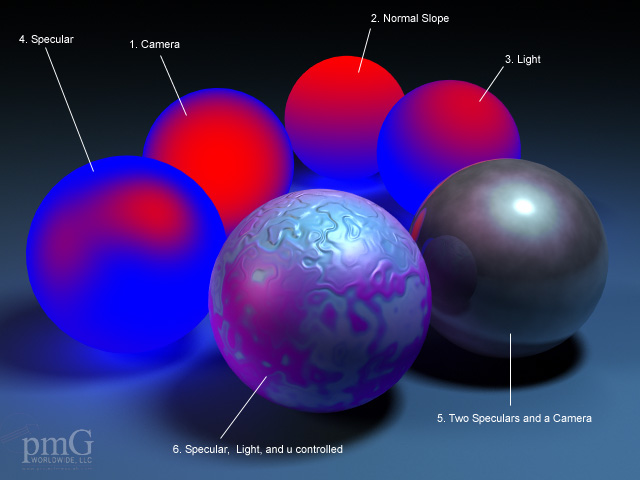
This scene is available in the messiah_content/Projects folder.
Spheres 1
- 4 have a simple gradient attached to the color of the material.
Luminosity is set to 1 so you can see the full effect. Spheres 5
& 6 use a combination of gradients and noise to produce real
world and not-so-real world effects.
Sphere 5 uses a specular gradient to create the "undercoat" gloss.
Noise is used to distort the glossiness of that gradient. There is
a second specular gradient to create the white hotspot (since it's
a separate gradient, it doesn't get distorted by the noise. It also
has a camera gradient that controls the level of reflectivity.
Sphere 6 is a bit more complex (but was very easy to create).
Compounded noise is used to control u value of a gradient that's
attached to the color on the material. It uses a specular gradient
to control the level of bump on the surface. That same gradient is
used to remove the effects of the first gradient. There is an
additional light gradient that provides some extra color
layering.