|
|
|---|
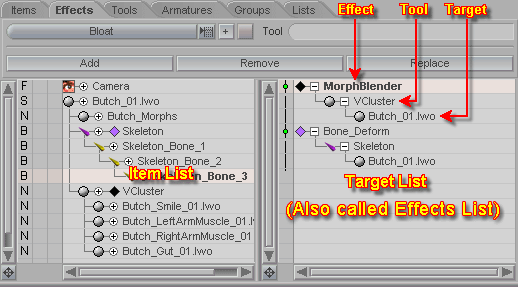
The Effects sub-tab is where you manage the targeting of all of the scene's effects. The list on the left is still the Item List, and the new list on the right is the Target List. Effects are targeted to scene items via Tools. "Targeting" simply means telling the effects and tools what item they should affect. For example, a Skeleton tool can be linked to a Bone Deform effect. The skeleton's bones can then target a mesh to deform it.
Here's a sample of the naming structure of each part of an effect: Effect: Bone_Deform Tool: Skeleton sub-Tool: Bone
When you are on this tab, the list on the right (see image) is the Effects List. This list will contain all information relating to effects. The highest level items in the list are Effects (Bone Deform, Melt, etc.). Grouped under these effects are the Tools (Skeleton, Cluster, etc.). Lastly, grouped under the Tools are the targets (mesh items, nulls, etc.). The order of the effects in the list determines the order that they are processed. Processing starts at the top of the list and works its way down.
The following is a list of the current Effects, Tools and their related sub-Tools:
| E f f e c t | T o o l | s u b - T o o l |
| Bloat | Null | -- |
|
Bone Deform |
Skeleton |
Bone |
|
Bulge |
Curve |
Curve Points |
|
DMorph |
Null |
-- |
| Flex | Curve | Curve Points |
| FlexMotion | Curve | Curve Points |
| Gizmo Player | Null | -- |
| Gravity | Null | -- |
| LagPoints | Null | -- |
| Melt | Null | -- |
| Metamation | Cluster | Cluster Tool |
| MorphBlender | Cluster | Cluster Tool |
| MotionBlender | Value | Value Slider |
| MotionDynamics | Force | Force Tool |
| Particles | Force | Force Tool |
| Puppet Master | Cluster | Cluster Tool |
| Soft Body Dynamics | Force | Force Tool |
| Spherize | Null | -- |
| Super Blender | Null | -- |
|
Xform |
|
|
|
-- |
Camera |
-- |
| -- | Cluster | -- |
| -- | Curve | Curve Points |
| -- | Force | Wind, Jet |
| -- | Light | Directional, Point, Spot, Sphere, Panel |
| -- | MetaEffector | Effector |
| -- | Null | -- |
| -- | Procedural | Sphere, Cube, Cylinder, Cone, Disk, Torus, Plane |
| -- | Skeleton | Bone |
| -- | Slider | -- |
| -- | Value | Slider |
Buttons--
Effects (pulldown list): Select the effect that you want to add to your scene.
![]() : Press
this button after you have selected the effect you want in the
pulldown list. And it will add it to the currently selected
item.
: Press
this button after you have selected the effect you want in the
pulldown list. And it will add it to the currently selected
item.
Add: To add an additional target to an effect, first select the new target from the list on the left (Item List). Now select the Tool from the list on the right that is linked to the desired effect. Now click on the Add button. The new target will be grouped under the tool in the Target List (right).
Remove: To remove a target from an effect, select the desired target (grouped under the tool) from the list on the right. Now press the Remove button. The effect will now no longer influence that target.
Replace: When you need to replace one target with another one, select the target from the Effects List. Now select the new target from the Item List and press Replace. Upon leaving Setup, the new target will be influenced by the effect, and the old target will no longer be influenced.