|
|
|---|
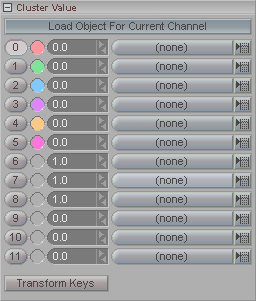
This block is used with MorphBlender to attach your morph targets to slider channels. Once this is set up, you can click over to the Animate tab and choose the slider to animate your morphs.
Load Object For Current Channel: Select a channel by clicking on the numbered buttons on the left side, then click this to bring up the Load Cluster/Object requester. The object will then appear in the pulldown list to the right of that channel number.
0-32: These are the channel numbers. When you click on a number, it becomes the selected, or active, channel.
Pulldown/Pop-up Lists: Use the pulldowns or pop-ups to select which object you want to use with that slider channel.
Transform Keys: Updates
the keyframes of a slider channel when you modify the rest position
of it here. The keyframes will retain all of their
information, but they'll be offset by the amount you enter
here.
For example, if you originally had a channel set to 0.0 here and you went to the Animate tab and did some animation, then came back to Setup and changed it to 0.5, it would update all of the keyframes you made on this channel by adding 0.5 to them. So if you had a keyframe value of 0.25 it would now be 0.75. This is extremely useful for making global changes. In fact, if you have the Motion Graph open, you will see the change happen as you adjust the value here. Also, the new value will become the new rest (default) position, so when you're on the Animate tab and you press Reset, it will reset to this new value.
When Transform Keys is off, it will not affect any animation when you make a change here, it will just use the new value as the new rest position.