|
|
|---|
Materials is where you will find messiah's Shader Flow for texturing your objects. The most important component of the Materials sub-tab is the Shader Flow, so be sure to read that section (it's mostly animated pictures anyway). And don't forget about all the shaders and materials on the Palette (F5).
|
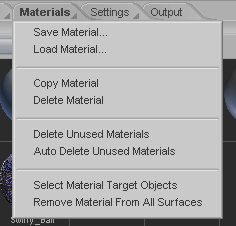
Save Material: Saves the current material (the whole Shader Flow for that material). Load Material: Load a saved material. Note: This will add the material to the Materials Tray, not alter the currently selected material. Copy Material: Makes a duplicate of the currently selected material in the Materials Tray. Delete Material: Deletes the currently selected material. Delete Unused Materials: Deletes all materials that are not actually being used on any surfaces. Unused materials are the ones with a little red X on the bottom right of the sample sphere. Auto Delete Unused Materials: Normally when you delete an object the materials do not get deleted. The idea is that you might want to use those materials on something else. But some people don't like the Materials Tray and Materials List (the list below the Materials Tray) to be cluttered with unused materials. If you are one of those people, this button is for you! Hooray! Select Material Target Objects: Select a material in the Materials Tray or Materials List, then select this option and all objects that use that material will be selected. This is very helpful in getting an understanding of which objects the material is applied to. Remove Material From All Surfaces: Removes the currently selected material from all surfaces that it is applied to. It will not remove the material from the scene though, so if you want ot put it back on, you can. |
Instancing Shaders:
There will be times when you set up a shader node and want to use
it in several places, such as on several materials or even as a
duplicate on the same material. I don't mean a copy, I mean
another instance of the same shader with the exact same settings,
so if you adjust the settings on the original it will change all of
the copies. To do this is very simple.
-
After you set up the shader that you want to instance, add another one and attach it where you want.
-
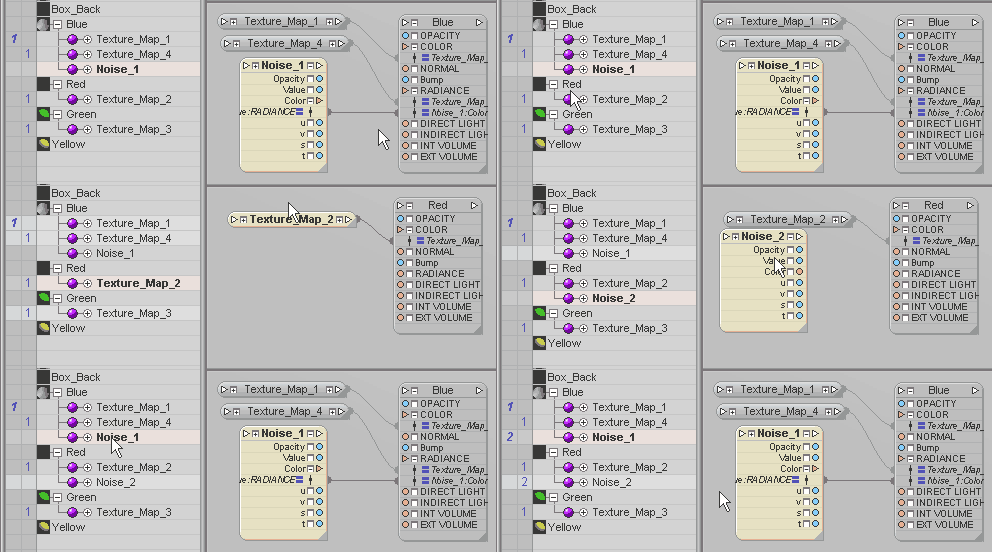
Select the original shader (the one that you did all of the settings for) and click in the second column to the left of the copy.
You will see a number appear (1 will be the first) next to the original (in bold) and the copy. So now the copy will be using the exact settings of the original. Any time you make a change to the original it will automatically be used by the copy. But you can't make any changes on the copy. Furthermore, you will not see the settings on the block for the shader on the copy. You must make do all work on the original.
Tip: One thing you might use this for is with the ColorCorrection shader. You can set up one "master" ColorCorrection shader, then apply that whenever you need it. One other tip you might find useful is to create a "dummy" material and put your "master" nodes there. That helps keep things organized, making it your one-stop instancing shop. (If you do the latter, it might be a good idea to apply that material to a surface in your scene, but deactivate it, because if it isn't applied to a surface and you use Delete Unused Materials, it will delete that material and all of the nodes.)
Here is a little animation that shows how to set up instances. Whatever image and settings have been created for Texture_Map_1 will also be used for Texture_Map_2, Texture_Map_3, and Texture_Map_4.

In this example, Texture_Map_1 is the
"master" and several "slave" instances are created.
And here is a sample of setting up an instance for a second shader. All of the settings for Noise_1 will be used in Noise_2 (as long as it is set as an instance, or "slave," of Noise_1).

In this example, Noise_1 is the "master"
and a "slave" instance is created.
