|
|
|---|

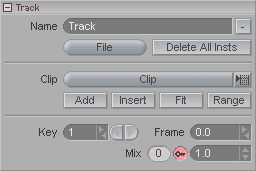
The Track block lets you give custom names to each track and keyframe its "strength"-- the degree to which it will be used.
Name: You can give each track its own name using this field.
File: Load and Save tracks.
Delete all Insts (Instances): Press this to delete all Clip Instances from the currently selected Track.
Clip (pulldown): This is a list of all Clips currently loaded. Select the Clip you want to add, then use one of the buttons below.
Add: Press this button to apply the selected clip starting from the Current Frame Marker. If there is no room between the Current Frame Marker and the Out point, it will add a new track and put it there.
Insert: Inserts the clip at the Current Frame Marker and shifts any clips to the right of it in that Track over to the right (future) to make room. For example, you have a Clip Instance on the timeline from frames 0-60 and your Current Frame Marker is at frame 0. When you press Insert, it will insert the clip (that you chose in the pulldown above) at frame 0, and move that other clip (the one that was at 0-60) over to the right to make room. So if the clip you are inserting is 10 frames long, it will go onto the timeline at frames 0-9, and the other clip will now be from frames 9-69.
Fit: Will shorten a clip to make it fit between two clips. So if you have a track with a clip from frames 0-30 and another clip from frames 40-60, and you insert an 80 frame clip between them, with the Current Frame Marker at frame 30, it will shrink that 80 frame clip down so it will go from frame 30-40. If shrinking it down would make it less than 1 frame, it will not fit it, it will make a new Track and put it there, but at its full length.
Range: Inserts the clip and scales it to the size of the Range (In and Out points). If there is a clip, or any portion of a clip on the current Track within the Range, it will create a new Track and put the clip there. The clip will automatically occupy the entire size of the range, scaling the clip to fit.
Key: This shows which keyframe is currently selected for the Mix value. This is not a frame number, it is a reference to the number of keys. For example, if your first keyframe is at frame 0, then that is Key 1. If your next keyframe is at frame 30, that is Key 2.
Frame: This shows which frame the current keyframe is on. It's also a quick way to move a keyframe; just enter the frame that you want the current frame to be on.
Mix: This sets how much the track and its contents should be used. For example if this is set to 0, then the track will not be used, and if it is set to 1, then it will be used at full strength. You can keyframe this number to do simple blends between tracks, or even leave it at less than 1 (100%) to let another track be "seen" through it.