|
|
|---|

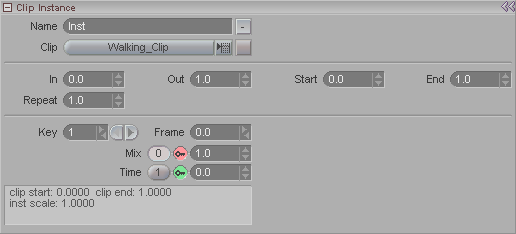
The Clip Instance block allows you to modify the parameters of the Clip Instance. A Clip Instance is a reference to a Clip. You can have multiple instances of a clip by copying or inserting them onto the Tracks. The Tracks don't actually have the Clips, they have the Clip Instances which reference the Clips themselves. So changes that you make to a Clip Instance, such as it's In and Out points, or end behavior (repeat, stop, etc.) will not alter the Clip itself.
Name: You can give each clip
its own name using this field. To delete the current
instance, press the ![]() button.
button.
Clip (pulldown): Choose which clip this instance should use.
In: Shows what the In (start) point of the
Clip Instance is.
Out: Shows what the Out (end) point of the Clip
Instance is.
Start: Allows you to set a start point within the
Clip Instance.
End: Allows you to set an out point within the Clip
Instance.
For example, you have a 60 frame clip where frames 1-30 are a walk, and 31-60 are a run. If you set the Start to 31 and the End to 60, then your clip will only use that portion (31-60). So if you then set your In to 0 and your Out to 60, it will stretch frames 31-60 to be 0-60. In other words, the Start and End tells messiah what portion of the clip to use, and In and Out tells it where it will be used in the timeline and for how long.
Repeat: How many times the motion should repeat within the Clip Instance. By default this is 1, which means that a 30 frame clip will play once in 30 frames. A setting of 4 will make the clip play 4 times within 30 frames. Note: This is just a display of the repeat number; do not use this field to set the number. Right-click drag the clip in the timeline to create repeats.
Key: This shows which keyframe is currently selected. This is not a frame number, it is a reference to the number of keys. For example, if your first keyframe is at frame 0, then that is Key 1. If your next keyframe is at frame 30, that is Key 2.
Frame: This shows which frame the current keyframe is on. It's also a quick way to move a keyframe; just enter the frame that you want the current frame to be on.
Mix: This sets how much the clip should be used. For example if this is set to 0, then the clip's motion will not be used, and if it is set to 1, then it will be used at full strength. You can keyframe this number to do simple blends between two clips, or even leave it at less than 1 (100%) to let another clip be "seen" through it.
Time: This lets you adjust the Clip Instance, speeding it up, slowing it down, reversing it, etc. This can be keyframed. By default there will be a keyframe at the beginning of the clip and at the end. Those take it from 0 to 1, which plays the clip at normal speed. 0 to 2 would play it twice as fast, while 1 to 0 would play it at normal speed but backward. Note: This operates over the whole timespace of the clip. So if you stretch or shrink the clip, the Time spline will still represent the length of it. This will make sense when you see it, because you will literally see the green spline on the Clip Instance.