|
|
|---|

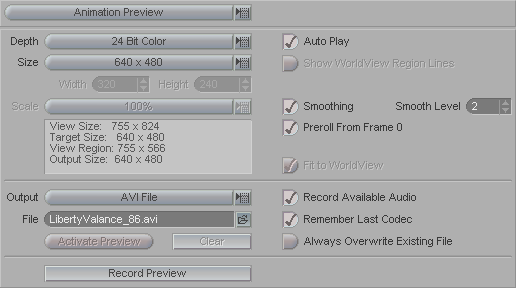
Animation Preview allows you to create a preview of your animation as it appears in the World View viewport, including audio if you have it. The preview will be for whichever view is active (if you hare in Dual or Quad View). Note: All codecs should function properly. However, some codecs don't work well with arbitrary sizes. In those cases, it's best to use the preset sizes to avoid problems (see Size, below).
Important: Do not minimize messiah while recording the preview. Doing so will stop the preview recording. Likewise, do not open another window over the World View viewport while recording the preview. Doing so will mess up the video.
Depth (pulldown): Choose between color or black & white.
Size: Choose from one of these selections:
World View - Whatever the size of the active World View is.
Active Camera - Uses the
settings on the Reticle block in
Setup (when you have the Camera selected) For messiah:studio users, you might have the Lock Size To Render button
on, in which case the size is set on the
Resolution block in Render![]() Output.
Output.
160x120 - 160 pixels wide, 120 pixels high
320x240 - 302 pixels wide, 240 pixels high
640x480 - 640 pixels wide, 480 pixels high
Custom - Use the Width and Height fields below to set a specific size if the one you want is not in this list.
Width & Height: These are used when the Size is set to Custom.
Scale: (Not available for the preset sizes, like 160x120, which are locked.) This lets you scale the preview size.
Auto Play: When this is on, the preview will automatically play after it is generated.
Smoothing/ Smooth Level: If your chosen preview size is a lot smaller than your viewport, you might get a lot of aliasing, due to the fact that it has to scale the image down. Activating Smoothing and setting your Smooth Level will reduce the artifacting. A Smooth Level of 2-4 is usually sufficient. Note: Because this is a process that must be run on the buffer, previews will take longer. This is to be expected. For the best speed don't set the level too high.
Preroll From Frame 0: This option will play the animation (internally) from frame 0 but only begin recording at the In point you have set. This will prevent problems with certain dynamics effects when your preview range doesn't start at 0. Your final preview will still be from the In point to the Out point.
Fit to World View: When you set a size that's smaller than the World View (which is highly recommended to conserve RAM), the preview will be small and will be centered in the viewport. Use this feature to stretch the preview so it will fit the view.
Output (pulldown): View the preview as either an AVI in your system's viewer (such as Media Player), or in the World View viewport.
File (text field): Set a name and path for the AVI file. Note: Once the path is set, using the folder icon on the right, you can just rename subsequent versions in the text field.
Activate Preview: When there is a World View preview in RAM, this button will activate (so you can play it in the viewport) or deactivate it (so the viewport displays the actual scene).
Clear: Press this to remove the World View preview from RAM.
Record Available Audio: When the Output is set to AVI, you can turn this on to include the audio (if you have any) in the AVI. When Output is set to World View, the audio will automatically be included.
Remember Last Codec: When the Output is set to AVI, you can turn this on to cause the system to use the same AVI codec that you used previously. Note: Codecs can only be remembered per-session and cannot be stored in your config. This is because most formats store specific memory pointer data that's impossible to retreive/restore.
Always Overwrite Existing File: This option will automatically overwrite an existing file. This means you will not get a request to confirm overwriting. Using this option with Remember Last Codec makes for a fluid workflow. Important: Always close the AVI player before overwriting. If you don't, messiah might crash.
Record Preview: Press this button to begin recording the preview. Press the ESC key on your keyboard to abort the recording.