|
|
|---|
This block appears when a MotionDynamics is selected, and it's where the parameters are set for it.
IMPORTANT NOTE: This block can appear from the Animate tab or Setup, but to make the springs you must be in Setup.
Make Springs: (Setup tab only) After you have selected two or more items in the World View, press this button to make the springs that will connect them. To select the items, make sure MotionDynamics is selected in the Item List, then hold Shift and left-click in the World View on the items you want to select to make springs from. This button is ghosted when not in Setup.
Make Hold Springs: (Setup tab only) When your items are selected (Shift left-click on them in the World View), press this button to make Hold Springs. A Hold Spring connects the object to where its keyframe position was. For example, it allows a null to be just a bouncy wobbly thing, because the null is connected to its original keyframe position. Like saying keep this to wherever I keyframed it, with a spring. Attached to itself. One end on object, the other end on key position. Used for making vibration type things. Select the object(s). Doesn't need more than one.
Make Branch Springs: (Setup tab only) This is a quick and easy way to make springs for more than one hierarchy. Just select (shift-click in the World View) the objects and press this button. It will respect the parenting hierarchies that you have. So if you have two separate hierarchies and you select all of the items in them, it will make two sets of springs instead of joining everything into one big one, like Make Springs would do. Another way to use it is to select the top item in a spring chain that you want to make and press this button. It will automatically connect each child with a spring.
New Spring Master: The Spring Master is the parent for a set of springs. It's useful for grouping springs together to keep things organized.
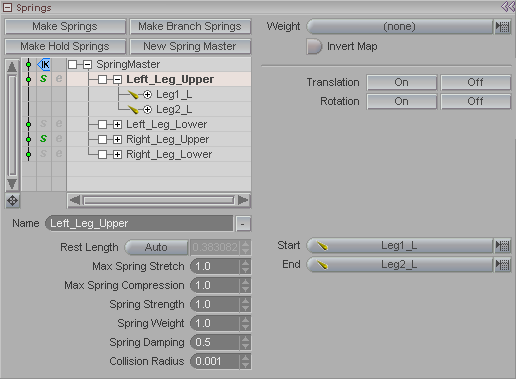
Spring List: This shows all of the Springs and SpringMasters that are part of this effect. You can turn them on and off with the gadgets in the left column, just like with effects, surfaces, etc. For the Spring Master you can set the calculation order (before or after IK, etc.). For the springs themselves you'll see little s and e symbols. s=Start of spring, and e=End of spring.
For the individual channels (which you'll see if you click on the [+] gadgets next to each of the springs), you can turn off the checkmarks to turn off processing for those channels. For example, you can turn off the rotations, or allow it to move in Z but not to rotate.
Name (text entry field): Use this field to name the Springs and SpringMasters. You can also rename them by double-clicking on them in the list, just like renaming in other lists, such as the Item List.
Rest Length (pulldown): Auto will take the rest length of the distance based on when it was applied in Setup. So if one end of the spring is 1 meter away from the other, Auto will tell the spring that it is 1 meter long, and anything longer is stretched, and anything shorter is compressed. See Max Spring Stretch and Max Spring Compression below.
Max Spring Stretch: Multiplier that says a spring can stretch this amount from its rest length.
Max Spring Compression: Multiplier that says a spring can compress this amount from its rest length.
Spring Strength: Controls how strong the spring is. In other words, how much effort it takes to get it to its Max Stretch or Max Compression. This setting works in conjunction with Spring Weight (below).
Spring Weight: Adjust the weight of the ends of the spring, which is like setting how much the object at the end of the spring weighs. Obviously polygons don't really exist, so if you have an object at the end of a spring you need to tell the spring how heavy the object supposedly is. The setting happens to the spring though, not to the object it's attached to, so if you change the object the setting will stay the same. This setting works in conjunction with Spring Strength (above).
Spring Damping: Sets the damping specific to the direction that the spring stretches in. You'll find this very useful, Kevin.*
Collision Radius: For the end of the springs, when they collide you can specify where the collision happens, whether it happens exactly at the end point or at a distance away. Basically it's a tolerance distance for how far away from the actual point the collision will hit. Think of it as a sphere around the collision points; the smaller the sphere the closer to the points the collision will happen.
Weight (pulldown): Select the weighting item here. This lets you fine tune where the effect is applied. For example you can use MetaEffectors.
Invert Map: Turn this on to invert the weighting that the Weight item from the Weight pulldown is applying. For example if the Weight item is a MetaEffector, the default for it is that the area within its sphere gets the weight, but if you turn Invert Map on, it will be the area outside the sphere that gets weighted.
Translation On: Left-click turns translation on for selected springs. (If a Spring Master is selected it applies to all of its children.) Right-click does it for everything in the current Motion Dynamics effect.
Translation Off: Left-click turns translation off for selected springs. (If a Spring Master is selected it applies to all of its children.) Right-click does it for everything in the current Motion Dynamics effect.
Rotation On: Left-click turns rotation on for selected springs. (If a Spring Master is selected it applies to all of its children.) Right-click does it for everything in the current Motion Dynamics effect.
Rotation Off: Left-click turns rotation off for selected springs. (If a Spring Master is selected it applies to all of its children.) Right-click does it for everything in the current Motion Dynamics effect.
Start (pulldown): Displays and lets you change the spring start
point (the green end).
End (pulldown): Displays and lest you change the spring's end
point (the red end).
*OK, your name might not be Kevin, but just think how weird that would have been if it was.