|
|
|---|

Note: This panel appears when you have Particles (pink diamond) selected in the Item List.
messiah:studio Note: The particles use a Surface and Material called ParticlesSurface. When using Particles in your scene, you will see that in the Surfaces sub-tab and Materials sub-tab.
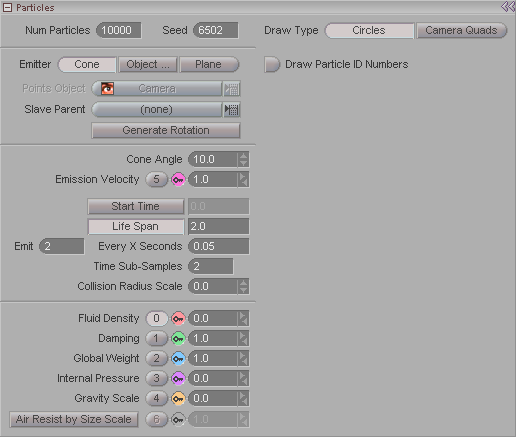
Num Particles: The total number of particles in existence at once for this instance of the particle effect. For example, if the number here is 10, then there will only be 10 particles total at any one time. That "at any one time" is based on the "Life Span" that you have set. If you have set the Life Span to 1 (1 second) then every second there will be a maximum of 10 particles. If you have it set to a Life Span of 15, then there will be a maximum of 10 particles generated every 15 seconds. (See also Particles Per Second.)
Draw Type: Choose whether you want the particles in the World View to be displayed as circles (dots) or quads (squares).
Seed: This number allows you to generate random numbers that will be the same each time you run it the scene, so if you get a flow you like, when you render it again, you'll get the same flow.
Draw Particle IDs: Turn this on to see the identification number for each of the particles. This is only really used for times when you need to do something to a specific particle, such as affect it with an expression.
Emitter: Chose whether you want to have a traditional cone emitter, or use an object from your scene as an emitter. A cone emitter will emit particles from one point, like a faucet. An object will emit particles from its points, spread evenly across all the whole object.
Points Object (pulldown): Chose the object you want to emit particles from. Any object can be selected. The particles will emit evenly from all of its points. Note: You must select Object Points from the Emitter choices above in order for this pulldown to become active.
Slave Parent: If you want to map a bunch of particles to the objects you would put them as children of some object. Then set that parent object here. So everything under that parent will map to particles.
Generate Rotation: Turn this on so particles will have rotation in addition to motion.
Cone Angle: This lets you adjust the size of the emitter if you have chosen a Cone emitter.
Emission Velocity: This channel is used to control how fast the particles will be shot from the emitter. It's great for simulating fireworks, explosions, and controlled flow of particles
Start Time: Enter the frame number that you want the particles to start emitting at.
Life Span: The number of seconds that a particle exists for.
Emit/Every X Seconds: The first field tells it how many particles to generate for every time period you enter in the second field. In the image above, it will generate 2 particles every 1/20th of a second, in other words, 40 per second. (I hope my math is correct on that.)
Time Sub-Samples: The number of in-between time step samples to calculate. (A time step is one frame.) Fast moving objects may need more samples between frames than slow moving ones. A setting of one will take one sample per time step. A setting of two will take two samples per time step, etc. The default is 2, and for most things that's fine.
Collision Radius : Lets you specify where the collision happens, whether it happens exactly at the point or at a distance away. Basically it's a tolerance distance for how far away from the actual point the collision will hit. Think of it as a sphere around the collision points; the smaller the sphere the closer to the points the collision will happen.
Fluid Density: Sets the density of the atmosphere that the particles are moving through. For example, you can set this to be thick, like water, or thin like air. The higher the number, the "thicker" the atmosphere.
Damping: Sets the damping of the movement.
Global Weight: The weight of the points. A positive number will make them weigh more, a negative weights will make them float.
Internal Pressure: An imaginary force that comes from within the object that pushes out toward the surface normals of the points. Picture a hot air balloon: a gust of wind will push in and deform it, but the pressure of the hot air inside the balloon pushes it back out into its original shape. A particle field can act just like that.
Gravity Scale: Adjusts the effect of gravity. For example, a setting of 1 is normal gravity, and a setting of .5 means half of normal gravity.
Air Resist By Size Scale: Use this to have the particles react to the environment differently depending upon their size.