|
|
|---|
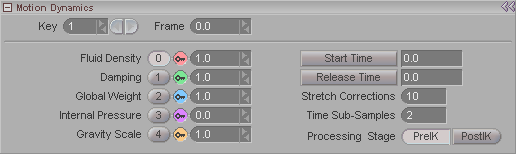
This block appears when a MotionDynamics is selected, and it's where the parameters are set for it.
Key: Displays the keyframe number of the current key. Enter a number in the entry field to go to a specific key or use the arrows to scroll through. Note: This is not referring to the frame number, but rather whether it's the first keyframe, second keyframe, etc. For example, the first keyframe might be on frame 0, and the second keyframe might be on frame 65.
Frame: Displays the frame number that a keyframe is on. Also, you can type a number in here to change the actual frame that a keyframe is on. For example, lets say you have keyframe #2 and it's on frame 33. Just type in 52 and now keyframe #2 will be on frame 52. It's a really fast way to accurately move a keyframe. In the illustration above, keyframe #10 is on frame 26.
Fluid Density: Sets the density of the atmosphere that the object is moving through. For example, you can set this to be thick, like water, or thin like air. The higher the number, the "thicker" the atmosphere.
Damping: Sets the damping of the movement-- how quickly it stops jiggling or waving, or whatever.
Global Weight: The weight of the points in the object. A positive number will make it weigh more, a negative weights will make it float.
Internal Pressure: An imaginary force that comes from within the object that pushes out toward the surface normals of the points. Picture a hot air balloon: a gust of wind will push in and deform it, but the pressure of the hot air inside the balloon pushes it back out into its original shape.
Gravity Scale: Adjusts the effect of gravity. For example, a setting of 1 is normal gravity, and a setting of .5 means half of normal gravity.
Start Time: Specifies the time when the soft body effect should start. Using this setting, you can make something stay solid until a certain point in your animation, then make it soft.
Release Time: Specifies the time when the object is to be released from keyframed control. In other words, if you have an object and you're keyframing it to wave around, releasing it would be like throwing it, or dropping it.
Stretch Corrections: How much the object will try to maintain its shape as it is stretched. The number entered is number of correction passes. The higher the number, the slower it will go, but the better the results will be. Generally, the default setting will be fine, so it's best to leave it as is unless really necessary.
Time Sub-Samples: The number of in-between time step samples to calculate. Fast moving objects may need more samples between frames than slow moving ones. A setting of one will take one sample per time step. A setting of two will take two samples per time step, etc.
Processing Stage: Choose whether you want the Motion Dynamic effect to be calculated before the IK calculations are made, or after. In some instances you might want the effect to take the IK into account, but other times you might not.