|
|
|---|
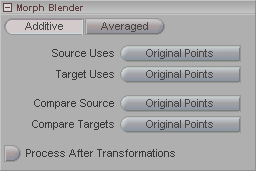
Note: This panel appears when you have Morph Blender (black diamond) selected in the Item List.
Additive/Averaged: Additive (Default), will allow you to layer the effect. It will accumulate the deformations of each morph target. So if you turn two morph sliders all the way up, each of them will be used. Averaged will average the difference in the points and display that. So if you turn two morph sliders all the way up, it will average the two and you'll see a blend, not the full 100% of each. For most projects, Additive should be used.
Source Uses (pulldown): Chooses which points should be
used to morph from. The choices are:
Original Points: The shape of the object
when it was originally loaded in.
Transformed Points: The shape of the object after being modified by effects (such as bones, etc.), or by user input (such as moving, rotating, scaling).
Target Uses: Chooses which points should be used to morph to. The choices are:
-
Original Points: The shape of the object when it was originally loaded in.
-
Transformed Points: The shape of the object after being modified by effects (such as bones, etc.), or by user input (such as moving, rotating, scaling).
Compare Source: Chooses which points in the source (the object in your scene) should be compared in order to decide if they should be used by the morph. (Points on the object will be morphed if it is determined that the points in the target are in a different place.) The choices are:
-
Original Points: The shape of the object when it was originally loaded in.
-
Transformed Points: The shape of the object after being modified by effects (such as bones, etc.), or by user input (such as moving, rotating, scaling).
Process After Transformations: The Morph Blender effect is calculated before transformations (moving, rotating, scaling), thereby allowing you to move, scale and rotate the character and not have it distort the morph. In versions of messiah prior to 1.5.3, they were calculated after them, so if you need it to work the old way, turn on this feature.