|
What is AutoRig
v2?
Autorig v2 is the second incarnation of AutoRig,
who in his previous life used to be a slug.
Well that was
pointless, how do I use it then?
1. Load your object
into a blank scene.
2. In the Setup Tab under
Items->New Items, double click the AutoRig icon that looks
like a man that's been dipped in red paint on one side
and radioactive waste on the other.
3. Go to the
Effects tab and select your character object(s) in the list on the
left, and the Bone_Deform in the list on the right.
4. Click the
'Add' button. Your object(s) should now appear in the list on
the right below the Bone_Deform effect.
5. If you loaded
your objects and the autorig scene in the wrong order, drag
your objects to the top of the list on the left so that they are at
the top of the list. Messiah draws things in the order they appear
in the list and if you have the objects at the bottom, you
won't see the bones through.
6. Starting
with Character_Root, position the elements where they
should be inside your character gradually outwards in the hirearchy
using the bone lengths to place the next control. Watch the
video tutorial at: http://www.usefulslug.com/files/autorigger_tutorial.mp4 to
get a more visual input for this step. It is important to note, that
the controls for the autorig use the next bone in the hirearchy to
'target' with the AP_Target armature. Therefore, most bones, except
for those that start a new branch on a hirearchy, should not have
any values on X or Y position. You should not use SCALE to scale
your bones, only length. If you do wish to use scale on the master
null before starting the rigging (because your character is much
smaller, or much bigger than the basic autorig file, use scale only
on the master null and then hit F5 to bring up the scripts menu
and double click UniformScaleRig.msa. This adapts all the
positional values and lengths of the bone to your new scale.
7. A
good tip while positioning the fingers is to position the bones
along the upper edge of the finger, but still inside the hand. The
autorigger automatically creates T-bones to help control the
deformation of your hand. For more information on rigging hands,
look at http://www.eggswhyzed.com/#post9
8.
You may weight your object using any of messiah's weight tools
including weightpaint and metaeffectors. When the autorigger creates
new bones in the same positions as these control bones, they
will take on the weight of the control bones.
9. Hit the
big autorig button. Your computer will appear to freeze for a
bit as the autorigger computes.
10. Happy animating!
An
examplefile for an autorigged character can be found here
What's
new in v2?
- Ribbon spine setup.
The ribbon
spine, also known as an IK on FK spine setup, is a combination of
the regular
FK spine that you are used to from the old version of
autorig with the additional ability
to move the hip, middle and
top parts of the character's spine independantly.
|-Left mouse
button will drag them independantly in screen space.
|-Right
mouse button will rotate the top and bottom on heading and pitch in
parent
coordinates, while the middle control will adjust the
zscale, the "tension" of the curve.
|-Double middle mouse button
will reset the item to it's original position and rotation.
You can see a small demo here: http://www.usefulslug.com/files/AutoRigv2_RibbonSpine.mov
- Selection and Display
additions.
Selection of the feet's IK goals are now made easier
by having them routed out to an
armature on the screen. LMB
selects the heel, MMB selects the toeball, RMB selects the
toe.
All the bones can be switched on and off for display using
the bones armature. If you add
new bones to the rig you should
add them to the Character_VisGrp_Bones group if you want them
to
take the new functionality.
You can see a small demo here: http://www.usefulslug.com/files/AutoRigv2_SelectionAndDisplay.mov
- SoftIK
SoftIK is new in
messiah v4 and is a softened IK chain to prevent IK pops. The
amount of
softening is animatable and will depend somewhat on the
speed of movement as well as the size
of the chain. It is off by
default but you can enable it by dragging the softIK values
in
the Character_Rig_Behaviour slider. The soft IK is
automatically stretchable so there is no
need to add an IKTel if
you use it in your own custom rigs.
You can see a small demo here: http://www.usefulslug.com/files/AutoRigv2_SoftIK.mov
- Uniform scale
rig
UniformScaleRig.msa is a new script that allows you to scale
a rig in messiah uniformly with a
master null and, when run, it
will go through the rig and adjust it so that bone lengths
and
position keys are correctly adjusted. When you run autorig it
is run once on the master null
of the rig, but if you want to for
instance scale the upper body using a master null, you can
do so
and then run UniformScaleRig from the F5 shelf.
You can see a small demo here: http://www.usefulslug.com/files/AutoRigv2_UniformScale.mov
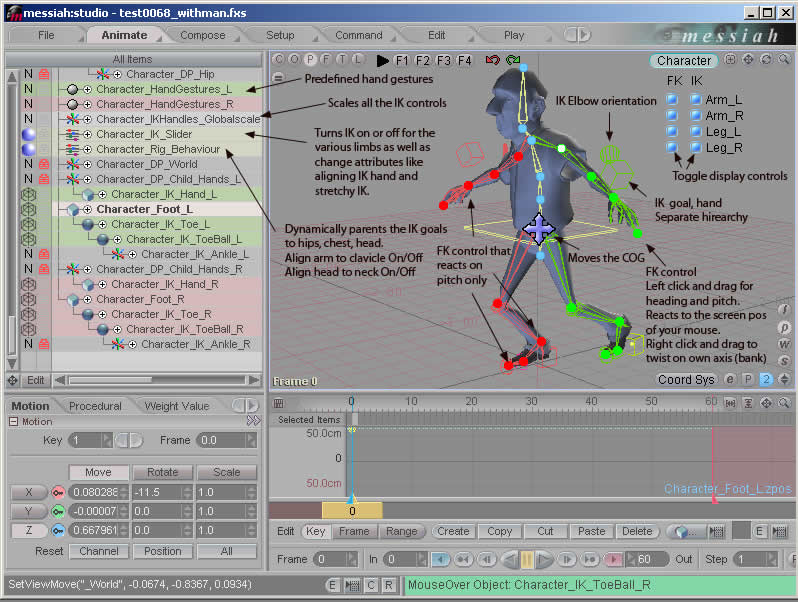
So
I've rigged my character. What are these dang green and red buttons
all over the shop?
An image with descriptions of the
autorig controls is shown below:
|