Tips & Tricks
To Make An Armature That Always Loads:
To have an armature appear every time messiah is
loaded, save it to the messiah/modules/defaults/armatures
folder. You'll notice that there's an armature in there right
now. To stop it from loading automatically just delete it
from the default armatures folder.
Note: Armatures save with scenes too, so if you have a scene with custom Armatures they will reload when you reload the scene.
Using Armatures to select Groups
for visibility in the Item List:
As great as it is that you can use the Item
List pulldown to select which Group you want visible, sometimes you just want a
quicker way. Armatures to the
rescue!
Here's how to do it: (Well, not that exact example.)
Create a Group, then go to Armatures.
Click on New Armature.
Turn on Realtime Draw and create a handle, then turn off Realtime Draw (so you don' accidentally create more).
Set the Type to Click.
In the Add Action
pulldown, select Compute Expression and
press the ![]() button to add it.
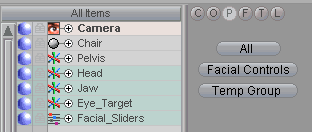
button to add it.
At the bottom of the interface you will see the Compute Expression block. In the Exp field, put: ItemListSet("All Items") But replace the "All Items" with the name of your Group. Do not remove the quotes. (See image below.)
![]()
Now when you switch to the Animate tab and click on your Armature handle it will change the Item List visibility to your group!
Note: You can create buttons for your Groups, or for the standard filtering choices, such as All Items and Unlocked Items. When creating buttons for your own Groups, type the name of the group exactly as you have named it, including the underscores (My_Cool_Group). To create a command for one of the standard choices, just type it in exactly as it appears in the Item List filter pop-up. For example: All Items (with a space), or Unlocked Items (with a space).
Armature Sample:
See the sample file Armature_Monte.mpj in messiah_content\Projects.
It's not the most advanced example, but it's pretty
effective. To use the handles just click on them (the dots)
and drag. Try the different mouse buttons. There are a
couple of other examples there too.
| Converted from CHM to HTML with chm2web Pro 2.82 (unicode) |